Imagine this: someone is at your door, but you’re busy in another room or outside your home. Wouldn’t it be great if your video doorbell could alert you with a clear chime sound?
Connecting your video doorbell to a chime makes this possible. It ensures you never miss a visitor or delivery again. In this guide, you’ll learn exactly how to set up your video doorbell with a chime, step by step. By the end, you’ll have a smarter, more connected home that keeps you in control—no matter where you are.
Ready to make your doorbell work smarter for you? Let’s dive in.
Choosing The Right Video Doorbell
Choosing the right video doorbell is important for a smooth setup and good performance. The right device fits your needs and works well with your chime system. This choice affects how clearly you hear visitors and how easy it is to install. Consider brand reputation, compatibility, and power options before buying.
Popular Video Doorbell Brands
Several brands lead the market for video doorbells. Ring offers many models with clear video and easy app use. Nest provides smart features and good integration with other devices. Arlo is known for wireless options and strong security. Each brand has unique features and price points. Choose one that matches your budget and needs.
Compatibility With Chimes
Not all video doorbells work with every chime. Check if your chime supports digital or mechanical signals. Some doorbells come with their own chime or app notifications. Others connect to existing wired chimes. Confirm compatibility before buying to avoid extra costs or complicated setups. Compatibility ensures your chime rings when someone presses the doorbell.
Wired Vs. Wireless Options
Wired doorbells use your home’s electrical system for power. They offer a constant power supply and fewer battery issues. Wireless doorbells run on batteries and are easier to install. They allow flexible placement but need battery changes. Choose wired for reliability and wireless for convenience. Consider your home setup and personal preferences before deciding.
Selecting A Compatible Chime
Selecting the right chime for your video doorbell is important. A compatible chime makes sure you hear alerts clearly. Not all chimes work well with video doorbells. Understanding your options helps you pick the best match. Let’s explore different chime types and what to check before buying one.
Mechanical Vs. Digital Chimes
Mechanical chimes use physical parts to create sound. They have a classic ringing tone. Many older homes have these chimes installed. Digital chimes produce sound electronically. They offer various tones and volume controls. Digital chimes often connect better with modern video doorbells. Choose a chime that matches your doorbell’s signal type for clear alerts.
Wireless Chime Options
Wireless chimes are easy to install. They do not need wiring to work. These chimes use radio signals to connect with your doorbell. They are flexible and portable. Wireless chimes suit homes without existing chime wiring. Check the signal range to avoid missed alerts. Battery life is another key factor for wireless chimes.
Checking Voltage Requirements
Video doorbells and chimes have specific voltage needs. Most mechanical chimes work on 16-24 volts AC. Digital and wireless chimes may require different voltages. Using the wrong voltage can damage your devices. Always check the doorbell’s manual for voltage specs. Match the chime’s voltage to the doorbell’s power supply for safe operation.
Preparing For Installation
Preparing for the installation of your video doorbell and chime is an important step. It helps ensure a smooth setup and avoids mistakes. Taking time to get ready makes the process easier and safer. Follow these simple steps to prepare properly.
Gathering Necessary Tools
Collect all tools before starting. You will need a screwdriver, drill, and level. A voltage tester is helpful to check wires. Have the doorbell and chime units ready. Keep all screws and mounting brackets close. This saves time and avoids searching later.
Safety Precautions
Work carefully to prevent accidents. Use insulated tools to avoid electric shocks. Wear safety glasses to protect your eyes. Keep children and pets away from the work area. Read the instruction manual for safety tips. Follow all guidelines strictly to stay safe.
Turning Off Power Supply
Switch off the power at the circuit breaker. This stops electricity flow to the doorbell wires. Use a voltage tester to confirm power is off. Never touch wires with the power on. Turning off power prevents shocks and damage. Double-check before you start working on wires.
Credit: ring.com
Wiring The Video Doorbell To The Chime
Wiring the video doorbell to the chime is a key step in setting up your doorbell system. Proper wiring ensures the chime rings every time someone presses the doorbell button. This process involves identifying wires, connecting them correctly to the doorbell and chime, and testing to confirm everything works.
Follow simple steps to wire your video doorbell to the existing chime. This helps maintain the traditional sound while adding smart features.
Locating Existing Doorbell Wires
First, find the wires behind your old doorbell button. These wires usually come from the transformer and the chime inside your home. Turn off power to the doorbell at the breaker to stay safe. Use a screwdriver to remove the doorbell button and expose the wires. Look for two copper or colored wires ready for connection.
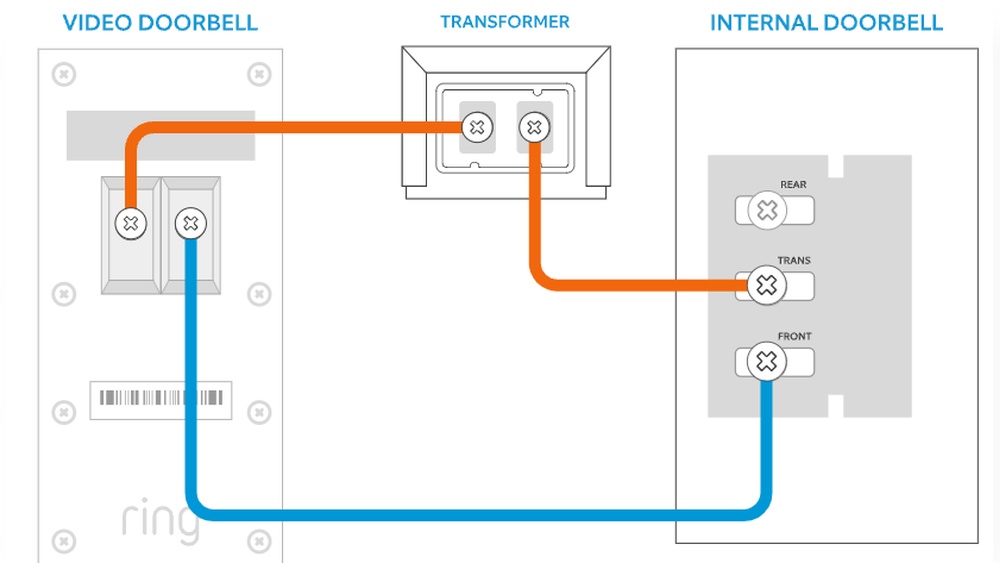
Connecting Wires To The Doorbell
Attach the two wires to the terminals on your new video doorbell. Usually, the terminals are marked as “Front” and “Trans” or “Transformer.” Make sure the wires are tight and secure to avoid loose connections. If your doorbell has a power connector, connect the wires accordingly. Do not mix the wires; follow the labels carefully.
Connecting Wires To The Chime
Next, open the chime cover inside your house. Find the terminals labeled “Front” and “Trans” on the chime. Connect the wires coming from the video doorbell to these terminals. This connection allows the chime to ring when the doorbell is pressed. Ensure the wires are firmly attached and not touching each other.
Testing The Wiring Connections
Restore power at the breaker. Press the doorbell button and listen for the chime sound. If the chime rings clearly, the wiring is correct. If not, double-check all wire connections for tightness and correct placement. Testing confirms your video doorbell and chime work together perfectly.
Setting Up The Video Doorbell
Setting up your video doorbell is the first step to improve home security. This process involves installing the device, connecting it to Wi-Fi, and linking it with your chime. Each step is simple and ensures the doorbell works smoothly.
Installing The Doorbell Unit
Choose a spot near your front door. Make sure it is at a good height for visitors. Use the mounting bracket that comes with your doorbell. Mark the screw holes with a pencil. Drill holes and insert anchors if needed. Attach the bracket firmly using screws. Snap the doorbell onto the bracket until it clicks.
Configuring Wi-fi Settings
Turn on the doorbell by pressing the power button. Open the doorbell app on your phone. Follow the prompts to connect to your Wi-Fi network. Enter your Wi-Fi password carefully. Wait for the doorbell to confirm connection. A strong Wi-Fi signal helps the doorbell work better.
Pairing With The Chime
Make sure your chime is plugged in and turned on. Open the app and find the pairing option. Press the pairing button on the chime. Select your chime from the app’s list. Wait until the app confirms the connection. Test by pressing the doorbell button to hear the chime ring.

Credit: www.youtube.com
Troubleshooting Common Issues
Troubleshooting common issues with your video doorbell and chime can save time and frustration. Problems may occur during setup or daily use. Identifying the issue quickly helps restore full function. This guide covers typical problems and simple fixes for each.
No Sound From Chime
Check if the chime is powered on and connected properly. Sometimes, the chime’s volume might be too low or muted. Adjust the volume settings on the chime device or app. Inspect the wiring between the doorbell and chime for loose connections. Restart both the doorbell and chime to refresh the system.
Doorbell Not Ringing
Confirm the doorbell button is not stuck or damaged. Verify the doorbell is receiving power from the transformer or battery. Ensure the chime is compatible with your doorbell model. Test the doorbell by pressing the button and watching for any response. Reset the doorbell to factory settings and set it up again if needed.
Wi-fi Connectivity Problems
Check if your Wi-Fi network is working and the signal is strong near the doorbell. Move the router closer or use a Wi-Fi extender if the signal is weak. Confirm the doorbell is connected to the correct Wi-Fi network. Restart your router and doorbell to clear minor glitches. Update the doorbell firmware for improved connectivity and stability.
Enhancing Your Setup
Enhancing your video doorbell setup makes your home more secure and connected. You can add more chimes, link with smart devices, and get alerts on your phone. These steps improve your experience and make sure you never miss a visitor.
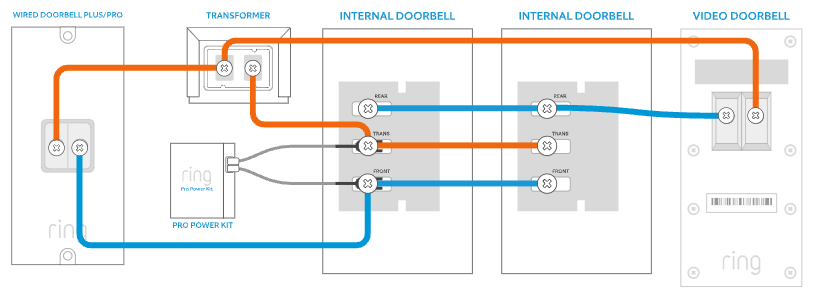
Adding Additional Chimes
Adding extra chimes helps you hear the doorbell from different rooms. You can buy wireless chimes and place them where they fit best. This way, everyone in the house knows when someone is at the door.
Wired chimes also work if your home supports them. They connect directly to your doorbell system. Choose chimes with adjustable volume for comfort.
Integrating With Smart Home Systems
Smart home systems let your doorbell work with other devices. You can connect it to smart speakers or security cameras. This setup gives you voice alerts and live video feeds easily.
Use popular platforms like Alexa or Google Home. They offer simple apps to control your doorbell and chimes. Integration helps you manage your home in one place.
Using Mobile Alerts And Notifications
Mobile alerts keep you updated even when away from home. Your phone will notify you when someone rings the doorbell. You can see live video or talk to visitors remotely.
Set custom alerts for different times or people. This feature adds convenience and extra security. Make sure your app is up to date for best performance.

Credit: www.youtube.com
Frequently Asked Questions
How Do I Connect A Video Doorbell To A Chime?
To connect, first turn off power to your doorbell. Then, connect the doorbell wires to the chime terminals. Finally, restore power and test the connection to ensure the chime rings when pressed.
Can All Video Doorbells Work With Existing Chimes?
Not all video doorbells support existing chimes. Check your doorbell’s specifications for chime compatibility before installation to avoid issues and ensure proper functionality.
Why Isn’t My Chime Ringing After Installation?
If the chime doesn’t ring, check wiring connections and power supply. Also, verify if the chime is compatible with your video doorbell model for seamless operation.
Do I Need A Separate Power Adapter For The Chime?
Most video doorbells use existing doorbell power, so a separate adapter isn’t needed. However, confirm your doorbell’s power requirements to avoid installation problems.
Conclusion
Connecting your video doorbell to a chime is simple and quick. Follow the steps carefully to avoid issues. A working chime helps you hear visitors clearly. Enjoy the added convenience and security it brings. Regularly check the connection to keep everything running smoothly.
This setup improves your home’s safety and comfort. Give it a try today and feel the difference.