Are you looking to remove a towel rack from your wall but aren’t sure where to start? Whether you’re updating your bathroom or just need to clear space, taking down a towel rack can seem tricky.
You might worry about damaging your wall or not having the right tools. Don’t worry—this guide will walk you through simple steps that anyone can follow. By the end, you’ll feel confident removing your towel rack quickly and cleanly, leaving your wall ready for the next project.
Keep reading to discover how easy it can be!
Credit: www.reddit.com
Tools Needed
Removing a towel rack from the wall requires a few basic tools. These tools help you work safely and get the job done quickly. Having the right tools makes the process smooth and prevents damage to your wall. Below is a list of tools needed for this task.
Screwdriver
A screwdriver is essential to remove screws holding the towel rack. Most towel racks use either a Phillips or flathead screw. Check the screw type before starting. Using the correct screwdriver prevents stripping the screws.
Utility Knife
A utility knife helps cut any paint or caulk around the rack. This step stops peeling paint when removing the rack. Use the knife carefully to avoid wall damage.
Pliers
Pliers help grip and twist stubborn screws or anchors. They also assist in pulling out nails or other fasteners. Choose pliers with a comfortable grip for better control.
Putty Knife
A putty knife removes any leftover adhesive or caulk. It also helps smooth the wall after removing the rack. Use a flexible putty knife for best results.
Wall Anchors Remover Or Drill
Wall anchors may stay in the wall after removing screws. A wall anchor remover or drill helps take these out. Removing anchors prevents holes and keeps the wall ready for repair.
Prepare The Area
Preparing the area is the first step to remove a towel rack safely. This step protects your walls and keeps the space clean. It also makes the removal process easier and faster.
Clear the space around the towel rack. Remove any items like towels, toiletries, or decorations nearby. This prevents accidents and gives you room to work comfortably.
Protect the floor and wall under the towel rack. Use a drop cloth or old towel to catch dust and debris. This keeps your bathroom clean and avoids damage.
Gather the right tools before starting. You may need a screwdriver, putty knife, and wall cleaner. Having tools ready saves time and avoids interruptions.
Clear Surrounding Items
Remove all towels and bathroom items near the rack. This stops things from falling or getting damaged. A clear area also helps you see the rack’s mounting points.
Cover Floor And Wall
Lay a protective cloth under the towel rack. It catches dust and small debris. Protecting the wall prevents scratches or paint damage during removal.
Collect Necessary Tools
Get a screwdriver that fits the rack’s screws. A putty knife helps to pry off any covers. Have a cleaner ready for after the rack is removed.
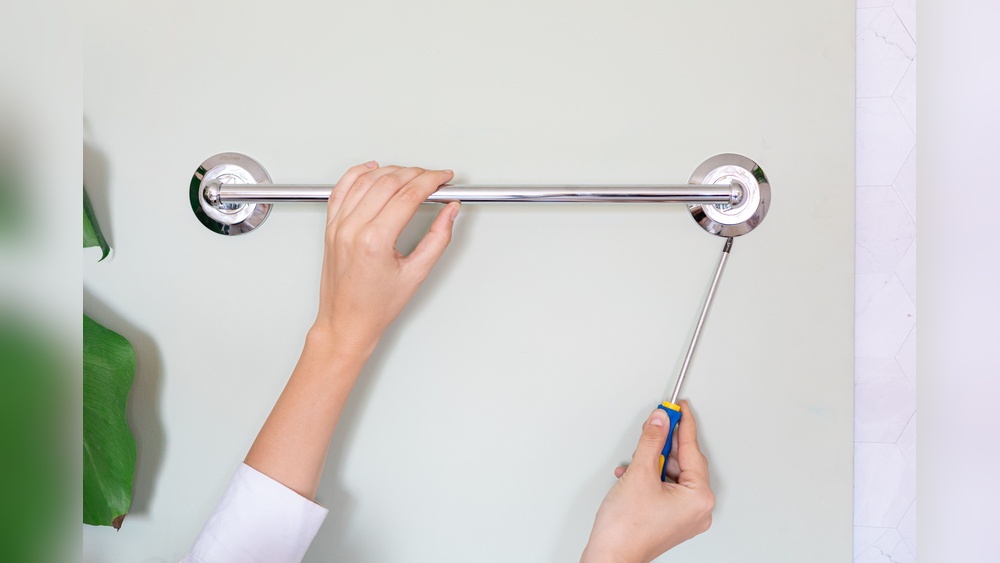
Locate The Mounting Hardware
Start by finding the screws or brackets holding the towel rack. These are usually hidden under small covers or at the ends. Knowing where the hardware is helps remove the rack without damage.
Removing a towel rack starts with finding the mounting hardware. This hardware holds the rack to the wall.
Most towel racks attach with screws hidden under covers or caps. These covers keep the rack looking neat.
Look closely at the ends of the towel rack. Check for small plastic or metal covers. These covers hide the screws.
Sometimes, the covers snap off easily. Other times, they need a flat tool to pry them open gently.
Check Under The End Caps
End caps are common places to find screws. These caps sit at the rack’s edges.
Try to wiggle or lift the caps carefully. Avoid breaking them or scratching the wall.
Once removed, you will see screws that hold the rack in place.
Use A Flashlight For Better Visibility
Bright light helps spot hidden screws or anchors. Shine a flashlight along the rack’s edges.
Look for small holes or indentations. These signs point to where the mounting hardware is.
Good lighting reduces mistakes and speeds up removal.
Identify The Type Of Screws Or Anchors
Know what kind of screws or anchors hold the rack. Some racks use simple screws.
Others may have wall anchors or toggle bolts for extra support.
This knowledge helps choose the right tools for removal.
Credit: www.reddit.com
Remove Screws Or Anchors
Removing a towel rack from the wall starts with taking out the screws or anchors. These hold the rack firmly in place. Removing them carefully prevents damage to your wall. Use the right tools to make the job easier and safer.
Locate The Screws Holding The Towel Rack
Look for screws on the ends or under the rack. Some have covers hiding the screws. Pry covers gently with a flat tool. Find all screws before starting removal.
Use The Correct Screwdriver
Choose a screwdriver that fits the screw head. Use a Phillips head or flathead screwdriver. Match the size for better grip. Turn slowly to avoid stripping the screws.
Remove Wall Anchors Carefully
Anchors hold screws in drywall for extra support. Pull them out gently with pliers. Twist anchors slowly to loosen them. Avoid pulling hard to prevent wall damage.
Check For Hidden Fasteners
Some racks use hidden clips or brackets. Look behind the rack for extra supports. Remove any remaining fasteners before taking the rack off.
Handle Wall Damage
Removing a towel rack often leaves holes or marks on the wall. These small damages need fixing for a clean look. Handling wall damage is simple with a few easy steps. Repairing the wall helps keep your room neat and fresh.
Fill Holes
Start by filling the holes left by screws or anchors. Use wall putty or spackle for small holes. Apply a small amount with a putty knife. Press it firmly into the hole. Let it dry fully before moving to the next step.
Sand And Smooth Surface
After the filler dries, sand the area gently. Use fine-grit sandpaper for best results. Sand until the surface feels smooth and even. This removes any bumps or rough spots. Wipe the dust away with a clean cloth.
Paint Touch-up
Match the wall paint color for a perfect finish. Use a small brush to apply paint over the repaired spot. Apply thin layers and let each dry. Repeat if needed to cover the area fully. This step blends the repair with the rest of the wall.
Clean Up
Cleaning up after removing a towel rack is important. It makes the wall ready for new paint or decoration. Proper cleanup helps keep your space neat and safe.
Remove Wall Anchors And Screws
Check the holes left by the towel rack. Pull out any wall anchors using pliers. Unscrew any screws still stuck in the wall. This prevents bumps and damage later.
Fill Holes With Spackle
Use spackle or wall filler to cover holes. Apply it with a putty knife for a smooth finish. Let the filler dry completely before touching it. This step makes your wall look new again.
Sand The Wall Smooth
After the filler dries, sand the area gently. Use fine-grit sandpaper for best results. Sand until the wall feels even and smooth. This helps paint stick better and look cleaner.
Clean Dust And Debris
Wipe the wall with a damp cloth. Remove all dust and small debris from sanding. A clean surface ensures better paint or wallpaper adhesion. It also keeps your room fresh.
:max_bytes(150000):strip_icc()/how-to-remove-towel-bar-5221017-03-4873175f190548228b867ee5a3dec733.jpg)
Credit: www.thespruce.com
Frequently Asked Questions
How Do I Safely Remove A Towel Rack From Drywall?
To remove a towel rack from drywall, first unscrew the mounting brackets. Use a putty knife to gently pry off any anchors. Patch holes with spackle, sand smooth, and repaint for a clean finish.
What Tools Are Needed To Remove A Towel Rack?
You need a screwdriver, putty knife, spackle, sandpaper, and paint. These tools help you unscrew, patch holes, and refinish the wall properly.
How To Fix Holes After Removing A Towel Rack?
Fill holes with spackle or wall filler. Let it dry, then sand smooth. Finally, repaint to match the wall color for a seamless look.
Can I Reuse The Towel Rack After Removal?
Yes, if undamaged, you can reuse the towel rack. Keep screws and brackets intact for easy reinstallation or relocation.
Conclusion
Removing a towel rack from the wall is simple with the right steps. Take your time to avoid wall damage. Use basic tools like a screwdriver and putty to fix holes. Clean the area well before installing something new. This quick task saves money and keeps your space neat.
A little care goes a long way. Now, you can remove or replace your towel rack with ease.