Are you looking to remove a hardwired smoke detector safely and quickly? Whether you need to replace it or troubleshoot an issue, knowing the right steps can save you time and prevent damage.
Removing a hardwired smoke detector might seem tricky, but with the right guidance, you can handle it confidently. Keep reading to discover simple, clear instructions that will help you take down your smoke detector without stress or hassle. Your safety and ease of mind start here.

Credit: www.youtube.com
Safety Precautions
Safety is the top priority when removing a hardwired smoke detector. These devices connect directly to your home’s electrical system. Careless handling can cause shocks or damage. Taking the right precautions protects you and your home.
Turn Off Power
Start by switching off the power to the smoke detector. Find the correct breaker in your electrical panel. Flip it to the off position. Double-check that the power is off using a voltage tester. This step stops electricity from flowing to the unit. Avoid touching wires until you confirm the power is off.
Gather Necessary Tools
Prepare the tools before starting the removal. You will need a screwdriver, voltage tester, and wire nuts. A ladder might be needed to reach the detector. Have a flashlight ready for dark spaces. Using the right tools makes the job safer and easier. Do not use damaged or improper tools to avoid accidents.

Credit: www.youtube.com
Locate The Smoke Detector
Before removing a hardwired smoke detector, you must find it first. Smoke detectors are usually on ceilings or high on walls. They are placed near bedrooms and hallways for safety. Knowing the exact location helps you work safely and avoid damage.
Take a flashlight if the area is dark. Look carefully at each detector to check if it is hardwired. Identifying the right unit saves time and prevents confusion.
Identify Hardwired Units
Hardwired smoke detectors connect to your home’s electrical system. They do not run only on batteries. Look for a small wire coming out of the back. Usually, there is a plastic cover hiding the wires.
Detectors with a wire bundle are hardwired. Battery-only detectors have no wires. Sometimes, hardwired units also have a small battery for backup power.
Check For Backup Batteries
Many hardwired smoke detectors have backup batteries. These keep the alarm working during power outages. Remove the detector’s cover to find the battery compartment. It is usually inside or on the side of the unit.
Check the battery type and condition. Replace old batteries before removing the detector. This keeps your home safe during the process.
Disconnect The Detector
Disconnecting the hardwired smoke detector is an important step before removal. It ensures your safety and prevents electrical shocks. Follow the right steps carefully to avoid damage.
Remove The Cover
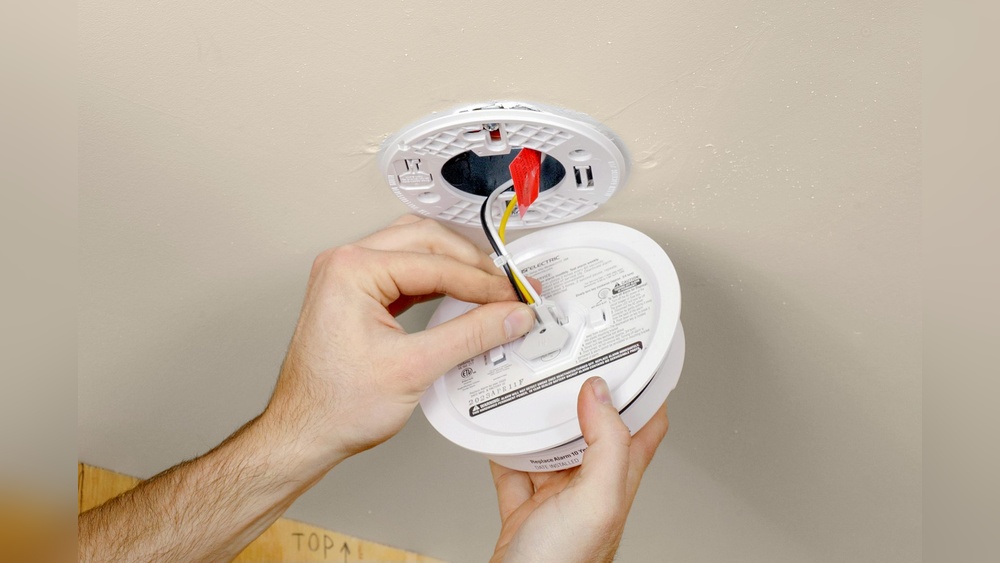
Start by gently twisting or sliding the smoke detector cover. This exposes the internal parts and wiring. Use light pressure to avoid breaking the plastic cover. Some models have a small tab or clip to release the cover.
Unplug The Connector
Look for the wiring connector inside the detector. This small plug connects the detector to the home’s power supply. Hold the connector firmly and pull it straight out. Avoid pulling on the wires to prevent damage. Once unplugged, the detector is fully disconnected.
Credit: support.firstalert.com
Remove The Mounting Bracket
Removing the mounting bracket is a key step in taking down a hardwired smoke detector. This part holds the detector firmly to the ceiling or wall. Taking it off carefully prevents damage to the fixture and wiring.
Start by making sure the power is off to avoid any electric shock. Then, focus on loosening the bracket. This process is simple but requires attention to detail and safety.
Unscrew The Bracket
Locate the screws holding the mounting bracket to the ceiling or wall. Usually, two or three screws secure it in place. Use a screwdriver that fits well to avoid stripping the screws.
Turn each screw counterclockwise to loosen it. Keep the screws safe for reinstallation or disposal. Do not rush; loosen the screws evenly to keep the bracket stable.
Detach The Detector
After unscrewing, gently pull the smoke detector away from the bracket. It may twist or slide off depending on the model. Handle it with care to avoid damaging wires connected behind.
Check for any clips or tabs holding the detector to the bracket. Release these if needed. Once free, set the detector aside safely to continue the removal process.
Handle Wiring Safely
Removing a hardwired smoke detector means handling electrical wires carefully. Safety is the top priority during this step. Avoid touching wires directly. Turn off the power at the circuit breaker to prevent shocks. Use a voltage tester to confirm no electricity flows through the wires before you start.
After disconnecting the smoke detector, the exposed wires need proper care. Leaving them open can cause short circuits or fire hazards. Follow these simple steps to protect your home and yourself.
Cap Exposed Wires
Use wire nuts to cover each exposed wire end. Wire nuts keep wires insulated and prevent contact with other wires or metal surfaces. Twist the wire nut firmly onto the wire until it feels secure. Double-check that no bare wire sticks out. This step is crucial for safety and code compliance.
Secure Wiring In Junction Box
Push the capped wires carefully back into the junction box. Arrange the wires neatly to avoid bending or damage. Make sure the junction box cover fits tightly. A secure cover stops dust and moisture from entering and protects the wires from accidental contact. Properly securing wiring keeps your home safe and ready for future use.
Test The Circuit
Testing the circuit is a key step after removing a hardwired smoke detector. It ensures the electrical system works correctly and safely. This step helps avoid electrical problems later.
Testing also confirms that power is off before you handle wires. It protects you from electric shocks. Follow the steps carefully to check the circuit.
Restore Power
First, turn the power back on at the circuit breaker. This step is needed to check if the wires have power. Be sure the smoke detector is disconnected before restoring power.
Watch for any sparks or unusual sounds. If you see sparks, turn off the power immediately. Safety always comes first.
Use Voltage Tester
Use a voltage tester to check if the wires have electricity. Touch the tester to the wires carefully. The tester will light up or beep if power is present.
Check all wires connected to the smoke detector. If no power shows, the circuit may be off or broken. If power shows, the circuit works correctly.
Replace Or Reinstall
After removing a hardwired smoke detector, you have two options: replace it or reinstall the same unit. Choosing the right path depends on the detector’s condition and age. A new detector offers better technology and safety features. Reinstalling may save time but check if the old unit works well. Both steps need careful handling for your safety.
Choose New Detector
Pick a smoke detector that fits your home and wiring. Look for models with a good safety rating. Choose one with a long-lasting battery backup. Make sure it matches the voltage of your wiring system. Select a unit with clear sound and easy test buttons. This ensures you get reliable alerts in emergencies.
Install Replacement Unit
Turn off power at the circuit breaker before you start. Connect the new detector’s wires to the home wiring carefully. Match wire colors: black to black, white to white, and red if present. Secure the detector base to the ceiling or wall with screws. Attach the new unit to the base by twisting it. Restore power and test the detector to confirm it works.
Frequently Asked Questions
How Do I Safely Disconnect A Hardwired Smoke Detector?
Turn off the power at the circuit breaker first. Remove the detector from its mounting bracket. Disconnect the wiring harness carefully. Avoid touching wires directly and use insulated tools if needed.
Can I Remove A Hardwired Smoke Detector Myself?
Yes, if you have basic electrical knowledge. Always turn off power before starting. Follow manufacturer instructions to avoid damage or injury. If unsure, consult a licensed electrician for safety.
What Tools Do I Need To Remove A Smoke Detector?
You generally need a screwdriver and a voltage tester. A ladder may be necessary for ceiling-mounted units. Insulated gloves and wire nuts can enhance safety during removal.
Will Removing A Hardwired Smoke Detector Affect Home Safety?
Yes, removing it without replacement reduces fire safety. Always install a new detector or alternative alarm system. Ensure your home remains compliant with local safety codes.
Conclusion
Removing a hardwired smoke detector can seem tricky at first. Take your time and follow each step carefully. Always turn off the power to stay safe. Use simple tools and check the wiring before disconnecting. This helps avoid damage to your home’s electrical system.
After removal, properly install a new detector or cover the wires. Regular smoke detector checks keep your home safe. Stay cautious and confident throughout the process. Small effort now means big safety later.