Is your towel rack loose or falling off the wall? Fixing it might seem tricky, but you can repair it yourself without calling a pro.
Imagine having a sturdy towel rack that holds your towels perfectly, making your bathroom look neat and organized. In this guide, you’ll learn simple, step-by-step tips to repair your towel rack in drywall quickly and easily. Keep reading, and you’ll save time, money, and frustration by doing it right the first time.
Tools And Materials Needed
Repairing a towel rack in drywall requires the right tools and materials. Using the correct items makes the job easier and ensures a strong repair. Prepare everything before starting to save time and avoid mistakes.
Essential Tools
- Screwdriver – for removing and tightening screws
- Drill – to make holes in the drywall
- Level – to keep the towel rack straight
- Stud finder – to locate wall studs
- Measuring tape – for accurate placement
- Utility knife – to cut drywall if needed
- Putty knife – to apply patching compound
- Sandpaper – to smooth the repaired area
Recommended Materials
- Drywall anchors – for secure mounting without studs
- Wood screws – to hold the rack firmly
- Patch kit or drywall compound – to fix holes
- Primer and paint – to match the wall color
- Replacement towel rack parts – if original pieces are broken
Assessing The Damage
Assessing the damage is the first step in fixing a towel rack in drywall. It helps you know what needs repair and how serious the problem is. A careful check saves time and effort in the long run.
Start by seeing if the towel rack is loose or has fallen off completely. Look for cracks or holes around the mount. These signs show where the damage lies.
Identifying The Problem
Look at the towel rack closely. Check if screws or anchors are missing or loose. See if the rack moves when you pull it gently. Look for damaged parts like bent brackets or broken screws. Note any holes bigger than the screw size. This shows if the drywall is damaged around the mount.
Checking Wall Integrity
Press gently around the towel rack area. The wall should feel firm and solid. Soft spots or crumbling drywall show a bigger problem. Check for water stains or mold, which weaken the wall. Use a flashlight to see inside holes for damage. If the drywall is weak, repair or replace it before fixing the rack.
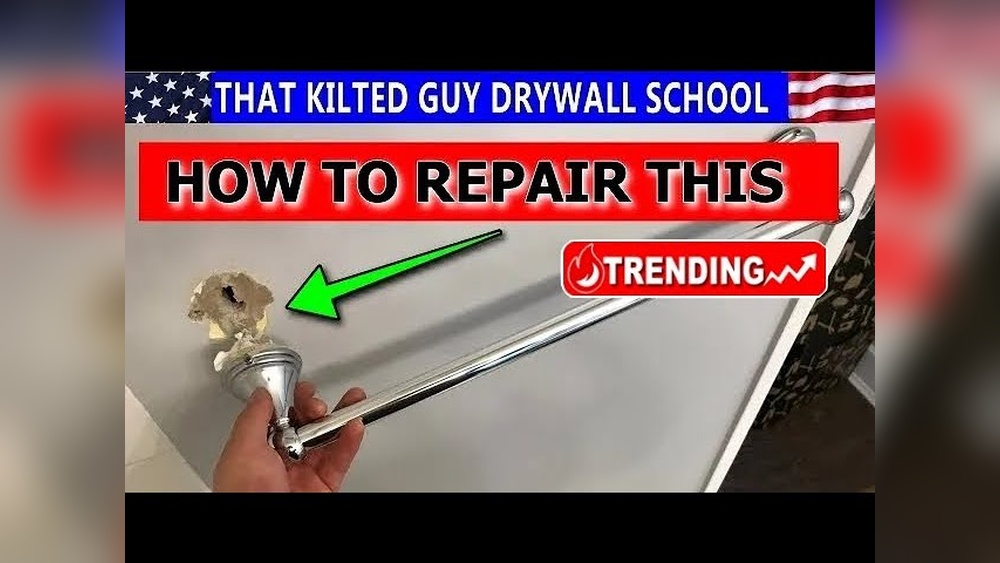
Removing The Old Towel Rack
Removing the old towel rack from drywall is the first step in fixing or replacing it. Careful removal helps avoid damage to your wall. Follow simple steps to detach the rack and clean the area for repairs or a new installation.
Detaching Fixtures
Start by locating the screws holding the towel rack. Use a screwdriver to remove each screw slowly. Keep the screws safe; you might need them later. Gently pull the rack away from the wall. Avoid forcing it to prevent drywall damage. If the rack is glued, use a putty knife to loosen it carefully.
Cleaning The Area
After removing the rack, clear any leftover debris or adhesive. Use a soft cloth or sponge with mild soap. Wipe the wall surface until clean and dry. Check for any holes or cracks in the drywall. Clean areas make it easier to repair and install new fixtures. A smooth surface ensures better adhesion for new anchors or screws.

Credit: diy.stackexchange.com
Repairing Drywall Holes
Repairing drywall holes is a key step when fixing a towel rack. Drywall often gets damaged by screws or anchors that hold the rack. Fixing these holes ensures your wall looks smooth and ready for a new rack. The repair process depends on the hole size. Small holes need simple filling, while bigger holes require patching.
Filling Small Holes
Small holes are easy to fix. Use spackling paste or joint compound for filling. Apply a small amount with a putty knife. Press the paste into the hole until it is full. Smooth the surface by spreading the paste evenly. Let it dry for several hours. Once dry, sand it lightly to remove rough edges. Paint over the area to match the wall color. This method quickly restores small holes.
Patching Larger Damages
Larger holes need more work. Cut a piece of drywall slightly bigger than the hole. Place it over the damaged area and trace around it. Cut out the damaged drywall along the traced lines. Fit the new drywall piece into the hole. Secure it with drywall screws or adhesive. Cover the edges with joint tape to prevent cracks. Apply joint compound over the tape and smooth it out. Let it dry, then sand the surface for a smooth finish. Paint the patch to blend with the wall. This method makes large holes disappear.
Reinforcing Wall For Support
Reinforcing the wall is key to fixing a towel rack in drywall. Drywall alone cannot hold much weight. It can easily crack or pull away from the wall. Strong support stops the towel rack from falling. It also keeps the wall safe from damage.
Using Anchors And Studs
Anchors give extra grip in drywall. They spread the load over a larger area. Choose anchors made for heavy loads. Plastic or metal anchors work well. Drill holes carefully and insert anchors firmly.
Studs are the best support for a towel rack. They are wooden beams behind the drywall. Find studs with a stud finder tool. Screw the rack directly into the stud. This holds the rack tightly and safely.
Alternative Support Methods
When studs are not in the right place, use a support board. Attach a wood board to the wall first. Screw the towel rack into the board. This spreads the weight and adds strength.
Another option is using toggle bolts. Toggle bolts open behind the drywall. They create a strong anchor point for heavy items. Drill the hole, insert the bolt, and tighten it securely.
Installing The New Towel Rack
Installing the new towel rack is the next step after preparing the wall. It needs careful placement and secure fixing. This ensures the rack holds towels without falling. Follow simple steps for a sturdy and neat installation.
Marking Placement
Start by holding the towel rack against the wall. Choose a height that suits your reach and bathroom layout. Use a pencil to mark where the screws will go. Check that the marks are level by using a small level tool. Mark all the holes before drilling.
Securing The Rack
Drill holes at the pencil marks on the drywall. Use anchors if the screws will not hit a stud. Push the anchors into the holes until flush with the wall. Align the towel rack with the holes. Screw it tightly to hold the rack firmly in place. Test by gently pulling the rack to confirm it is secure.
Finishing Touches
After securing the towel rack to drywall, the final steps improve its look and function. These finishing touches make the repair blend with the wall and stay strong. Careful sanding and painting hide any damage and give a smooth finish. Testing stability ensures the rack holds towels without risk.
Sanding And Painting
Start by sanding the patched area with fine sandpaper. This removes bumps and rough spots. Smooth the surface gently to avoid damage. Wipe the dust with a dry cloth. Use a paint that matches your wall color. Apply thin coats for even coverage. Let each coat dry before adding the next. This process hides the patch and blends it with the wall.
Testing Stability
Wait for the paint to dry completely. Gently pull and push the towel rack. Check for any movement or looseness. Tighten screws if needed. Hang a towel and observe how it holds. The rack should feel secure without wobbling. Fix any issues before regular use. This ensures your towel rack stays safe and functional.

Credit: diy.stackexchange.com
Preventing Future Damage
Preventing future damage to your towel rack and drywall saves time and money. Small steps keep your bathroom walls strong and your towel rack secure. Protect your repair by using the rack wisely and checking it regularly.
Proper Use Tips
Hang only lightweight towels on the rack. Avoid overloading the rack with heavy or wet items. Use both hands to place or remove towels gently. Never pull or tug hard on the rack. This reduces stress on the drywall and mounting hardware.
Regular Maintenance
Check the rack often for loose screws or wobbling. Tighten screws with a screwdriver when needed. Look for cracks or holes in the drywall around the rack. Fix small drywall issues early to stop bigger damage. Clean the rack with a soft cloth to avoid rust or wear.

Credit: www.wallshark.com
Frequently Asked Questions
How Do I Fix A Loose Towel Rack On Drywall?
To fix a loose towel rack, remove it carefully. Locate the drywall anchors and replace them if damaged. Use new anchors and screws designed for drywall to ensure a secure hold. Tighten the screws without overdoing it to avoid wall damage.
What Tools Are Needed To Repair A Towel Rack?
You need a screwdriver, drywall anchors, a drill, and a level. A putty knife and spackle may help with wall repair. Measuring tape ensures proper placement. These tools help secure the rack firmly and restore the wall’s appearance.
Can I Reuse Old Drywall Anchors For Towel Rack Repair?
Reusing old drywall anchors is not recommended. They lose grip and can cause instability. Always use new anchors for a secure installation. This prevents the towel rack from loosening and protects your drywall from damage.
How Do I Repair Drywall Holes After Towel Rack Removal?
Fill small holes with spackle using a putty knife. For larger holes, use a drywall patch before applying spackle. Sand the area smooth after drying. Finally, paint over the repair to match the wall color for a clean look.
Conclusion
Repairing a towel rack in drywall is simple with the right steps. Use the correct anchors to keep it strong. Take your time to measure and drill carefully. Avoid putting too much weight on the rack. Small repairs can save money and improve your space.
Now, your towel rack will hold towels safely again. Try this fix yourself and enjoy a neat bathroom.