Are you ready to make your patio more pet-friendly without any hassle? Installing the Ideal Pet Products patio door permanently is easier than you think.
This step-by-step guide will walk you through the process, helping you create a safe and convenient entryway for your furry friend. Imagine the freedom your pet will enjoy, and the peace of mind you’ll have knowing the door is secure and built to last.
Keep reading to discover how you can transform your patio quickly and confidently.
Choosing The Right Patio Door
Choosing the right patio door is important for your pet’s safety and comfort. A well-chosen door lets your pet go outside easily. It also fits your home’s style and size perfectly. This section helps you pick the best door for your needs.
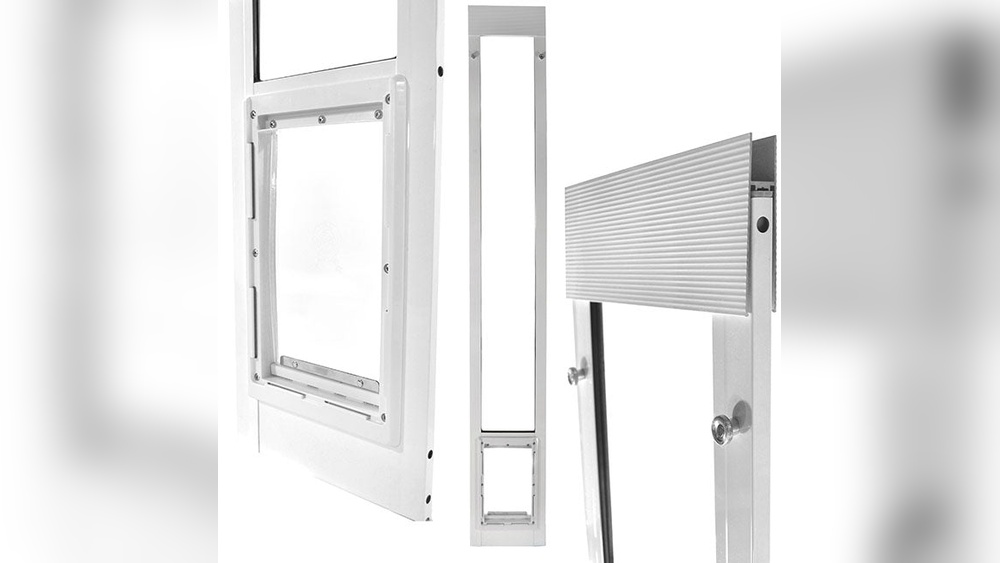
Types Of Ideal Pet Products Patio Doors
Ideal Pet Products offers several patio door options. Sliding doors slide open smoothly. They save space and are easy to use. Hinged doors open like regular doors. They work well in tight spaces. There are also doors with built-in pet flaps. These let pets come and go without opening the main door.
Measuring Your Door Frame
Measure the width and height of your door frame carefully. Use a tape measure and write down the numbers. Measure from the inside edges of the frame. Double-check your measurements for accuracy. Correct measurements help you choose a door that fits well. A wrong size can cause gaps or blockages.
Selecting The Best Door For Your Pet
Think about your pet’s size and habits. Large dogs need bigger flaps or doors. Small pets need smaller openings to keep them safe. Consider how often your pet uses the door. Choose doors with durable materials for active pets. Doors with good seals keep weather outside. Pick a door that matches your home’s look. This keeps your space stylish and functional.
Credit: www.youtube.com
Tools And Materials Needed
Before starting the installation of the Ideal Pet Products patio door, gather all necessary tools and materials. Having everything ready makes the process smooth and faster.
Using the right tools helps ensure a proper and secure fit. Avoid interruptions by preparing in advance.
Essential Installation Tools
- Measuring tape for accurate dimensions
- Power drill with drill bits
- Phillips and flathead screwdrivers
- Level to check alignment
- Utility knife for trimming
- Hammer for minor adjustments
- Caulk gun for sealing edges
Additional Supplies For A Secure Fit
- Weatherstripping to prevent drafts
- Silicone caulk for waterproof sealing
- Mounting screws provided with the door
- Shims to adjust door height and level
- Protective gloves for safe handling
- Drop cloth to protect flooring
Preparing The Door Frame
Preparing the door frame is an important step before installing the Ideal Pet Products patio door. This ensures a smooth fit and long-lasting use. Taking time to get the frame ready helps avoid problems later.
Clearing The Installation Area
Start by removing any objects around the door frame. Clear dirt, dust, and old paint chips. This makes the surface clean for a better seal. Use a brush or vacuum to clean all corners.
Checking For Frame Damage
Look closely at the door frame for cracks or rot. Damaged wood can cause leaks or weak spots. Check for loose nails or screws. Fix these issues before moving to the next step.
Making Necessary Adjustments
Measure the frame to ensure it is square and level. Use a level tool for accuracy. Sand rough spots and fill gaps with wood filler. These small changes help the door fit perfectly.

Credit: www.lowes.com
Installing The Patio Door
Installing the Ideal Pet Products patio door is a straightforward task. Follow simple steps for a secure and lasting fit. Proper installation ensures smooth operation and safety for your pet. This section covers key steps to install the patio door correctly and efficiently.
Positioning The Door Correctly
Start by placing the door frame in the opening. Make sure the door sits evenly on the threshold. Check that the door is level from side to side. Keep enough space around the frame for adjustments. Proper positioning prevents gaps and helps with sealing.
Securing The Door Frame
Use screws to fasten the door frame to the wall. Begin with the top corners, then move to the sides. Avoid overtightening screws to prevent damage. Use a level again after securing each side. This step locks the door firmly in place.
Ensuring Door Alignment
Slide the door open and closed to test alignment. Adjust screws if the door sticks or gaps appear. Check the lock mechanism to ensure it works smoothly. Aligning the door prevents drafts and keeps pets safe. Take your time to get the fit just right.
Sealing And Finishing Touches
Sealing and finishing touches are essential for a perfect patio door installation. These steps protect your home from drafts, water, and pests. Proper sealing ensures your door lasts long and works well. It also improves energy efficiency and comfort inside your house.
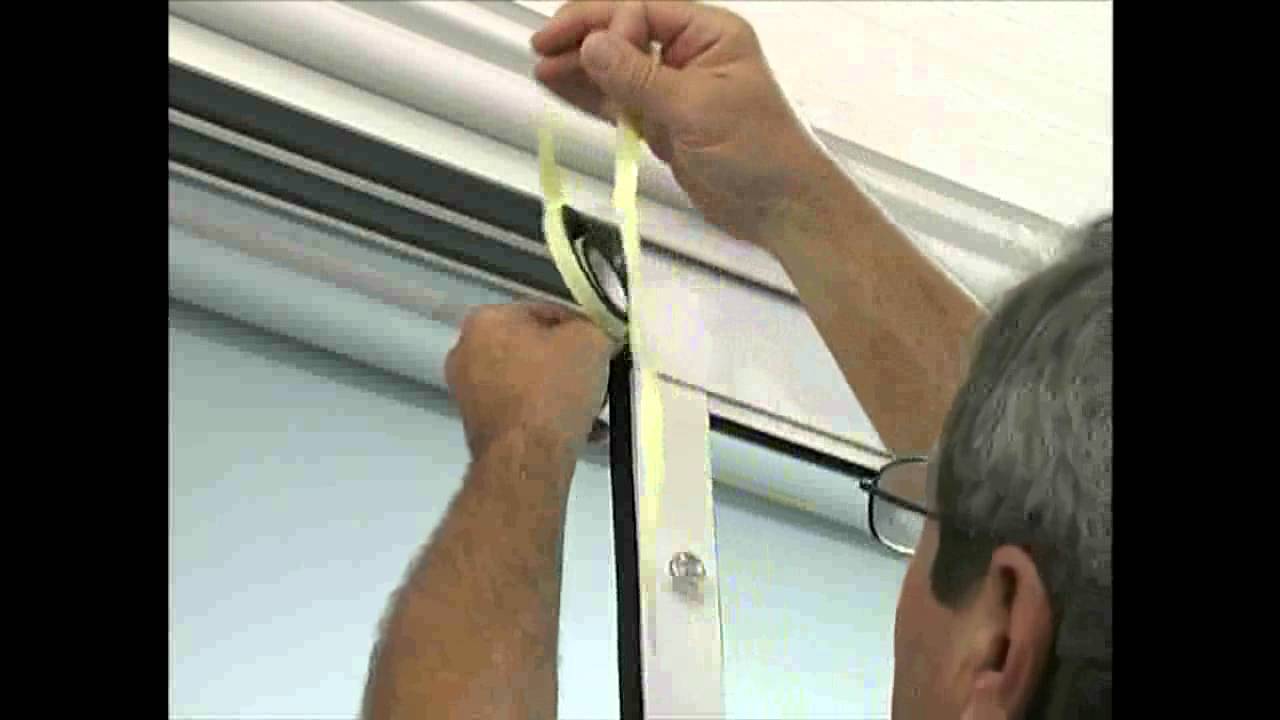
Applying Weatherstripping
Start by cleaning the door frame and edges. Remove dust and dirt for better adhesion. Cut weatherstripping strips to fit the door’s length. Press the strips firmly along the edges where the door meets the frame. Weatherstripping blocks air leaks and stops water from entering. Check that it fits snugly without gaps.
Caulking Gaps And Edges
Use exterior-grade caulk for all gaps around the door frame. Squeeze a steady line of caulk along seams and joints. Smooth the caulk with a wet finger or tool for a clean finish. Caulking seals tiny cracks and prevents moisture damage. Allow it to dry fully before moving on.
Testing Door Functionality
Open and close the door several times. Ensure it moves smoothly without sticking or rubbing. Check the locking mechanism for secure closure. Look for any air leaks by feeling around the edges. Adjust weatherstripping or caulk if you find gaps. Your door should seal tightly and operate easily.

Credit: www.petdoors.com
Maintaining Your Patio Door
Maintaining your Ideal Pet Products patio door keeps it working smoothly and looking great. Regular care helps prevent problems and extends the door’s life. Simple steps make a big difference.
Regular Cleaning Tips
Clean the glass and frame often. Use mild soap and water. Avoid harsh chemicals that can damage the surface. Wipe with a soft cloth to remove dirt and dust. Keep the track free from debris to ensure smooth sliding.
Lubricating Moving Parts
Apply a silicone-based lubricant to the rollers and tracks. This reduces friction and noise. Do not use oil-based products as they attract dirt. Lubricate every few months or when the door feels stiff.
Troubleshooting Common Issues
If the door sticks or won’t slide, check the track for dirt or damage. Tighten loose screws on handles and locks. For misaligned doors, adjust the rollers using the screws on the bottom. Replace worn parts to maintain easy operation.
Frequently Asked Questions
How Do I Prepare The Patio Door For Installation?
First, remove the old door and clean the frame. Ensure the opening is level and square. Measure the space accurately before installing the Ideal Pet Products patio door.
What Tools Are Needed For Installation?
You’ll need a drill, screwdriver, measuring tape, level, shims, and caulking gun. These tools help ensure a secure, precise installation of the pet patio door.
How To Secure The Patio Door Permanently?
Use screws to fasten the door frame tightly into the wall studs. Apply weatherproof caulk around the edges to seal gaps and prevent drafts.
Can I Install The Pet Door Myself?
Yes, with basic DIY skills and proper tools, you can install it yourself. Follow the manufacturer’s instructions closely for best results.
Conclusion
Installing the Ideal Pet Products patio door is simple and effective. Follow each step carefully for a secure fit. Check all parts before starting to avoid mistakes. Use the right tools and measure twice for best results. Your pet will enjoy easy outdoor access safely.
Enjoy the convenience and comfort this door provides daily. Keep your home and pet safe with a proper install. Trust your skills and take your time. This project adds value and joy to your home.