Are you ready to boost your home security with the Arlo Wired Video Doorbell? Installing it yourself might sound tricky, but it’s easier than you think.
This step-by-step guide will walk you through the entire process, saving you time and money. By the end, you’ll have a smart doorbell that lets you see and talk to visitors right from your phone. Keep reading—you’re just moments away from making your home safer and smarter.
Tools And Materials Needed
Preparing the right tools and materials makes installing your Arlo Wired Video Doorbell smooth. Having everything ready saves time and avoids frustration. This section lists all essentials to gather before starting.
Required Tools
You need a drill with screwdriver bits to make holes for mounting. A voltage tester ensures no electric current flows during installation. Wire strippers help expose wires for connection. A level keeps the doorbell straight on the wall. A pencil marks drill points. A ladder may be necessary for higher doorbells.
Compatible Doorbell Systems
The Arlo Wired Video Doorbell works with most 16-24V wired doorbell systems. It supports mechanical and digital chimes. Check your existing doorbell transformer voltage to match. Compatibility ensures the doorbell functions correctly and rings your chime.
Safety Precautions
Turn off power at the circuit breaker before starting. Use a voltage tester to confirm wires have no current. Wear safety glasses while drilling. Avoid touching wires directly. Follow all local electrical codes to prevent hazards. Safety protects you and your home during installation.
Preparing For Installation
Preparing for the installation of your Arlo Wired Video Doorbell is an important first step. It helps ensure a smooth setup and keeps you safe. Follow these steps carefully before starting the installation process.
Turn Off Power
Locate the circuit breaker for your doorbell. Switch it off to cut power. This step protects you from electric shock. Double-check by pressing your existing doorbell. If it does not ring, the power is off.
Remove Existing Doorbell
Use a screwdriver to remove the screws holding your old doorbell. Gently pull the doorbell from the wall. Keep the wires exposed but avoid letting them touch. Remove any mounting hardware if needed.
Check Doorbell Wiring
Look at the wires connected to your old doorbell. They should be two separate wires without damage. Use a voltage tester to confirm the wires have power. Note the wire colors for easier connection later.
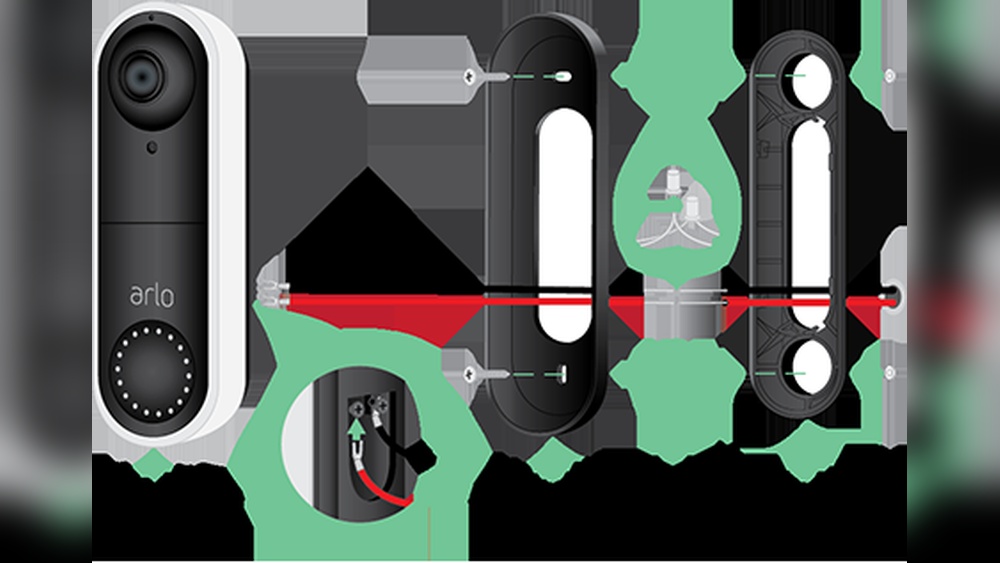
Mounting The Arlo Wired Doorbell
Mounting the Arlo Wired Video Doorbell correctly is key for clear video and reliable performance. This step ensures the doorbell captures visitors and sends alerts without interruption. Follow these simple steps to place and secure your doorbell for the best results.
Positioning The Doorbell
Choose a spot near your main entrance. The camera should face the area where visitors stand. Place it at eye level, about 48 inches from the ground. Avoid direct sunlight or places with heavy glare. Make sure the doorbell can connect to your Wi-Fi easily.
Drilling And Mounting
Use the mounting bracket as a template. Mark the drill holes on the wall. Pick the right drill bit for your wall type, such as wood or brick. Drill carefully to avoid damage. Insert anchors if needed to hold screws firmly. Attach the bracket securely to the wall.
Securing The Device
Align the doorbell with the mounting bracket. Slide or snap it into place firmly. Tighten any screws to lock the doorbell securely. Check that it does not wobble or move. Test the doorbell button to confirm it works well. Your device is now ready for setup.

Credit: kb.arlo.com
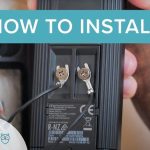
Connecting The Wiring
Connecting the wiring is a crucial step in installing your Arlo Wired Video Doorbell. Proper wiring ensures the doorbell gets power and works correctly. Follow each step carefully to avoid any issues. Stay calm and take your time for the best result.
Identify Wires
First, find the wires coming from your doorbell system. Usually, two wires are present. One wire carries power, and the other completes the circuit. Use a voltage tester to check the power wire. Mark the wires to avoid confusion during connection.
Attach Wires To Terminals
Next, connect the wires to the doorbell terminals. Loosen the terminal screws on the back of the doorbell. Insert each wire under the correct screw. Tighten the screws firmly to hold the wires in place. Make sure no bare wire touches other parts.
Test Connections
After wiring, test the doorbell connection. Turn the power back on at the breaker. Press the doorbell button to check if it rings. Watch for any flickering or power loss. Fix loose wires if the doorbell does not work properly.
Setting Up The Arlo App
Setting up the Arlo app is the first step to using your Arlo Wired Video Doorbell. The app controls your doorbell and shows live video on your phone. It helps you manage settings and receive alerts instantly. Follow these simple steps to get started.
Download And Install App
Go to the App Store or Google Play Store on your phone. Search for “Arlo” using the search bar. Tap the download or install button to get the app. Wait a few moments for the app to install fully. Open the app once installation finishes.
Create Or Log In To Account
You need an Arlo account to use the app. Tap “Sign Up” if you do not have an account. Fill in your email and create a password. If you already have an account, tap “Log In.” Enter your email and password to access your account.
Add New Device
After logging in, find the option “Add Device” on the app screen. Select “Video Doorbell” from the device list. Follow the on-screen instructions to connect your doorbell. The app will ask to scan a QR code on the doorbell. Wait for the app to confirm the connection. Your Arlo Wired Video Doorbell is now ready to use.

Credit: www.amazon.com
Configuring Doorbell Settings
After installing your Arlo Wired Video Doorbell, configuring the settings is essential. This helps tailor the device to your needs. Proper setup improves security and convenience.
Adjusting the doorbell settings lets you control how the device reacts and notifies you. Each feature can be fine-tuned easily through the Arlo app. This section covers key settings to enhance your experience.
Adjust Motion Detection
Open the Arlo app and select your doorbell device. Find the motion detection settings. Here, set the sensitivity level to low, medium, or high. High sensitivity detects small movements but may cause false alerts. Low sensitivity reduces alerts but might miss some activity.
Define the motion zones to focus on specific areas. This avoids unnecessary notifications from irrelevant zones. Save your settings to activate the changes.
Set Notification Preferences
Go to the notification settings in the app. Choose how and when you want alerts. Options include push notifications, email, or both. Set quiet hours to pause notifications during certain times. This keeps alerts from disturbing you at night.
Enable or disable notifications for motion, doorbell rings, or both. Customize alerts based on your daily routine. This helps you stay informed without overload.
Customize Chime Options
Access the chime settings in the app. Select the sound you prefer for your doorbell. Adjust the volume to suit your home environment. Some models allow different sounds for motion and ring alerts.
Test the chime to ensure it is audible. Customize the length of the chime if the option is available. These settings help you notice visitors clearly.
Troubleshooting Common Issues
Troubleshooting common issues with your Arlo Wired Video Doorbell can save time and frustration. Many problems arise from simple causes. Quick checks can restore your doorbell’s function fast.
Follow these tips to fix frequent problems. Each section covers a key issue area. Use them to get your doorbell working smoothly.
Power And Wiring Problems
Check if the doorbell has power. No lights or sounds often mean power issues. Confirm the doorbell is wired to a working transformer. The transformer should meet Arlo’s voltage requirements.
Inspect all wiring connections. Loose or damaged wires cause power loss. Tighten screws and replace frayed wires. Use a voltage tester to verify current flow.
Reset the circuit breaker if the doorbell does not power on. Some homes have switches controlling doorbell circuits. Ensure the breaker is on and working.
Connectivity Issues
Strong Wi-Fi signals are essential. Weak or no connection stops video and alerts. Place the doorbell near the router during setup. Move the router closer if needed.
Restart your router and the doorbell to refresh connections. Check for Wi-Fi interference from other devices. Change your router’s channel if needed.
Verify the doorbell connects to the correct Wi-Fi network. Use the Arlo app to confirm network status. Re-enter Wi-Fi credentials if connection fails.
App Configuration Errors
Ensure the Arlo app is up to date. Old versions may cause setup or alert issues. Update the app from your device’s app store.
Log out and log back into the app. This can fix sync problems. Clear the app cache on your phone if it behaves oddly.
Follow the in-app setup steps carefully. Missing a step can block full functionality. Restart the setup process if errors appear.

Credit: wasserstein-home.com
Frequently Asked Questions
How Do I Wire The Arlo Wired Video Doorbell?
Connect the doorbell wires to the existing doorbell transformer. Use the included screws and mounting bracket to secure the device. Ensure power is off before wiring.
What Tools Are Needed For Installation?
You need a drill, screwdriver, wire stripper, and voltage tester. These tools help safely mount and wire the Arlo doorbell.
Can I Install Arlo Wired Doorbell Myself?
Yes, with basic electrical knowledge and tools, DIY installation is possible. Follow the step-by-step instructions carefully for safety and accuracy.
How Long Does Arlo Doorbell Installation Take?
Installation typically takes 20 to 40 minutes. Time varies based on your experience and existing doorbell setup.
Conclusion
Installing the Arlo Wired Video Doorbell is simple and quick. Follow each step carefully for the best results. Your home gets better security and easy monitoring. Enjoy clear video and instant alerts on your phone. This doorbell helps you stay connected with visitors anytime.
Take your time and double-check connections before finalizing. Soon, you will have a smarter, safer front door. This guide makes installation easy for everyone. Start protecting your home with confidence today.