Are you ready to make your home smarter and safer? Installing a Ring Video Doorbell 2 plus a Chime is easier than you think, and it gives you peace of mind by letting you see and hear who’s at your door from anywhere.
In this guide, you’ll get simple, step-by-step instructions that anyone can follow. By the end, you’ll have your doorbell set up perfectly, ready to protect your home and keep you connected. Let’s get started and make your front door work smarter for you!

Credit: www.arloren.com
Tools And Materials Needed
Installing a Ring Video Doorbell 2 and Chime requires a few basic tools and materials. Having everything ready makes the process smooth and quick. This section lists all essential items to gather before starting installation.
Tools Needed
A screwdriver is a must for mounting the doorbell and chime. A drill with drill bits helps to make holes in the wall or door frame. A level ensures the doorbell is straight. A pencil or marker is useful for marking drill points. Wire strippers come handy if you connect to existing doorbell wiring.
Materials Needed
The Ring Video Doorbell 2 unit and the Chime device are the main materials. Use the screws and anchors included in the package for secure mounting. Double-sided tape can help if you prefer no drilling. A charged smartphone is needed to complete the setup with the Ring app.
Optional Supplies
Electrical tape can secure wire connections if needed. A voltage tester helps check the doorbell wiring power. A ladder may be required if your doorbell location is high. Having these ready saves time and avoids interruptions during installation.
Preparing Your Doorbell Location
Choose a spot near your front door with good Wi-Fi and easy access to power. Clear the area, removing dirt and obstacles for a smooth installation. Make sure the height is right for the camera to capture visitors clearly.
Choose The Best Spot For Your Doorbell
Pick a location near your main entrance door. The spot should show visitors clearly. Make sure the camera can see the porch and pathway well. Avoid places with too much sun or glare. The doorbell should be easy to reach but out of harm’s way.
Check Your Wi-fi Signal Strength
Test the Wi-Fi signal at the chosen spot. The Ring Doorbell needs a strong connection to work smoothly. Weak Wi-Fi causes delays and missed alerts. Use a phone or laptop to check signal bars. Move closer to the router if needed.
Ensure Power Availability
Decide how you will power your doorbell. The Ring Video Doorbell 2 uses a rechargeable battery or existing doorbell wiring. Check for nearby wires if you want a wired setup. If not, prepare to charge the battery regularly. A good power source keeps the doorbell online.
Clear The Installation Area
Remove any dirt, dust, or obstacles from the wall. A clean surface helps the doorbell attach firmly. Use a cloth and mild cleaner to wipe the spot. Avoid wet surfaces or loose paint. Smooth, dry walls provide the best hold.
Charging The Ring Doorbell 2
Charging the Ring Video Doorbell 2 is a simple process. It ensures your doorbell stays powered and ready. Knowing how to charge it properly helps avoid interruptions.
The device uses a rechargeable battery. You can charge it before installation or when the battery runs low. The battery is easy to remove and replace.
Removing The Battery Pack
First, locate the battery at the back of the doorbell. Use the provided screwdriver to open the security screw. Gently pull out the battery pack. Handle it with care to avoid damage.
Charging The Battery
Connect the battery to a USB charging cable. Use a standard USB charger or a computer port. Charge the battery fully for about 5 hours. A green light will show when charging is complete.
Reinstalling The Battery Pack
Place the battery back into the doorbell. Align it carefully to fit the slot. Tighten the security screw to secure the battery. Your doorbell is now ready to use again.
Installing The Doorbell Bracket
Installing the doorbell bracket is the first step to secure your Ring Video Doorbell 2. A strong bracket keeps your doorbell steady and safe. Follow these simple steps to mount it properly and ensure your device works well.
Marking The Mounting Spots
Hold the bracket against the wall near your door. Use a pencil to mark the holes. Make sure the marks are level and at a good height. Double-check the marks before drilling.
Drilling Holes And Anchoring
Use a drill bit suited for your wall type. Drill holes exactly where you marked. Insert wall anchors to keep screws tight. Anchors help hold the bracket firmly on the wall.
Attaching The Bracket
Align the bracket holes with the drilled holes. Insert screws and tighten them with a screwdriver. The bracket should feel solid and not move. Now it is ready for the doorbell installation.
Mounting The Ring Doorbell 2
Mounting the Ring Doorbell 2 is a key step for its proper use. It ensures clear video and easy access for visitors. The process is simple and takes only a few minutes.
Choose a spot near your front door. The area should be dry and have good Wi-Fi signal. This helps the doorbell work well and connect to your phone.
Gathering The Tools And Parts
Start by collecting the tools and parts. You need the Ring Doorbell 2, mounting bracket, screws, and anchors. A drill, screwdriver, and level also help.
Marking The Mounting Location
Hold the mounting bracket against the wall. Use a pencil to mark the screw holes. Check that the bracket is straight with a level.
Drilling Holes And Installing Anchors
Drill holes where you marked. Use the anchors if mounting on drywall or brick. Push anchors into holes to hold screws firmly.
Attaching The Mounting Bracket
Fix the bracket on the wall with screws. Tighten them well so the bracket does not move. Double-check the bracket is level.
Securing The Ring Doorbell 2
Slide the Ring Doorbell onto the bracket. Press firmly until it clicks into place. Use the security screws and screwdriver to lock it.
Credit: www.vicentetorns.com
Connecting The Chime
Connecting the chime to your Ring Video Doorbell 2 is a simple step. It lets your indoor chime ring when someone presses the doorbell. This part is important to hear alerts inside your home. Follow the steps below to connect the chime correctly.
Choosing The Chime Location
Select a spot inside your house where you can hear the chime clearly. Common places are near the main entrance or living room. Avoid noisy areas or places far from the doorbell. The chime should be easy to access for wiring.
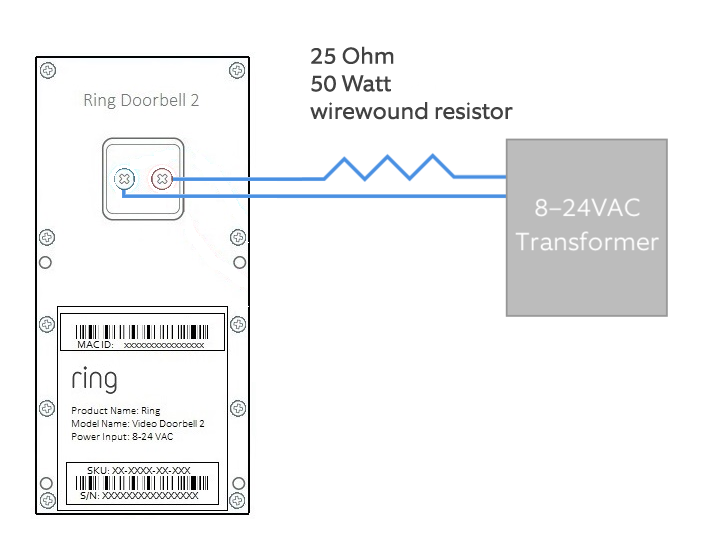
Wiring The Chime
Turn off the power to the chime circuit before starting. Remove the chime cover carefully to expose the wires. Connect the wires from the chime to the Ring chime kit terminals. Use a screwdriver to secure the wires tightly. Check that no wires are loose or touching each other. Replace the chime cover after wiring is complete.
Testing The Chime Connection
Turn the power back on after wiring. Press the Ring doorbell button to test the chime. Listen for the sound inside the house. If the chime rings, the connection is successful. If not, double-check the wiring and power supply. Repeat the test until the chime works properly.
Setting Up The Ring App
Setting up the Ring app is the first step to use your Ring Video Doorbell 2 and Chime. The app helps you control your devices from your phone. You can see visitors, get alerts, and adjust your settings easily. Follow the simple steps below to get started with the Ring app.
Creating An Account
Download the Ring app from the Apple App Store or Google Play Store. Open the app and tap “Create Account.” Enter your email address and create a strong password. Agree to the terms and conditions. Verify your email by clicking the link sent to your inbox. Your account is ready for use.
Adding The Doorbell Device
Open the Ring app and tap “Set Up a Device.” Choose “Security Devices” and then select “Video Doorbells.” Follow the instructions to scan the QR code on your doorbell. Connect the doorbell to your Wi-Fi network by entering your Wi-Fi password. The app will confirm once the device is online.
Configuring Settings
Access your device settings in the Ring app. Set up motion zones to control where the doorbell detects movement. Adjust alert tones and volume for notifications. Link your Chime to the doorbell for indoor alerts. Customize settings to fit your needs and improve security.
Testing Your Doorbell And Chime
Testing your Ring Video Doorbell 2 and Chime ensures everything works perfectly. This step confirms the doorbell rings and the chime sounds as expected. It helps detect any issues before finalizing the installation. A smooth test means your home is more secure and ready to welcome visitors.
Testing The Doorbell Button
Press the doorbell button gently. Listen for the sound from the doorbell unit. Check if the LED light on the doorbell turns on. The light shows the device is active. If no sound or light appears, check the battery or wiring.
Checking The Chime Sound
Make sure the chime device is plugged in and powered. Press the doorbell button again. Listen for the chime sound inside your home. The sound should be clear and loud enough. If the chime is silent, verify the connection or settings in the Ring app.
Using The Ring App For Testing
Open the Ring app on your phone or tablet. Select your doorbell device in the menu. Use the “Live View” to see the camera feed. Press the doorbell button from the app to test notifications. Confirm you receive alerts and hear the chime sound.
Troubleshooting Common Issues
Troubleshooting common issues with your Ring Video Doorbell 2 and Chime helps keep your system working well. Many problems are easy to fix. This section guides you through quick solutions for typical problems. Follow each step to restore your doorbell’s function fast.
Power And Battery Problems
Check if the battery is charged. A low battery causes poor performance. Remove the doorbell and charge the battery fully. Make sure the power source works if you use wiring. Replace old batteries to keep the doorbell active.
Wi-fi Connection Issues
Weak Wi-Fi signals cause delays or no video. Place your router closer to the doorbell. Remove obstacles like walls or metal objects. Restart your router and doorbell for fresh connections. Use the Ring app to check signal strength.
Chime Not Ringing
Confirm the Chime is plugged in and powered. Check volume settings on the Chime device. Restart the Chime by unplugging it for 10 seconds. Re-sync the Chime with your Ring Doorbell using the app.
Motion Detection Problems
Adjust motion zones in the Ring app for better accuracy. Clean the camera lens to avoid false alerts. Ensure no objects block the sensor view. Restart the doorbell to reset motion detection.
Video Quality Issues
Clean the doorbell lens gently with a soft cloth. Check Wi-Fi speed for smooth video streaming. Lower video quality settings in the app if needed. Restart the device to clear temporary glitches.
Credit: www.vicentetorns.com
Frequently Asked Questions
How Do I Install A Ring Video Doorbell 2?
To install, first charge the battery fully. Next, mount the bracket on your doorframe. Attach the doorbell, connect to Wi-Fi, and complete setup via the Ring app.
How To Connect Ring Video Doorbell 2 To Wi-fi?
Open the Ring app, select your device, and follow prompts to connect it to your home Wi-Fi network. Ensure a strong signal for optimal performance.
Can I Install A Ring Chime With My Doorbell?
Yes, the Ring Chime plugs into any outlet inside your home. It connects wirelessly to your Ring Doorbell, alerting you when someone presses the button.
What Tools Are Needed For Installation?
You will need a drill, screwdriver, level, and anchors (if mounting on brick or stucco). The Ring kit includes screws and a mounting bracket.
Conclusion
Installing a Ring Video Doorbell 2 and Chime is simple and quick. Follow each step carefully for best results. Your home will feel safer with clear video and alerts. Test the device after installation to ensure it works well. Enjoy the convenience of seeing visitors from your phone.
This setup adds smart security without much effort. Keep your family and property protected every day. Easy and effective.