
Are you ready to boost your home’s security with a Ring Wi-Fi Enabled Video Doorbell? Installing this smart device might seem tricky, but it’s easier than you think.
Imagine seeing who’s at your door from anywhere, right on your phone. In this guide, you’ll learn simple, step-by-step instructions to set up your doorbell quickly and confidently. Keep reading, and soon you’ll enjoy the peace of mind that comes with knowing your home is safer and smarter.
Choosing The Right Ring Doorbell
Choosing the right Ring doorbell is the first step to a smooth installation. The model you pick affects how it works and fits your home. Consider your needs and home setup carefully. This helps you avoid issues and get the best experience.
Battery Vs. Wired Models
Ring doorbells come in battery-powered and wired versions. Battery models are easy to install anywhere. No wiring needed. They need charging every few months. Wired models connect to your home’s power. They do not need recharging. Wired doorbells offer continuous power but need electrical work. Choose based on your comfort with wiring and power needs.
Compatibility With Your Doorframe
Check if the doorbell fits your doorframe. Some models work better with certain shapes and sizes. Measure your doorframe before buying. Look for mounting options that suit your wall type. Some doorbells come with adjustable brackets. This helps fit uneven or angled surfaces. Proper fit ensures good camera angles and stability.
Wi-fi Requirements
Your doorbell needs a strong Wi-Fi signal. Check your Wi-Fi speed near the door. Ring doorbells need at least 2 Mbps upload speed. Weak signals cause delays or poor video quality. Consider a Wi-Fi extender if the signal is weak. Good Wi-Fi ensures smooth live video and alerts. This makes your doorbell reliable and easy to use.
Gathering Tools And Materials
Before installing your Ring Wi-Fi Enabled Video Doorbell, gather all necessary tools and materials. This step helps the process go smoothly. Having everything ready saves time and avoids frustration. You will need some basic tools, safety gear, and the components that come with your doorbell. Prepare your workspace and check each item carefully.
Required Tools
Start by collecting simple tools. You need a drill with bits for mounting holes. A screwdriver, either Phillips or flathead, is essential. A level helps ensure the doorbell is straight. A pencil or marker will mark drill points. A wire stripper may be necessary if connecting to existing doorbell wires. Keep these tools close during installation.
Safety Gear
Safety matters. Wear safety glasses to protect your eyes from dust and debris. Gloves protect your hands from sharp edges. Use a sturdy ladder if mounting high. Turn off power at the breaker before handling wires. Make sure your area is well-lit and free of obstacles. Safety gear helps prevent accidents.
Included Components
Check the box for all components. The Ring doorbell unit is the main piece. Mounting brackets and screws come with it. You will find anchors for drywall installation. A quick start guide provides step-by-step instructions. Some models include a screwdriver or drill bit. Confirm you have everything before starting the installation.
Preparing For Installation
Preparing for installation of your Ring Wi-Fi enabled video doorbell is a key step. It ensures safety and smooth setup. Proper preparation saves time and avoids common issues.
Follow these steps carefully before you start mounting the device.
Turning Off Power
Safety is the first priority. Turn off power at the circuit breaker. This stops electricity flow to the doorbell wiring. Use a voltage tester to confirm power is off. Never skip this step.
Testing Doorbell Wiring
Check the existing doorbell wires for functionality. Use a multimeter to test voltage. The voltage should be between 16 and 24 volts AC. Proper voltage ensures the Ring doorbell works correctly. Replace damaged wires before installation.
Marking Mounting Spots
Choose a good spot near your door. The spot should have a clear view of visitors. Use the mounting bracket as a template. Mark holes with a pencil for drilling. Accurate markings help avoid mistakes during mounting.
Mounting The Doorbell
Mounting the Ring Wi-Fi Enabled Video Doorbell is a simple step. This part is important for good video quality and proper function. Follow each step carefully to ensure the doorbell is secure and positioned well.
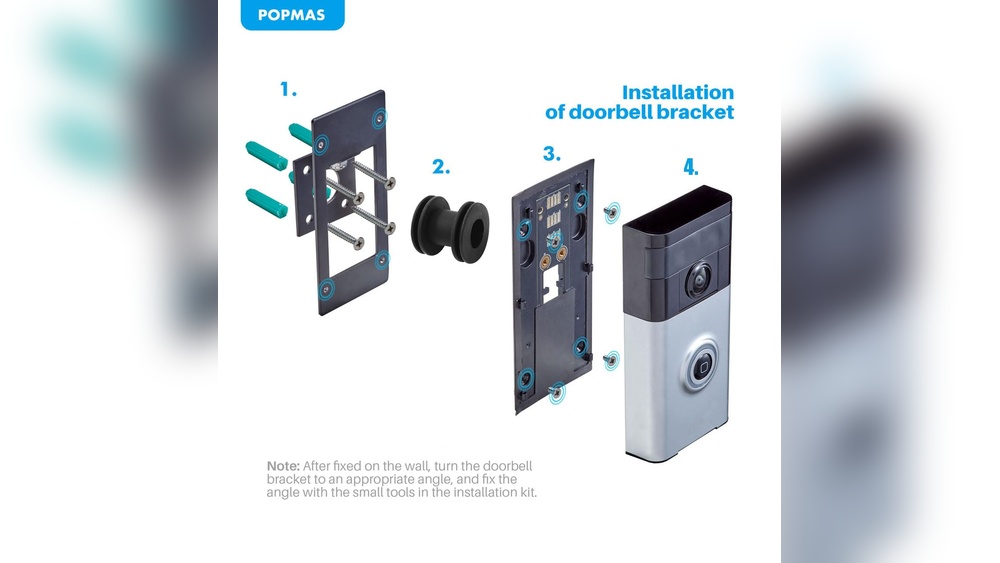
Attaching The Mounting Bracket
Start by taking the mounting bracket out of the box. Hold it against the wall near your door. Use a pencil to mark the screw holes. Drill small holes at the marks for the screws. Insert the plastic anchors if you need extra support. Screw the bracket tightly to the wall. Make sure it does not move.
Securing The Doorbell
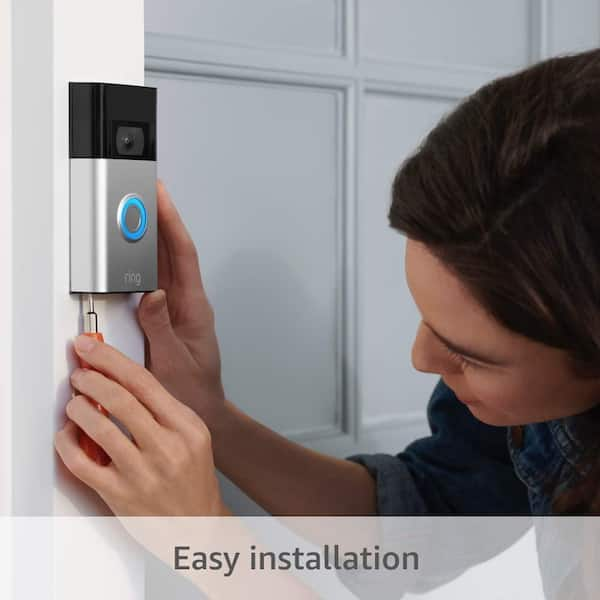
Align the bottom of the doorbell with the mounting bracket. Push the doorbell into the bracket firmly. You will hear a click sound. This means the doorbell is locked in place. Test by gently pulling the doorbell. It should stay attached without moving.
Adjusting The Angle
The video camera should face the area you want to see. Slightly tilt the doorbell up or down if needed. Some models allow side-to-side adjustment too. Use the included wedge if you cannot get the right angle. Tighten any screws to keep the angle fixed. Check the live video feed on your phone to confirm the view.
Connecting To Wi-fi
Connecting your Ring Wi-Fi Enabled Video Doorbell to your home network is a key step. It lets you see and talk to visitors from anywhere. This section guides you through the simple connection process.
Downloading The Ring App
Start by downloading the Ring app. It works on both Android and iOS devices. Search for “Ring” in your app store. Download and install the app on your smartphone or tablet. The app controls your doorbell and sends alerts.
Setting Up An Account
Open the Ring app after installation. Tap “Create Account” to begin. Enter your email address and create a strong password. Confirm your details and accept the terms. You will receive a verification email. Click the link to verify your new account.
Linking The Doorbell To Wi-fi
Power on your Ring Doorbell. Follow the app’s instructions to add a new device. The app will prompt you to connect to your Wi-Fi network. Select your home network from the list. Enter your Wi-Fi password carefully. Wait for the doorbell to connect. The app confirms once the connection is successful.
Credit: www.homedepot.com
Configuring Doorbell Settings
Configuring your Ring Wi-Fi Enabled Video Doorbell settings is key to getting the best use out of your device. This step personalizes how your doorbell reacts to visitors and alerts you. It helps manage notifications and controls video recording options. Proper setup ensures you only get alerts that matter. Let’s explore how to adjust these important settings.
Setting Motion Detection Zones
Motion detection zones let you focus the doorbell’s sensors on specific areas. This reduces false alerts from passing cars or animals. Open the Ring app and select your doorbell device. Tap on “Motion Settings” and then “Motion Zones.” Use the grid to select or deselect areas to monitor. Save your settings. This customization keeps alerts relevant and timely.
Adjusting Notification Preferences
Notification preferences control how and when you get alerts. You can choose to receive push notifications on your phone or email alerts. In the Ring app, go to “Device Settings” and select “Notifications.” Turn notifications on or off based on your needs. You can also set quiet times to avoid disturbances. Tailored alerts ensure you stay informed without overload.
Enabling Video Recording
Video recording lets you save footage of visitors and events. To enable this, open the Ring app and go to “Video Settings.” Choose the recording length and quality. Turn on cloud recording if you want remote access to videos. Some plans require a subscription for cloud storage. Recording provides a record for security and peace of mind.
Testing The Doorbell
After installing your Ring Wi-Fi Enabled Video Doorbell, testing is important. Testing ensures the device works properly. It helps catch any setup issues early. Follow the steps below to check video, audio, and motion alerts. Troubleshooting tips are also included to fix common problems quickly.
Checking Video And Audio
Open the Ring app on your phone. Press the live view button to see the video feed. Check the video quality. It should be clear and bright. Speak into the app’s microphone. Listen to the doorbell’s speaker for your voice. Make sure you hear sound on both ends. Test at different times of day for best results.
Testing Motion Alerts
Walk in front of your doorbell to trigger motion detection. Watch your phone for alert notifications. Check if alerts arrive quickly and clearly. Adjust motion settings in the app if alerts are too sensitive or not sensitive enough. Test alerts several times to confirm they work reliably. This keeps your home secure.
Troubleshooting Common Issues
If video or audio doesn’t work, check your Wi-Fi connection. Restart your router and doorbell if needed. Ensure the doorbell firmware is updated in the app. For missing motion alerts, adjust motion zones and sensitivity. If problems persist, remove the device from the app and reinstall it. These steps fix most common issues fast.
:strip_icc()/BHG-how-to-install-video-doorbell-6833360-part-01-step-05_30445-c97141832b6541158a12194e97fccded.jpg)
Credit: www.excelcare24.co.uk
Maintaining Your Ring Doorbell
Maintaining your Ring Wi-Fi Enabled Video Doorbell keeps it working well. Regular care helps the device last longer and perform better. Simple steps prevent problems and improve security for your home.
Battery Replacement Tips
Check your Ring doorbell battery often. Replace it when the battery level is low. Use only the battery model recommended by Ring. Turn off the device before removing the battery. Charge the new battery fully before installing it. This keeps your doorbell powered and ready.
Firmware Updates
Firmware updates improve your doorbell’s performance and security. Connect your device to Wi-Fi to receive updates. Open the Ring app to check for new versions. Install updates as soon as they are available. This ensures your doorbell has the latest features and fixes.
Cleaning And Care
Keep your Ring doorbell clean for clear video quality. Use a soft cloth to wipe the lens and body. Avoid harsh chemicals that could damage the device. Clean the doorbell gently to remove dust and dirt. Proper care helps your doorbell capture sharp images every time.
:strip_icc()/BHG-how-to-install-video-doorbell-6833360-part-02-step-05-418dcd0ead7b415181d36f311ff079be.jpg)
Credit: www.pwmachineservices.com
Frequently Asked Questions
How Do I Connect Ring Doorbell To Wi-fi?
To connect your Ring doorbell, open the Ring app and follow the setup prompts. Select your Wi-Fi network and enter the password. Ensure your phone is near the doorbell for a smooth connection. The device will confirm once successfully connected.
What Tools Are Needed To Install Ring Doorbell?
You need a drill, screwdriver, level, and the mounting screws included. A power drill helps with wall anchors if mounting on brick or stucco. Also, keep your smartphone handy for app setup and Wi-Fi connection steps.
Can I Install Ring Doorbell Without Existing Doorbell Wiring?
Yes, Ring doorbells can work wire-free using rechargeable batteries. You simply mount the device and connect it to Wi-Fi. However, wired installation allows continuous power and chime integration if desired.
How To Test Ring Doorbell After Installation?
Press the doorbell button and check for notifications on your phone. Use the live view feature in the Ring app to verify video and audio. Ensure the device is charging if wired or battery is adequately charged.
Conclusion
Installing a Ring Wi-Fi video doorbell is simple and quick. Follow each step carefully for best results. Test the doorbell to make sure it works well. Enjoy better home security and easy visitor alerts. Now, your front door is smarter and safer.
Keep the app updated for smooth performance. Feel confident knowing your home is protected day and night. This small device can make a big difference. Try it yourself and see how easy it is!