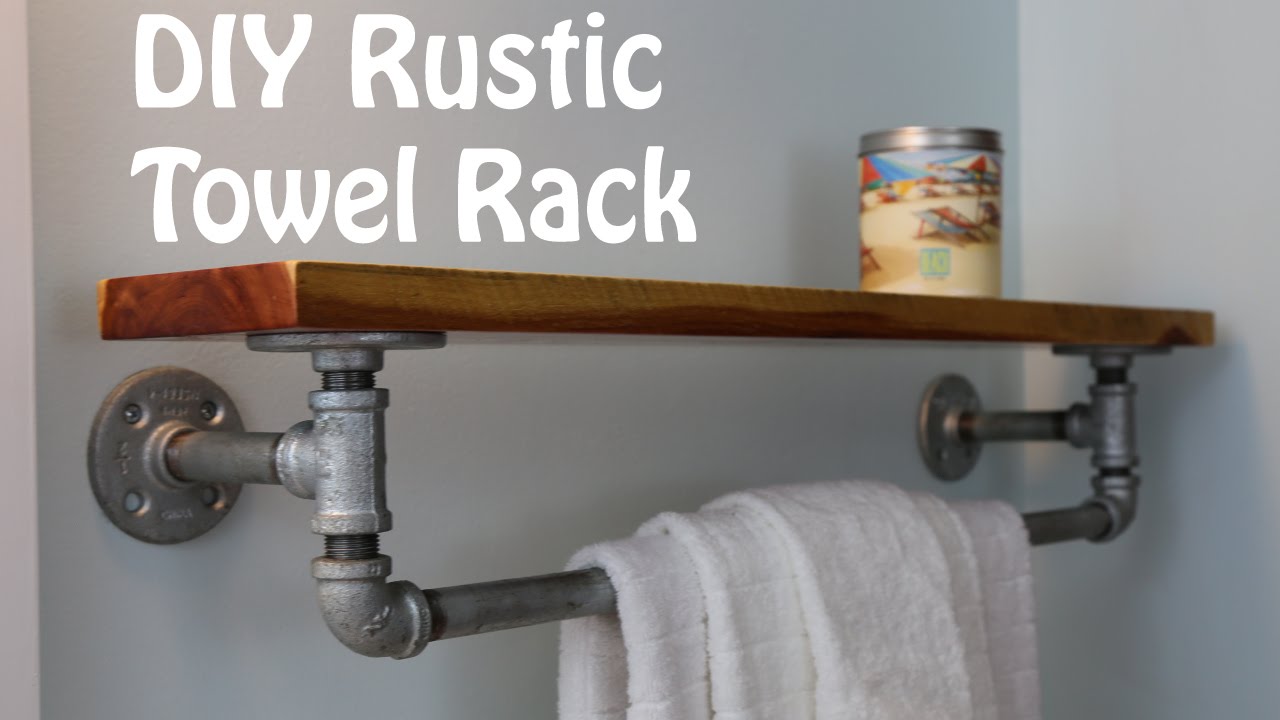
Are you tired of cluttered towels and looking for a stylish way to organize your bathroom or kitchen? Building your own pipe towel rack is easier than you think, and it adds a unique, industrial touch to your space.
Imagine having a sturdy, custom rack that fits perfectly where you need it, made with simple materials you can find at any hardware store. In this guide, you’ll discover step-by-step how to create your own pipe towel rack that saves space, looks great, and impresses anyone who visits.
Ready to transform your towel storage and give your room a fresh new vibe? Let’s get started!

Credit: citygirlmeetsfarmboy.com
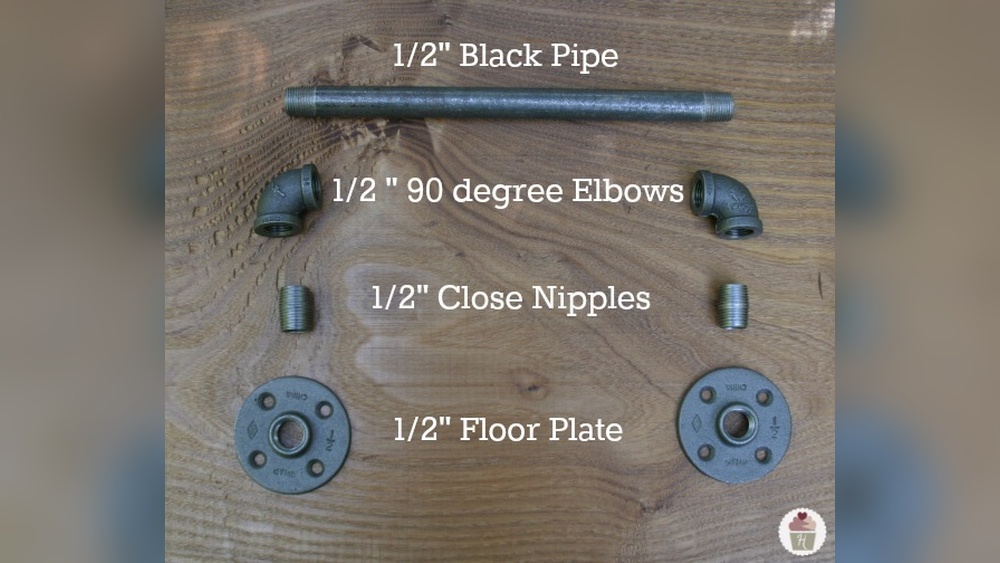
Materials Needed
Gathering the right materials is key to building a strong pipe towel rack. This step ensures your project is smooth and efficient. Below are the main materials you will need. Each part plays a role in the final look and durability.
Types Of Pipes
Choose pipes made of black iron, galvanized steel, or copper. Black iron pipes give a rustic and industrial look. Galvanized steel resists rust and lasts longer in humid places. Copper pipes add a warm, classic touch but cost more. Pick the size carefully—usually, 1/2 inch or 3/4 inch diameter works well for towel racks.
Tools Required
You will need a pipe wrench or adjustable wrench to tighten fittings. A tape measure helps get exact lengths and spacing. A pipe cutter or hacksaw is necessary to cut pipes to size. Use a drill to fix the rack to the wall. Sandpaper smooths rough pipe edges after cutting.
Additional Supplies
Grab pipe fittings such as elbows, tees, and flanges to connect pipes. Wall anchors and screws secure the rack safely. Thread seal tape prevents leaks and loosens fittings. A level ensures your rack hangs straight. Finally, optional paint or spray finish protects pipes and improves appearance.
Choosing The Right Design
Choosing the right design for your pipe towel rack is key to its success. The design affects how well it fits your space and matches your style. It also decides how useful and sturdy the rack will be. Consider these factors carefully before you start building.
Space Considerations
Measure the area where you want to place the towel rack. Think about how much wall space is free. Avoid designs that are too wide or tall for the spot. Leave enough room for towels to hang without touching the floor. Check for nearby objects that might block access.
Style Options
Pipe towel racks come in many styles. Rustic designs use dark, rough pipes and wood. Modern looks often have sleek, painted pipes. Industrial style shows raw metal and simple shapes. Pick a style that fits your bathroom or kitchen decor. Matching the design keeps your space looking neat and planned.
Size And Dimensions
Decide how many towels you want to hold. A rack with more bars can hold more towels. Keep each bar at a comfortable height to reach. The distance between bars should allow towels to dry well. Balance size with space to avoid clutter.
Preparing The Pipes
Preparing the pipes is the first step in making a pipe towel rack. Pipes need to be the right size and clean for a strong and neat rack. This process helps the pipes fit well and last longer.
Proper preparation makes the building easier and the final product better. Follow these steps carefully for good results.
Measuring And Cutting
Measure the pipes carefully before cutting. Use a tape measure to get exact lengths. Mark the pipes with a pencil or marker. Cut the pipes straight using a pipe cutter or saw. Smooth the edges with sandpaper to avoid sharp ends. Accurate cuts ensure the rack fits perfectly on your wall.
Cleaning And Finishing
Clean the pipes to remove dirt and oil. Use a cloth with soap and water or a degreaser. Dry the pipes completely to prevent rust. Check for rough spots and sand them down. Clean pipes help paint stick better and look nicer.
Painting And Coating
Apply a primer to protect the pipes from rust. Use spray paint or brush-on paint made for metal. Choose a color that matches your room or style. Let the paint dry fully before handling. Add a clear coat for extra protection and shine. A good finish keeps the rack looking new for years.
Credit: gmpolyplast.com
Assembling The Rack
Assembling the pipe towel rack is the most exciting step. This part brings all the pieces together. You will see your rack taking shape. Careful assembly ensures your rack is sturdy and lasts long.
Fitting The Pipes Together
Start by matching the pipes with the right connectors. Push the pipes firmly into each joint. Make sure each pipe fits snugly without gaps. Test the connections by gently pulling the pipes. Tight fits keep the rack stable and safe.
Securing Joints
Use pipe thread tape or glue to secure each joint. Wrap tape around threaded ends before connecting. This prevents leaks and loosens joints. For non-threaded pipes, apply strong adhesive inside connectors. Let the glue dry fully before moving on.
Adding Wall Mounts
Attach wall mounts at the rack’s ends or corners. Mark the spots on the wall first. Drill holes matching the mount size. Insert anchors if needed for extra strength. Screw mounts tightly to hold the rack securely. Check the rack for steadiness once mounted.
Installing The Rack
Installing the pipe towel rack is a simple process. It requires a few tools and careful steps. Proper installation ensures the rack holds towels securely and looks great on your wall. Follow these steps to mount your rack correctly and safely.
Marking The Wall
Start by holding the rack against the wall. Use a level to keep it straight. Mark the spots where the screws will go. Double-check the marks to ensure even spacing. Accurate marks help the rack fit perfectly.
Drilling And Anchoring
Choose a drill bit size that matches your wall anchors. Drill holes at the marked spots carefully. Insert anchors into the holes. Anchors prevent the screws from loosening over time. Use a hammer gently if needed to fit anchors flush.
Mounting The Rack
Align the rack with the anchors in the wall. Insert screws through the rack’s holes into the anchors. Tighten the screws using a screwdriver. Check that the rack is secure and does not wobble. Your pipe towel rack is ready to use.
Customizing Your Towel Rack
Customizing your pipe towel rack lets you create a piece that fits your space and style. It adds both function and charm to your bathroom or kitchen. Small changes can make a big difference in how useful and attractive the rack becomes.
Adding Shelves Or Hooks
Shelves give extra space for toiletries or folded towels. Use wooden boards or metal trays that match the pipe design. Hooks are perfect for hanging washcloths, robes, or brushes. Attach them at different heights to hold various items. This customization helps keep your space tidy and organized.
Incorporating Decorative Elements
Decorative parts bring character to your towel rack. Paint the pipes in colors that match your room. Wrap the pipes with rope or fabric for a rustic look. Add small plants or vintage signs on shelves for charm. Simple touches make the rack a focal point in your room.
Maintaining The Rack
Keep your rack clean by wiping it regularly with a damp cloth. Check for rust or loose screws and fix them early. Avoid water buildup on metal parts to prevent damage. Proper care helps your towel rack last longer and look great.

Credit: citygirlmeetsfarmboy.com
Frequently Asked Questions
What Materials Do I Need For A Pipe Towel Rack?
You need galvanized pipes, flanges, elbows, and pipe nipples. Also, prepare screws, a drill, and a level for installation. These materials create a sturdy, industrial-style towel rack.
How Do I Assemble A Pipe Towel Rack?
Connect pipes and fittings in your desired shape. Attach flanges to the wall, then screw the pipe frame into them securely. Ensure alignment using a level.
Can I Customize The Pipe Towel Rack Size?
Yes, you can adjust pipe lengths to fit your space. Measure your wall area before buying materials to ensure a perfect fit.
Is A Pipe Towel Rack Durable For Bathrooms?
Absolutely. Galvanized steel pipes resist rust and moisture. This makes them ideal for bathroom environments and long-lasting use.
Conclusion
Creating a pipe towel rack can be simple and fun. You only need a few materials and tools. Follow the steps carefully, and you will build a strong rack. It saves space and adds a unique look to your room.
This project fits well in bathrooms or kitchens. Try making one yourself and enjoy the satisfaction of DIY work. It’s a great way to add style and function. Ready to start? Gather your parts and begin today.