
Looking to add a warm, magical glow to your space? Installing LED string lights is one of the easiest and most affordable ways to transform any room or outdoor area.
But if you’ve never done it before, the process might feel a bit confusing. Don’t worry—you’re about to discover simple, step-by-step tips that will help you hang your LED string lights quickly and safely. By the end of this guide, you’ll know exactly how to brighten up your home and create the perfect atmosphere you’ve been dreaming of.
Keep reading, and let’s get started!

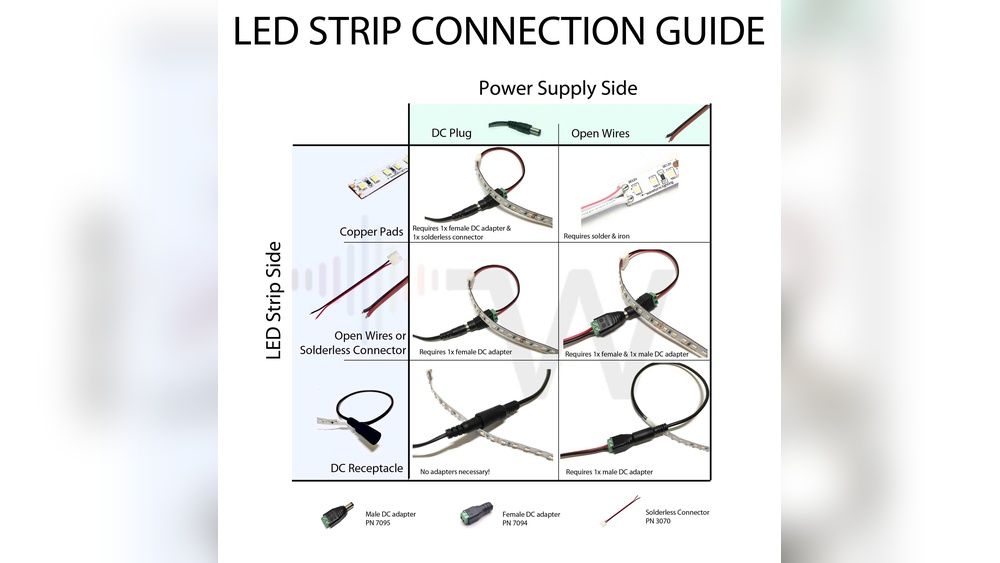
Credit: www.wikihow.com
Choosing The Right Led String Lights
Choosing the right LED string lights is important for a great look and safe use. Different lights suit different places and styles. Picking the right type, color, and brightness helps create the perfect atmosphere. Understanding your options makes the installation easier and more fun.
Types Of Led String Lights
LED string lights come in many styles. Some have small bulbs, others have big ones. You can find globe lights, fairy lights, and icicle shapes. Each type gives a different effect. Choose the style that fits your space and taste.
Indoor Vs Outdoor Options
Indoor and outdoor LED string lights are not the same. Outdoor lights need to be waterproof and strong. Indoor lights are lighter and may not handle weather. Always check the label before buying. Use outdoor lights outside to avoid damage and danger.
Color And Brightness Choices
LED lights come in many colors like white, warm yellow, or multicolor. Brightness varies too. Soft lights create a cozy feel. Bright lights help when you need more light. Pick colors and brightness that match your mood and place.
Gathering Essential Tools And Materials
Before starting to install LED string lights, gather all needed tools and materials. This step saves time and helps avoid mistakes. Having everything ready makes the process smooth and safe.
Basic Tools Needed
Get a ladder to reach high places safely. Use a measuring tape to check distances and spacing. A screwdriver helps secure mounting clips or hooks. Wire cutters can trim excess wire neatly. A drill may be needed for mounting on tough surfaces.
Safety Equipment
Wear gloves to protect your hands from sharp edges. Safety glasses keep your eyes safe from dust and debris. Use a sturdy ladder and check it before climbing. Avoid electrical shocks by turning off power while working on wiring.
Additional Accessories
Mounting clips or hooks help hold the lights in place. Extension cords might be needed for power reach. Zip ties keep wires organized and secure. Weatherproof tape protects connections from rain and moisture.
Planning Your Lighting Layout
Planning your lighting layout is the first step to a beautiful LED string light display. It helps you decide how many lights you need and where to place them. Good planning saves time and avoids mistakes. It also ensures your lights look balanced and bright.
Measuring The Space
Start by measuring the area where you want to hang the lights. Use a tape measure to get the length and width. Write down these numbers. Measure twice to avoid errors. Knowing the size helps you buy the right length of string lights. It also helps you plan the layout better.
Designing The Arrangement
Think about the shape and style you want. Do you want straight lines, zigzags, or a grid? Mark spots where lights will hang, like walls, fences, or trees. Consider how much light each area needs. Keep the design simple for easy installation. Make sure the lights will highlight your space well.
Power Source And Outlet Placement
Check where power outlets are in your space. Place your lights near these outlets to avoid long extension cords. If outlets are far, plan safe ways to use extension cords. Avoid running cords across walkways. Make sure the power source is protected from weather. This keeps your lights safe and working well.
Preparing The Installation Area
Preparing the installation area is an important step for a smooth setup. It helps to avoid problems later and ensures the lights look great. Taking time to prepare saves effort during and after installation.
Cleaning And Clearing Surfaces
Start by cleaning the surfaces where you will hang the lights. Remove dirt, dust, and cobwebs. Use a cloth or brush to wipe the area. Clear away any loose objects or debris. A clean surface helps the lights stick better and last longer.
Checking For Obstacles
Look carefully for any obstacles that might block the lights. Check for branches, wires, or nails in the way. Make sure the area is free from anything that could damage the string lights. Clear obstacles to avoid tangles and broken bulbs.
Ensuring Weatherproofing
Check if the installation area is exposed to rain or wind. Use weatherproof clips or hooks to secure the lights. Seal any holes or gaps where water might enter. Protect the plugs and connections with waterproof covers. Proper weatherproofing keeps your lights safe and working well.
Step-by-step Installation Process
Installing LED string lights can transform any space into a warm, inviting area. Following a clear step-by-step process makes the task simple and safe. This guide breaks down the key steps to help you set up your lights quickly and effectively.
Testing The Lights Before Installation
Start by plugging in the string lights to check if all bulbs work. Look for any dim or flickering bulbs and replace them. Testing ensures you avoid problems after installation. It saves time and effort in the long run.
Mounting Techniques
Choose a mounting method based on where you want to hang the lights. Use hooks, clips, or adhesive strips for walls and ceilings. For outdoor spaces, consider sturdy hooks or nails. Space the mounts evenly to keep the lights straight and neat.
Securing The Lights Safely
Secure the lights without damaging wires or surfaces. Avoid tight bends or pulling on the cords. Use insulated clips and avoid metal fasteners that can cut wires. Keep plugs and connections off the ground to prevent water damage.
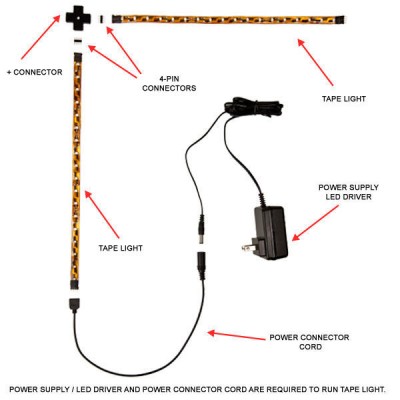
Credit: blog.1000bulbs.com
Enhancing Your Decor With Led Lights
LED string lights bring a warm, inviting glow to any space. They create a cozy atmosphere and highlight your decor. These lights are versatile and easy to install. They can brighten up both indoor and outdoor areas. Using LED lights enhances your home’s style without much effort.
Creative Placement Ideas
Place LED string lights along window frames to add sparkle. Wrap them around stair railings for a charming touch. Hang lights from the ceiling to create a starry effect. Use them to outline shelves or mirrors for subtle lighting. Try weaving lights through plants for a natural look.
Combining With Other Decor Elements
Pair LED lights with candles for a soft glow. Combine lights with fabric drapes for a dreamy feel. Add lights around photo frames to highlight memories. Use them alongside colorful cushions to brighten a room. Mix string lights with lanterns to create a cozy corner.
Using Timers And Controls
Timers help save energy by turning lights on and off automatically. Remote controls make it easy to change light settings from afar. Use dimmers to adjust brightness for different moods. Smart plugs allow scheduling lights through a phone app. These tools add convenience and control to your lighting.
Maintaining And Troubleshooting
Maintaining and troubleshooting LED string lights keeps them bright and long-lasting. Regular care prevents damage and saves money on replacements. Simple fixes often solve common issues quickly. Understanding basic maintenance helps you enjoy your lights without hassle.
Regular Cleaning Tips
Dust and dirt reduce light brightness. Clean lights gently with a soft cloth. Avoid water near electrical parts. Use a dry brush to remove debris. Clean lights every few weeks for best results.
Fixing Common Issues
Check connections if lights flicker or go out. Loose plugs cause power loss. Inspect wires for cuts or breaks. Replace damaged wires carefully. Reset the power source to fix minor glitches.
Replacing Bulbs And Components
Identify the bulb type before buying replacements. Turn off power before removing bulbs. Use gloves to avoid damage. Replace faulty bulbs with the same model. Test lights after changing parts to ensure they work.
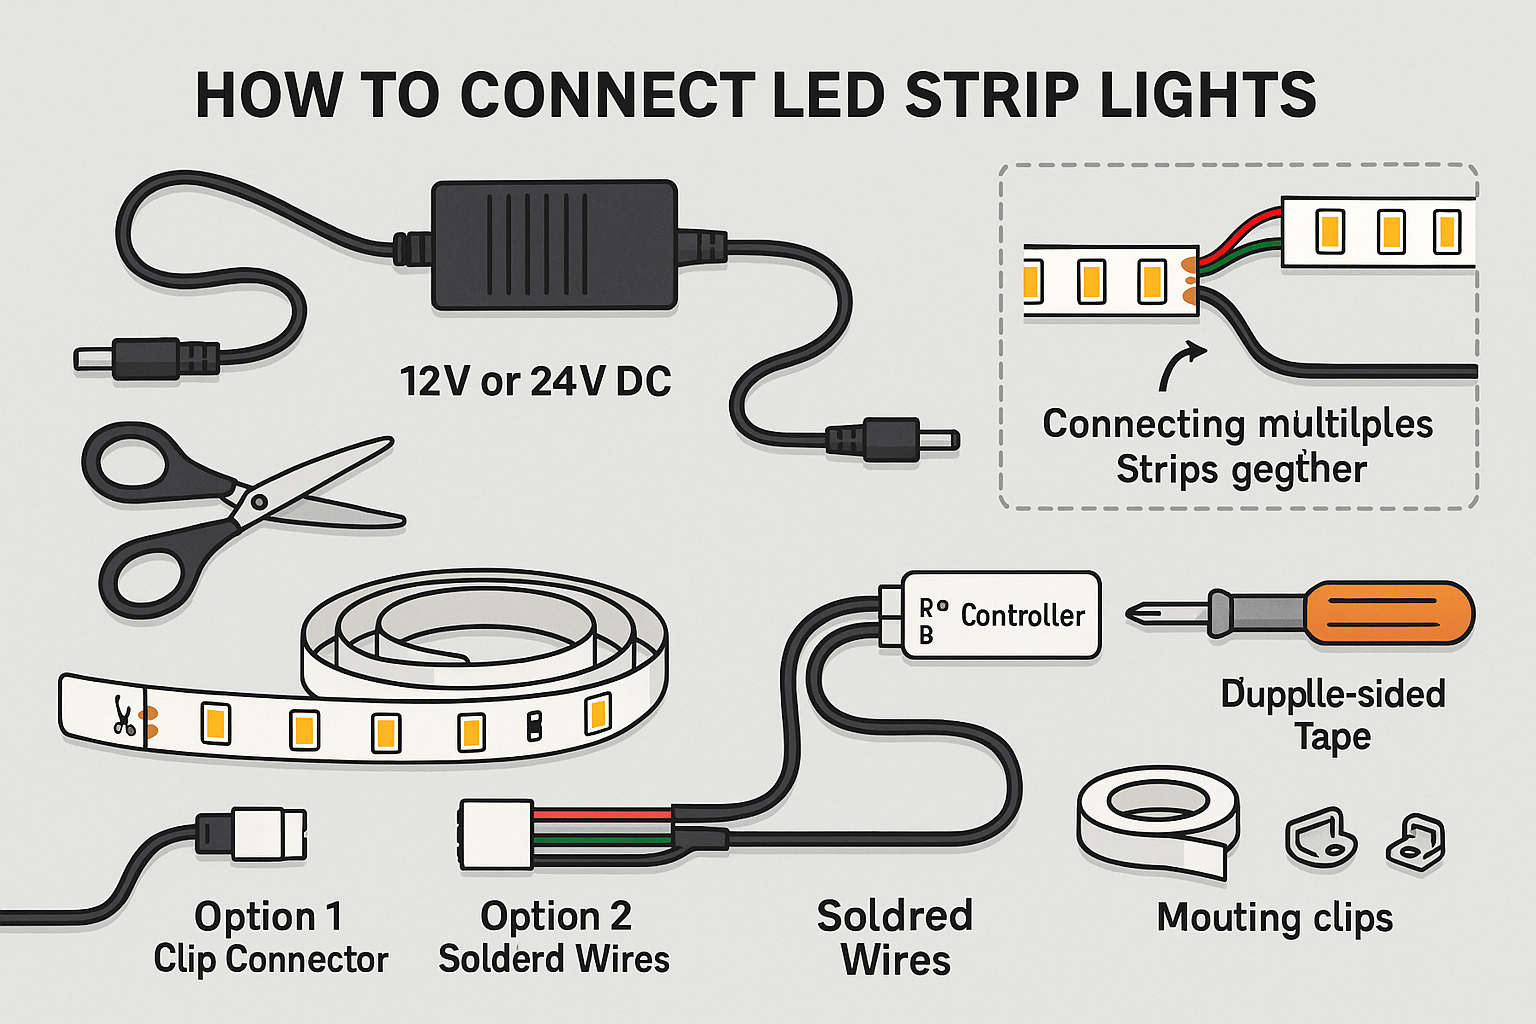
Credit: hitlights.com
Frequently Asked Questions
How Do I Safely Install Led String Lights Outdoors?
Choose waterproof LED string lights designed for outdoor use. Secure them with weather-resistant clips. Avoid overloading circuits and keep plugs off the ground to prevent water damage.
What Tools Are Needed To Install Led String Lights?
You typically need hooks or clips, a ladder, and a power source. Optional tools include zip ties and adhesive hooks to secure the lights neatly.
Can I Connect Multiple Led String Lights Together?
Yes, many LED string lights are designed to connect end-to-end. Check manufacturer guidelines for maximum connection length to avoid power overload.
How Do I Hide Wires When Installing Led String Lights?
Use cable clips or adhesive hooks to secure wires along edges. Tuck wires behind furniture or plants to keep the setup neat and discreet.
Conclusion
Installing LED string lights is simple and fun. Follow the steps carefully for the best results. Check your lights and power source before starting. Secure the lights well to avoid damage or accidents. Enjoy the warm, bright glow that LED lights bring.
They save energy and last a long time. Brighten your space easily with these easy-to-follow tips. Now, your place looks cozy and inviting. Try different patterns to match your style and mood. Bright lights, happy nights.