Are you looking to customize your LED string lights but don’t know where to start? Cutting and connecting LED string lights might sound tricky, but with the right steps, you can easily make your lights fit perfectly anywhere.
Imagine turning your space into a cozy, glowing haven exactly the way you want it. In this guide, you’ll discover simple, clear instructions that anyone can follow—no technical skills needed. Keep reading, and you’ll soon be able to shape your LED lights to match your style and needs perfectly.
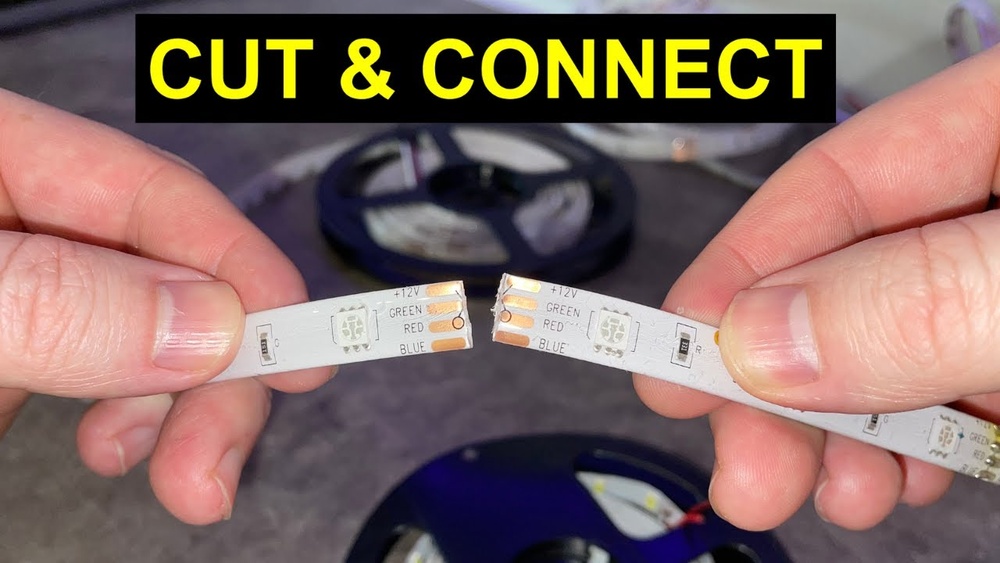
Credit: www.youtube.com
Choosing The Right Led String Lights
Choosing the right LED string lights is key for any lighting project. The perfect lights make cutting and connecting easier. They fit your space and style well. Knowing the types and features helps you pick wisely.
Types Of Led String Lights
LED string lights come in many styles. Some have small bulbs, others larger. Some lights are clear, others colored. Battery-operated lights offer more placement options. Plug-in lights provide steady power. Some strings have fixed lengths, others are flexible. Choose the type that suits your project.
Factors To Consider Before Cutting
Check the string’s cutting marks. Only cut where the manufacturer allows. Look at the wire thickness and quality. Thin wires may break easily. Consider the voltage and power source. Cutting can change how the lights work. Ensure the string supports reconnecting after cutting. Safety first. Test the string before and after cutting.
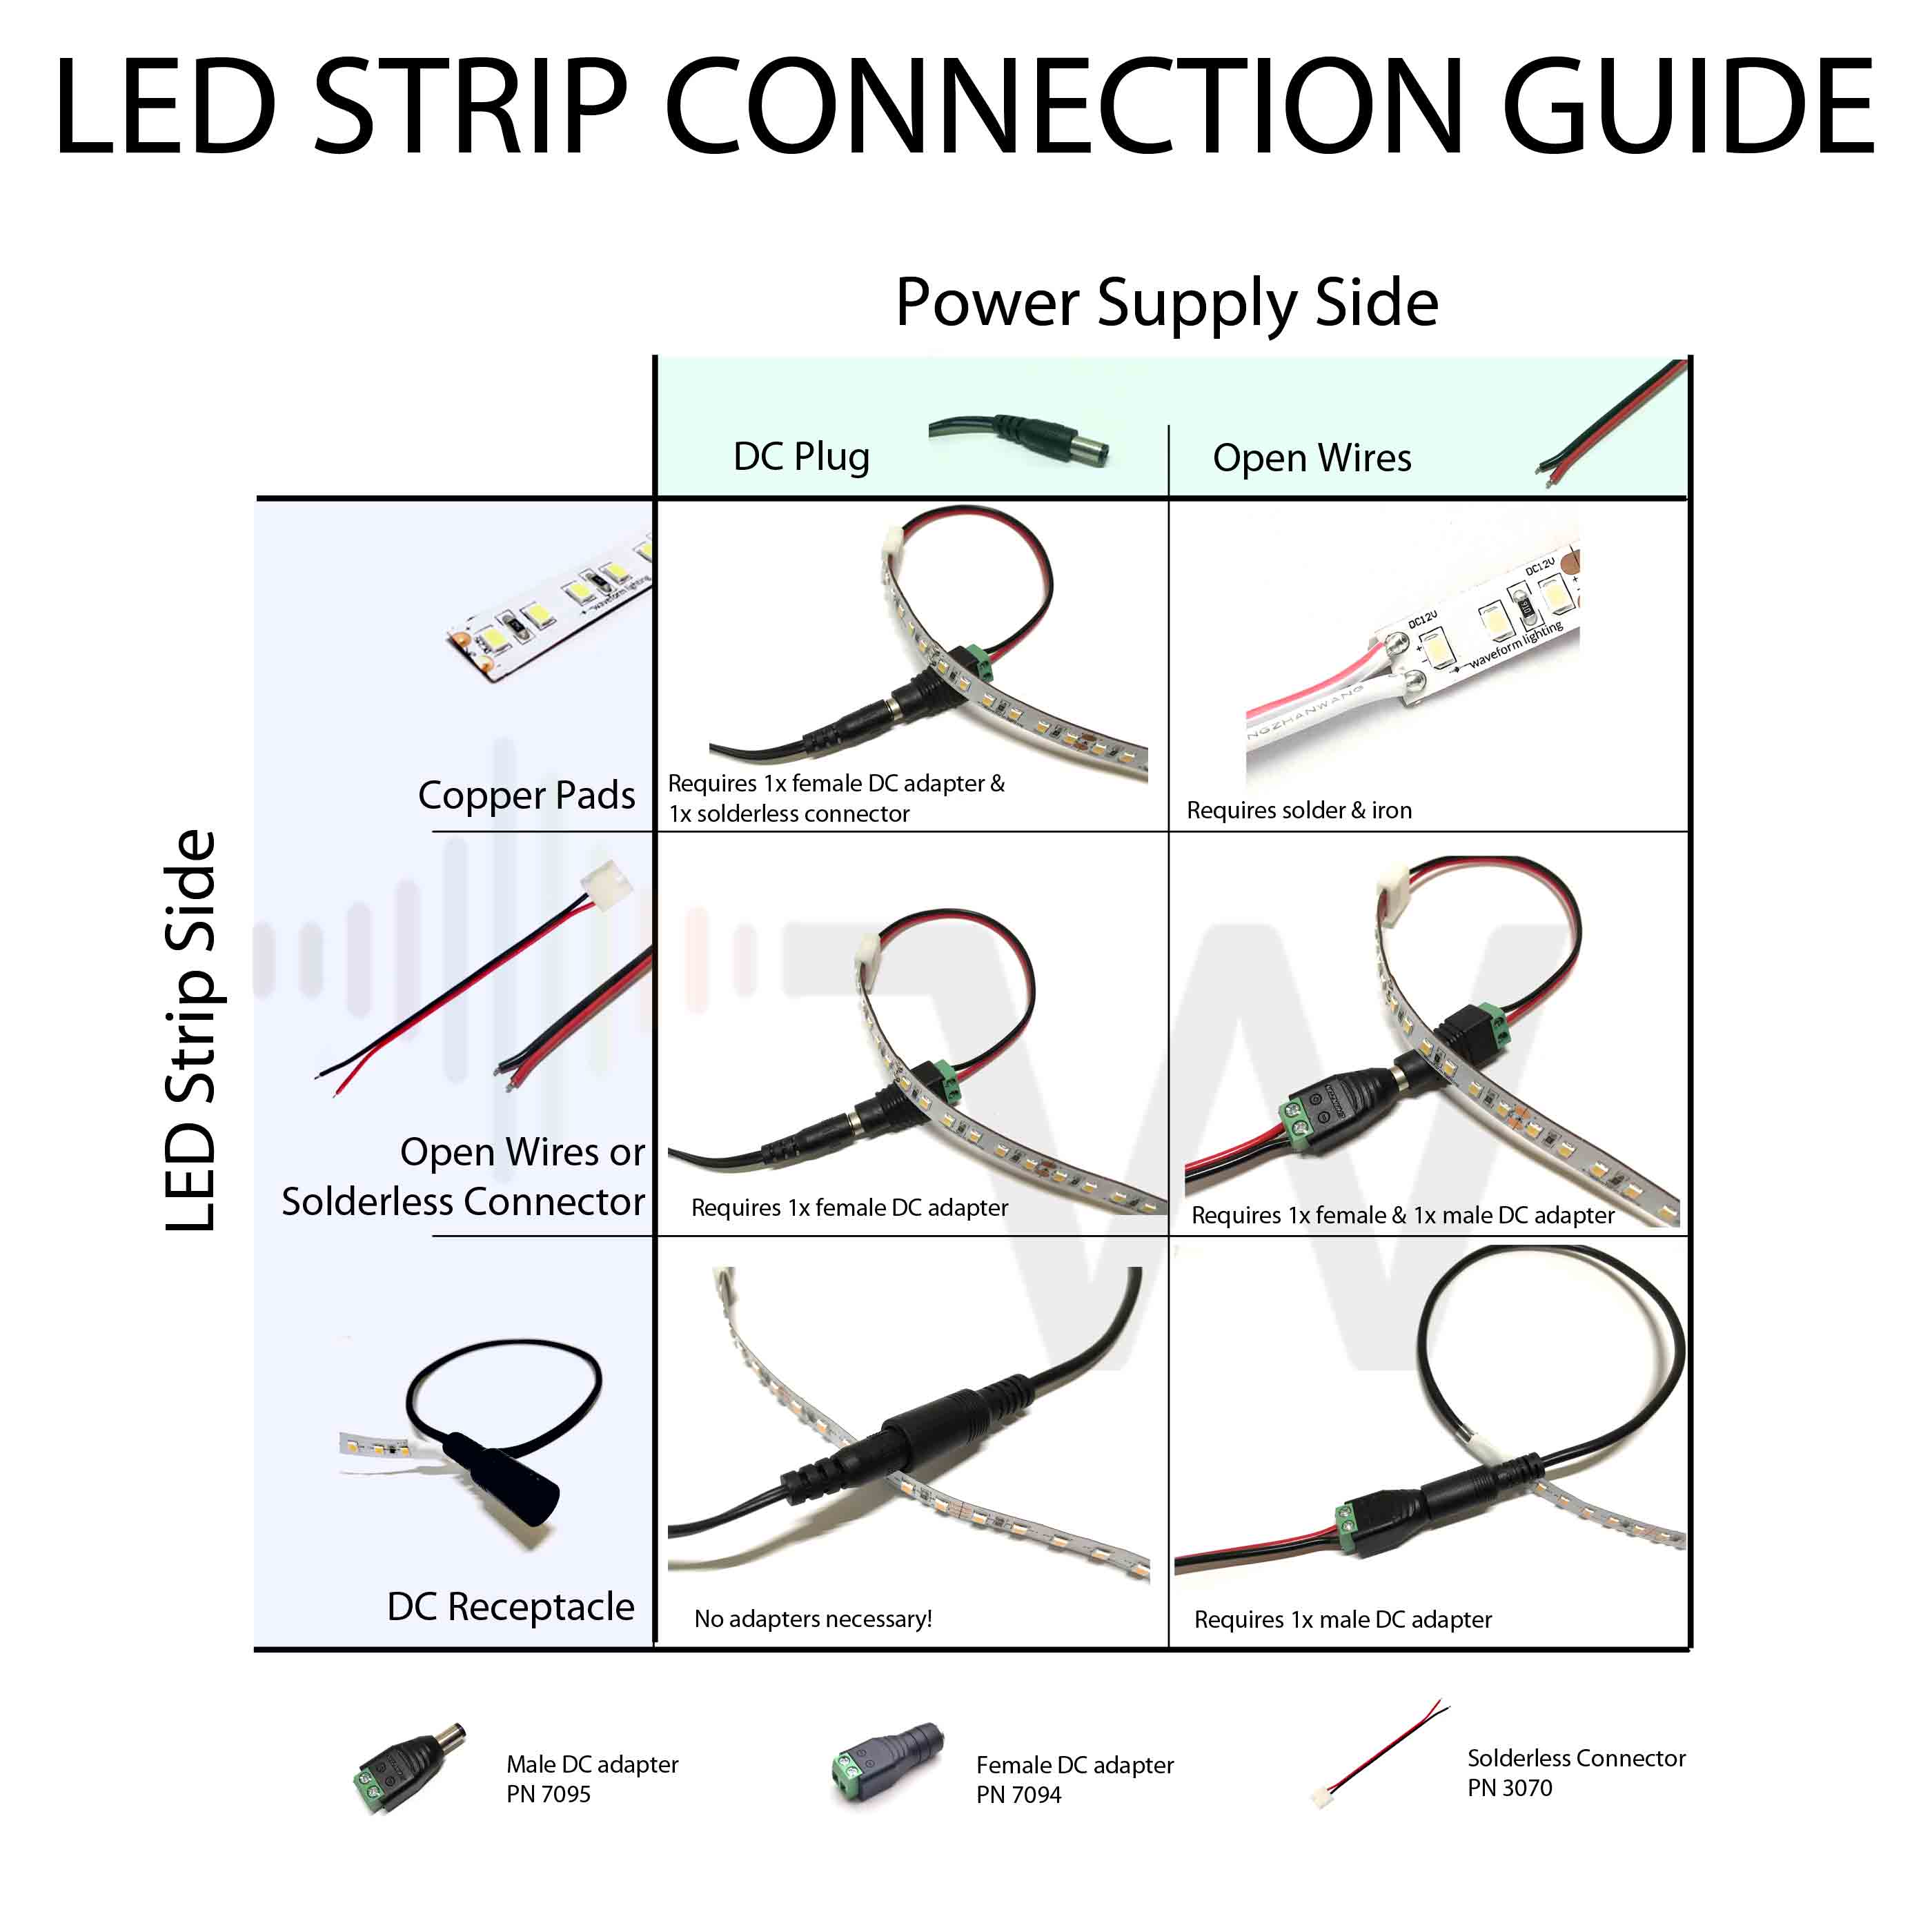
Credit: www.waveformlighting.com
Tools And Materials Needed
Before cutting and connecting LED string lights, gather the right tools and materials. This step makes the process safe and simple. Proper tools help you get clean cuts and secure connections. Using correct materials ensures your lights work well and last long.
Essential Cutting Tools
A sharp pair of wire cutters is key for clean cuts. Use scissors only if they are strong enough for wires. A utility knife helps remove the outer plastic coating carefully. Needle-nose pliers assist in bending and holding wires. A ruler or measuring tape ensures you cut at the right spot.
Connectors And Accessories
Use LED string light connectors to join cut ends safely. Silicone connectors protect the wires from moisture. Twist-on wire connectors or quick splice connectors make connections easy and secure. Electrical tape adds extra safety and keeps connections tight. Heat shrink tubing offers strong insulation around joined wires.
Preparing To Cut Led String Lights
Preparing to cut LED string lights is important for a clean, safe job. Before cutting, you need to understand the string light design and where cutting is allowed. This will help avoid damage and keep the lights working.
Identifying Cut Points
Look closely at the LED string lights. Cut points usually appear as small marks or copper pads. These spots are designed for safe cutting without breaking the circuit. Each segment between cut points has its own power supply. Only cut at these marks to keep the lights functional.
Safety Precautions
Always unplug the lights before cutting. This prevents electric shocks and damage. Use sharp scissors or wire cutters for a clean cut. Avoid cutting wires outside the marked points. Keep your hands dry and work in a well-lit area. These steps protect you and your lights during the process.
Credit: www.novostella.net
Step-by-step Cutting Process
Cutting LED string lights allows you to customize their length for any space. The process is simple but requires care. Follow each step carefully to avoid damage and keep the lights working.
Measuring And Marking
First, decide how long the light string should be. Use a tape measure to get the exact length you want. Find the closest cut point on the string. LED strings have marked cutting spots, usually with a small line or scissors symbol. Mark this spot clearly with a marker or tape. Do not cut between these marks to avoid breaking the circuit.
Making The Cut
Use sharp scissors or wire cutters for a clean cut. Cut exactly on the marked line. Avoid cutting too far from the mark. This keeps the lights functional and safe. After cutting, check the ends for exposed wires. Cover any bare wires with electrical tape or heat shrink tubing. This prevents shorts and keeps your lights safe to use.
Connecting Cut Led Strings
Connecting cut LED string lights lets you customize their length. It also helps repair broken sections. This process is simple with the right tools and steps. Safety is key when working with electrical components. Follow these methods to join your LED strings securely and neatly.
Using Connectors
Connectors are quick and easy for joining cut LED strings. They come in various shapes to fit different LED types. Simply insert the cut ends into the connector slots. Make sure the wires match positive and negative terminals. Press the connector firmly to lock the wires in place. This method avoids soldering and saves time. Check the connection by powering on the lights carefully.
Soldering Wires For Secure Connection
Soldering wires offers a strong and permanent link for LED strings. Strip a small part of the wire insulation first. Twist the exposed wires to prevent fraying. Heat your soldering iron and apply solder to the wire tips. Join the wires by holding them together and melting the solder. Let the solder cool before moving the wires. Use heat shrink tubing to cover and protect the solder joint. This method ensures a reliable electrical connection for long use.
Testing And Troubleshooting
Testing and troubleshooting are key after cutting and connecting LED string lights. This step ensures the lights work safely and correctly. It helps find small problems before they become bigger. Proper testing saves time and money on repairs.
Checking Light Functionality
Plug in the LED string lights to test them. Check if all LEDs light up evenly. Look for any flickering or dim bulbs. Test the connection points where you cut and joined the wires. Use a multimeter to check for electrical flow. Make sure the power supply matches the LED string voltage. Replace any faulty bulbs or wiring parts immediately.
Common Connection Issues
Poor connections cause most LED string light problems. Loose wires or bad solder joints stop electricity flow. Water or moisture can cause short circuits. Polarity matters; LEDs need correct positive and negative connections. Use electrical tape or heat shrink tubing to protect joints. Avoid sharp bends in the wires. Check for damaged insulation that may cause shorts. Fix any issues before final installation.
Creative Diy Projects With Led Strings
LED string lights offer great fun for creative DIY projects. You can cut and connect them to fit your needs. This flexibility makes LED strings perfect for unique decorations and practical uses. Simple tools and a bit of patience help you customize these lights easily.
Decorative Ideas
Use LED strings to brighten up any space. Wrap them around plants or shelves for a warm glow. Create wall art by shaping the lights into words or patterns. Frame mirrors or pictures to make them stand out. Hang them inside jars or bottles for soft lighting. These lights add charm to parties and holidays too.
Practical Applications
LED strings can improve your home’s function. Use cut sections to light up dark closets or drawers. Attach them under cabinets for better kitchen lighting. Place strips along stairs to increase safety. Add lights inside bookshelves to highlight your collection. Small LED segments work well for craft projects and model displays.
Frequently Asked Questions
How Do You Safely Cut Led String Lights?
Use sharp scissors and cut only at designated cutting marks. Ensure the lights are unplugged before cutting to avoid electric shock.
Can Led String Lights Be Connected After Cutting?
Yes, you can connect LED string lights after cutting by using compatible connectors or soldering the wires carefully.
What Tools Are Needed To Cut And Connect Led Lights?
You need scissors, wire strippers, connectors or soldering tools, and electrical tape for cutting and reconnecting LED string lights.
Will Cutting Led String Lights Affect Their Brightness?
Cutting at the correct points won’t affect brightness, but improper cuts may cause sections to stop working or flicker.
Conclusion
Cutting and connecting LED string lights is simple with the right steps. Always measure carefully before you cut. Use proper tools to avoid damage. Connect wires firmly to keep lights working well. Test your lights after connecting each part. Safe handling makes your project last longer.
Enjoy the flexibility to create your own light design. Brighten your space with confidence and ease. Keep these tips in mind for a smooth experience. Your LED string lights can now shine exactly how you want.

