Have you ever wanted to create a warm, magical glow right in your own home? Stringing mini LED lights into a jar is a simple and stunning way to add charm and coziness to any room.
Imagine a soft, twinkling light that instantly transforms your space—without complicated tools or messy wires. In this guide, you’ll discover easy steps to turn an ordinary jar into a beautiful light display that catches everyone’s eye. Ready to brighten up your space with just a few simple moves?
Let’s get started!
Materials Needed
Gathering the right materials is the first step to create a beautiful jar with mini LED lights. Each item plays a key role in making your project safe and stunning. Keep the list simple to avoid confusion and enjoy the process more.
Choosing The Right Jar
Pick a clear glass jar with a wide opening. It helps to place the lights easily inside. Mason jars work great because they are sturdy and stylish. Avoid jars with dark or frosted glass. They block the light and reduce the glow effect.
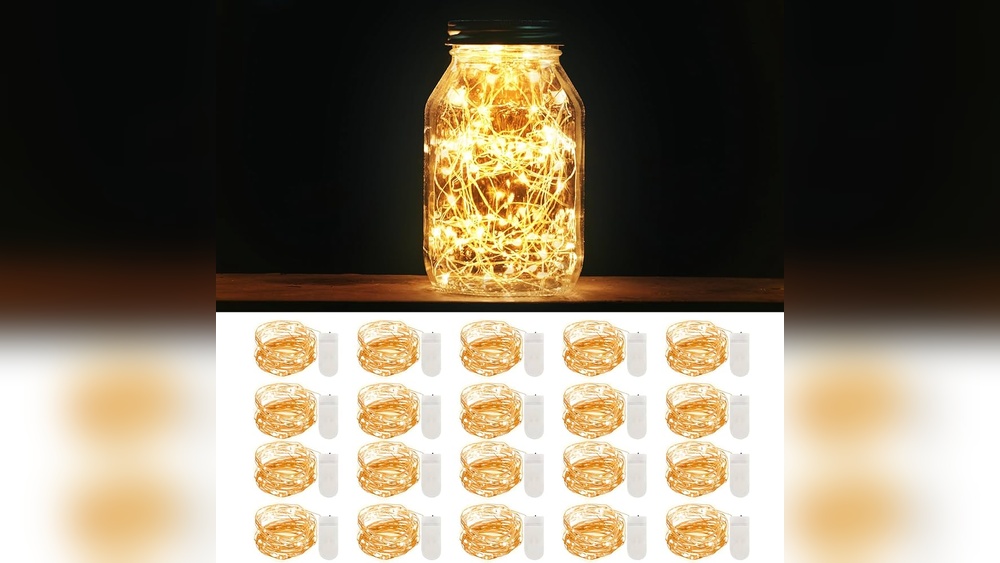
Selecting Mini Led Lights
Choose battery-operated mini LED lights for safety and ease. These lights stay cool and use less power. Copper wire lights are flexible and fit well inside jars. Pick warm white or soft yellow bulbs for a cozy look. Check the length to ensure it fits inside your jar comfortably.
Additional Supplies
Prepare a small screwdriver to open the light battery case. Have batteries ready and fresh for long-lasting glow. A pair of scissors can help trim the wire if needed. Use clear tape to secure the wire inside the jar. A small piece of cloth or paper can hide the battery pack for a neat finish.
Preparing The Jar
Preparing the jar is the first step to create a beautiful mini LED light jar. A clean and dry jar helps the lights shine clearly. It also keeps your project safe and neat.
Adding decorations inside or outside the jar can make your light jar unique. This step is optional but fun for creativity.
Cleaning And Drying
Start by washing the jar with warm water and soap. Remove any labels or glue residue carefully. Use a sponge or cloth to clean all surfaces well.
Rinse the jar thoroughly to remove soap. Dry the jar completely with a soft towel. Make sure no moisture stays inside the jar. Wet jars can cause damage to the lights or create fog inside.
Optional Decorations
Decorate the jar with ribbons, paint, or stickers. Use materials that do not block light from the LEDs. Try adding natural items like dried flowers or small stones.
Place decorations on the outside or inside, based on your style. Avoid heavy items that may break the jar or stop the lights from fitting well.
Arranging The Led Lights
Arranging the LED lights inside the jar is a key step to create a warm and magical glow. How you place the lights affects the look and feel of your project. Take your time to arrange them carefully for the best effect.
Small details matter. The way lights spread out inside the jar can make it look full and bright or sparse and dull.
Testing The Lights
Before placing the lights in the jar, test them to ensure they work. Plug in the battery pack or connect to power. Look closely to see if every LED lights up. Replace any faulty bulbs or fix loose connections. Working lights make the final jar shine beautifully.
Inserting Lights Into The Jar
Gently coil the LED string into a loose bundle. Slowly place the lights inside the jar through the opening. Avoid forcing the lights in to prevent damage. Use a stick or pencil to push lights deeper if needed. Leave the battery pack or switch outside for easy access.
Positioning For Best Glow
Spread the lights evenly inside the jar to avoid dark spots. Arrange some lights near the glass walls for a soft glow. Let other lights gather in the center for brightness. Slightly twist or move the string to fill empty spaces. This balance creates a warm and inviting light effect.

Credit: www.amazon.com
Securing The Setup
Securing your mini LED lights inside a jar is key for a neat and lasting decoration. Proper setup keeps the lights safe and the jar looking good. Small steps can make a big difference in how your project turns out.
Managing Wires
Start by arranging the wires carefully. Tuck excess wire along the jar’s edge. Use small clips or twist ties to hold wires in place. Avoid tight bends to prevent wire damage. Keep wires neat to stop tangling and clutter.
Sealing The Jar Lid
Close the jar lid tightly to protect the lights. Use clear tape or glue around the lid edge. This stops dust and moisture from entering. A sealed lid also keeps wires secure and prevents movement. Check the seal regularly to keep the setup safe.
Creative Variations
Creative variations make stringing mini LED lights into a jar more fun and unique. You can change colors, add decorations, or choose different power options. These small changes create big effects. Let’s explore some ideas.
Using Colored Lights
Colored mini LED lights bring a lively look to your jar. Pick colors that match the season or your room’s style. Red and green work well for holidays. Soft pastels create a calm mood. You can mix colors for a playful touch. Colored lights brighten the jar and draw attention.
Adding Decorative Elements Inside
Decorations inside the jar add charm and personality. Try small fake flowers or glitter for sparkle. Tiny figurines or shells make it interesting. Natural items like pine cones or dried leaves give a rustic feel. Layer these elements with the lights for depth. Your jar becomes a mini art piece.
Battery Vs. Plug-in Options
Choosing power sources affects your jar’s use and look. Battery-operated lights offer flexibility and easy placement. No cords needed means you can move your jar anywhere. Plug-in lights stay bright longer and don’t need battery changes. They work well near outlets or for permanent displays. Decide based on where you want to place your jar.

Credit: www.walmart.com
Safety Tips
Safety is key when stringing mini LED lights into a jar. Small parts and electricity need careful handling. Follow these tips to avoid accidents and keep your project safe.
Handling Electrical Components
Always check the lights before use. Look for frayed wires or broken bulbs. Use dry hands when plugging or unplugging. Keep batteries and plugs away from water. Do not force connections or bend wires sharply. Use insulated tools if needed. Avoid using damaged parts to prevent shocks or shorts.
Avoiding Overheating
Mini LED lights generate little heat but can still get warm. Use low-voltage lights designed for indoor use. Avoid leaving the lights on for long hours. Turn them off when not needed. Place the jar in a well-ventilated area to help cool. Do not cover the jar with fabric or paper. Overheating can cause burns or fire hazards.

Credit: www.lightbulbs.com
Frequently Asked Questions
How Do I Start Stringing Mini Led Lights Into A Jar?
Begin by choosing battery-operated mini LED lights for safety. Remove batteries before inserting lights into the jar. Arrange the lights evenly inside to create a balanced glow.
What Type Of Jar Is Best For Led Light Projects?
Use a clear glass jar without labels or decorations. Mason jars are popular due to their size and clarity. Clean the jar thoroughly to ensure maximum light reflection.
Can I Use Solar-powered Mini Led Lights In Jars?
Yes, solar-powered LED lights work well for jars. Place the jar where sunlight reaches the solar panel. This option is eco-friendly and saves on battery replacement.
How Do I Secure The Led Lights Inside The Jar?
Use adhesive putty or double-sided tape to hold lights in place. Avoid hot glue to prevent damage or melting. Secure wires neatly to avoid clutter inside the jar.
Conclusion
Stringing mini LED lights into a jar adds charm to any space. It creates a soft, warm glow that feels cozy. The process is simple and fun to do. You only need a few materials to start. This small project can brighten up a room quickly.
Try different jars or light colors for variety. It’s a great way to decorate without much effort. Enjoy the beauty of your light-filled jar every day.