Are you ready to upgrade your home security with the Hello Video Doorbell? Installing this smart device might seem tricky, but with the right steps, you can do it yourself quickly and easily.
Imagine seeing who’s at your door from your phone, anytime, anywhere. In this guide, you’ll learn exactly how to install your Hello Video Doorbell without any hassle. Keep reading to make your home safer and smarter today!
Prepare For Installation
Preparing for the installation of your Hello Video Doorbell is the first step. Proper preparation ensures a smooth and quick setup. It helps avoid problems during installation. Follow these simple steps to get ready.
Check Package Contents
Open the box and check all items. Make sure the doorbell, mounting bracket, screws, and anchors are included. Look for the instruction manual and any extra parts. Missing items can delay installation.
Gather Required Tools
Collect tools before you start. You may need a drill, screwdriver, level, and pencil. A ladder might be necessary if you install the doorbell high. Having tools ready saves time and effort.
Review Compatibility
Check if your doorbell works with your home system. Confirm your Wi-Fi signal is strong near the door. Verify your existing doorbell wiring if you plan to use it. Compatibility avoids technical issues later.
Turn Off Power
Turning off the power is a key step before installing your Hello Video Doorbell. It keeps you safe and prevents electric shocks. Always take this step seriously. A small mistake can cause injury or damage to your home’s electrical system.
Locate Circuit Breaker
Find the main circuit breaker panel in your home. It is usually in the basement, garage, or utility room. Open the panel door carefully. Look for the breaker that controls the doorbell or front porch light. Switch this breaker to the OFF position. This stops the electricity flow to the doorbell wiring.
Ensure Safety Measures
Wear insulated gloves if you have them. Use a voltage tester to check the wires. Make sure there is no power before touching any wires. Do not touch wires with wet hands. Keep children and pets away from the work area. Safety first. Always double-check power is off before starting your installation.
Remove Old Doorbell
Removing your old doorbell is the first step to install the Hello Video Doorbell. This step ensures a clean setup area. Also, it helps prevent electrical issues during installation. Take your time and follow each step carefully for safety and success.
Unscrew Existing Doorbell
Locate the screws holding the doorbell to the wall. Use a screwdriver to remove these screws. Keep the screws safe if you plan to reuse them. Gently pull the doorbell off the wall. Avoid pulling too hard to prevent wire damage.
Disconnect Wiring
After removing the doorbell from the wall, find the wires behind it. These wires power your doorbell. Carefully loosen the wire connectors or screws holding the wires. Disconnect each wire one by one. Note which wire goes where for easier installation later.
Credit: lucidco.net
Install Mounting Plate
The mounting plate is a key part of installing your Hello Video Doorbell. It holds the device securely to your wall or door frame. Follow the steps carefully for a strong and stable setup. This will help your doorbell work properly and last longer.
Position The Plate
Start by choosing the right spot for the mounting plate. Place it near your door at a height easy to reach. Make sure the plate is flat against the surface. Check that the doorbell will have a clear view of your entrance. Mark the holes on the wall with a pencil to prepare for drilling.
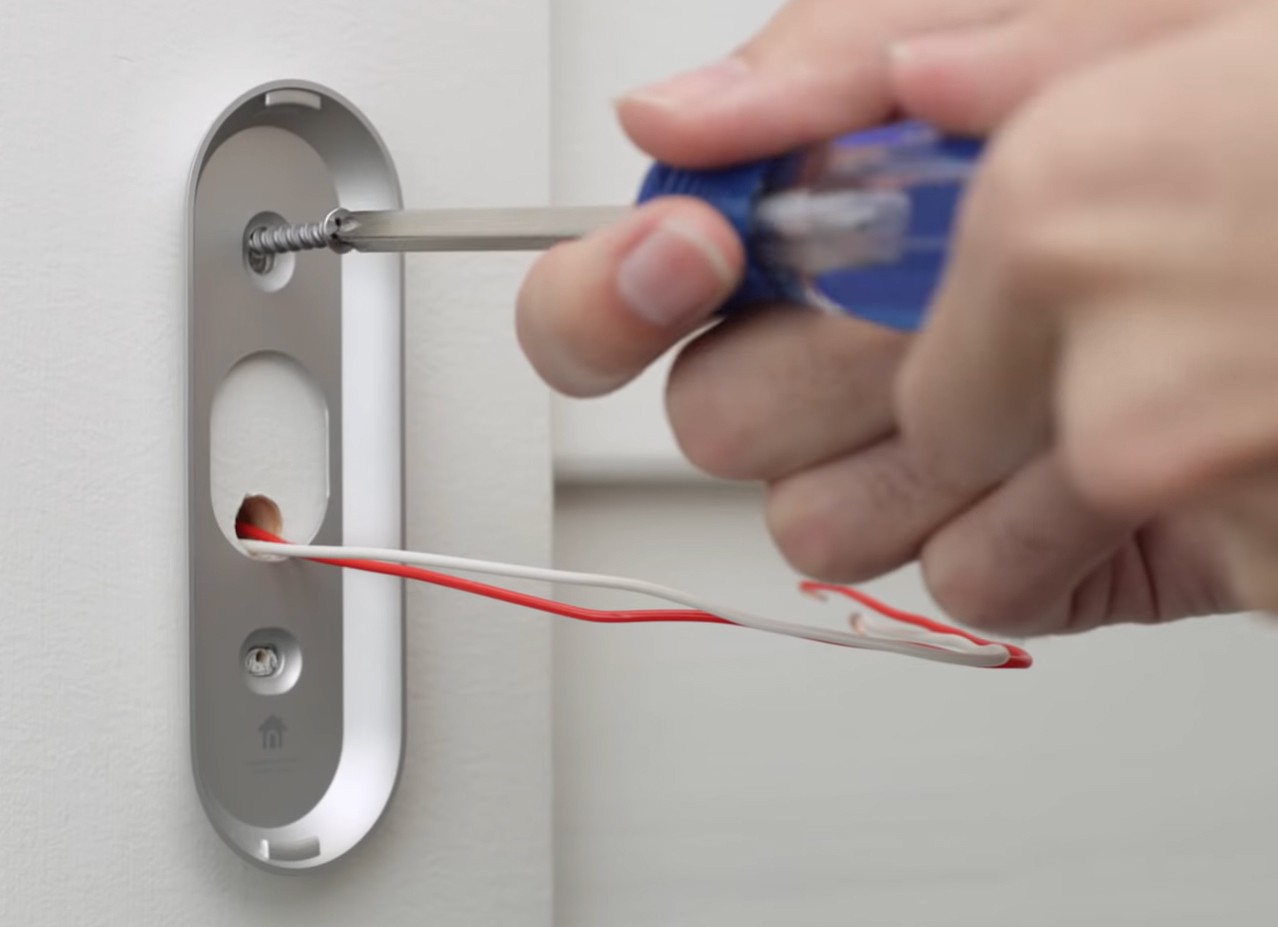
Secure With Screws
Drill holes where you marked the wall. Use the screws that come with your doorbell. Align the mounting plate with the drilled holes. Screw it tightly to keep it firm and stable. Avoid over-tightening to prevent damage to the plate or wall. Once secure, the mounting plate is ready for the doorbell.
Connect Wiring
Connecting the wiring is a key step in installing the Hello Video Doorbell. It links the doorbell to your home’s power supply. Proper wiring ensures the device works smoothly and safely. Take your time to connect the wires correctly. Follow each step carefully to avoid any issues later.
Attach Wires To Terminals
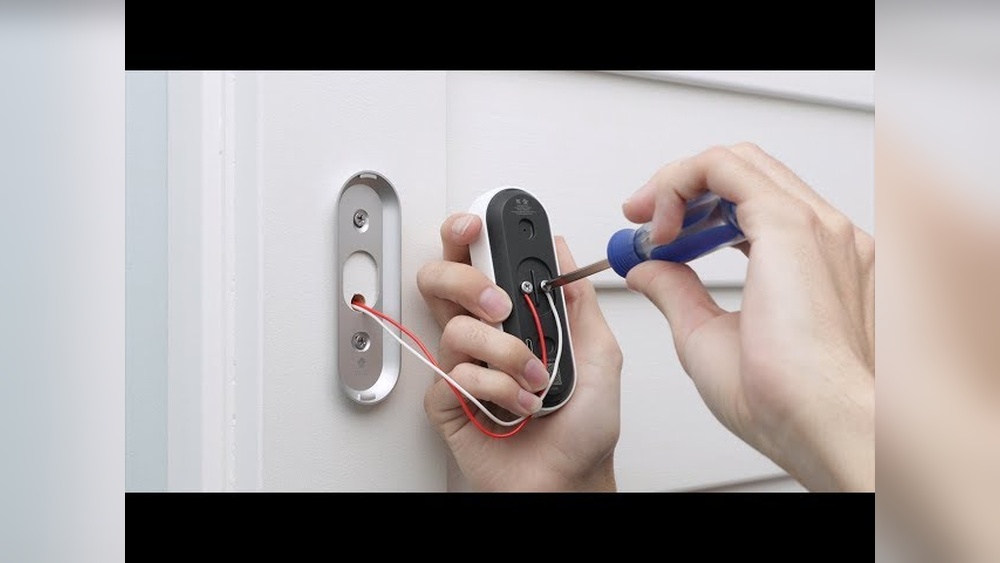
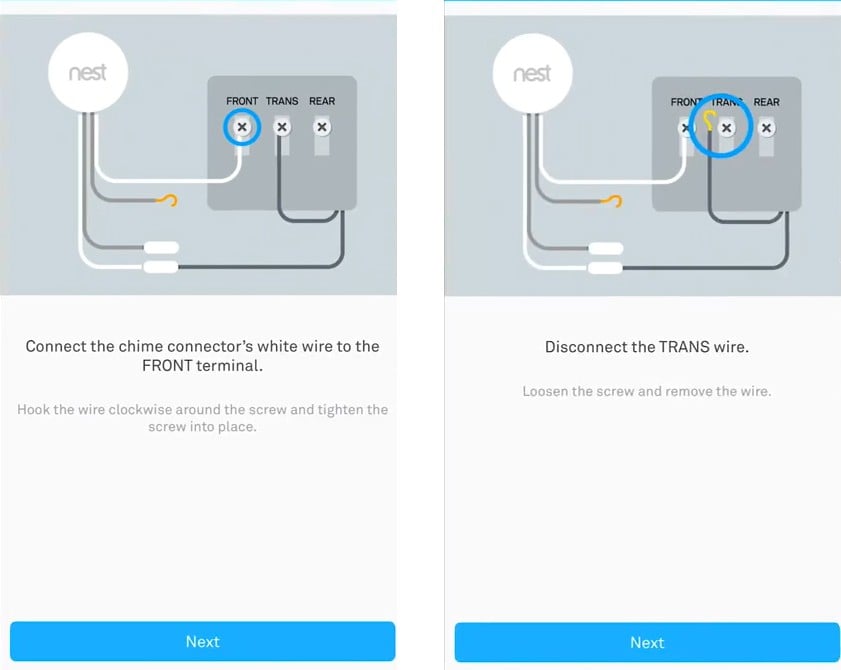
First, identify the wires coming from your wall. Usually, two wires power the doorbell. Match each wire to the correct terminal on the doorbell. Loosen the terminal screws just enough to insert the wire ends. Push the wires under the screws firmly. Tighten the screws to hold the wires in place. Avoid loose or exposed wires to prevent shorts or damage.
Check For Secure Connections
After attaching, gently tug each wire to test security. The wires should stay firmly attached without slipping. Loose wires can cause power loss or device failure. Inspect the terminals for any stray wire strands. Use electrical tape if needed to cover exposed wire ends. Confirm everything is tight and secure before moving on.
Attach Hello Video Doorbell
Attaching the Hello Video Doorbell is the next key step after preparing the mounting plate. This step ensures your doorbell stays secure and works correctly. Proper attachment helps the device stay in place and connect well to power and Wi-Fi. Follow these simple instructions to attach the Hello Video Doorbell easily and safely.
Align With Mounting Plate
Hold the Hello Video Doorbell near the mounting plate. Match the edges of the doorbell with the plate corners. Check that the camera faces outward and the button is at the right height. Take your time to ensure it fits perfectly. Good alignment avoids damage and keeps the doorbell steady.
Snap Or Screw Into Place
After aligning, you can snap the doorbell onto the plate. Press gently but firmly until it clicks. If your model uses screws, insert and tighten them carefully. Use a screwdriver to secure the device. Do not over-tighten to avoid cracking. Your Hello Video Doorbell is now fixed and ready for the next setup step.
Restore Power
Restoring power is a crucial step after installing your Hello Video Doorbell. It ensures the device gets electricity and starts working. Without power, the doorbell cannot function or connect to your home network. Follow these simple steps to safely restore power and check your doorbell.
Turn On Circuit Breaker
Locate the circuit breaker panel in your home. Find the breaker that controls the doorbell’s power. Flip the switch to the ON position. This restores electricity to the doorbell wiring. Wait a few seconds to let the power flow through the system.
Test Doorbell Function
Press the button on your Hello Video Doorbell. Listen for the chime inside your house. Check if the doorbell camera powers up. Make sure the device connects to your Wi-Fi network. This confirms the power is restored and the doorbell works properly.
Set Up The App
Setting up the Hello Video Doorbell app is the first step to start using your new device. The app lets you see visitors, get alerts, and control your doorbell from anywhere. Follow these simple steps to get the app ready on your phone.
Download And Install
Go to the App Store on iPhone or Google Play on Android. Search for “Hello Video Doorbell” in the search bar. Tap the download or install button to get the app on your phone. Wait a few moments for the app to fully install.
Create Account
Open the Hello Video Doorbell app after installation. Tap on “Create Account” or “Sign Up.” Enter your email address and create a strong password. Follow the on-screen instructions to complete your profile. This account will help you manage your doorbell settings securely.
Connect Doorbell To Wi-fi
Make sure your phone is connected to your home Wi-Fi network. In the app, select “Add Device” and choose your Hello Video Doorbell. Follow the prompts to connect the doorbell to the same Wi-Fi network. Wait for the app to confirm the connection before continuing.
Customize Settings
Customizing your Hello Video Doorbell settings helps you get the best experience. Adjust the features to match your needs and daily routine. Personal settings make the doorbell more useful and less annoying.
Focus on notifications, motion detection, and video quality. These settings improve security and convenience. Spend a few minutes to personalize them after installation.
Adjust Notifications
Control how and when you get alerts from the doorbell. Choose to receive notifications on your phone or tablet. Turn off alerts during certain hours to avoid distractions. Set different sounds for visitors or motion alerts. This way, you know what is happening without checking the app all the time.
Set Motion Zones
Motion zones let you pick which areas trigger alerts. Draw zones on the app to focus on your porch or driveway. Ignore areas with frequent, unimportant movement like busy streets. This reduces false alarms and saves your time. Motion zones help catch real visitors or packages only.
Test Video And Audio
Check the video feed to ensure clear images day and night. Adjust brightness and contrast for better view. Test the microphone and speaker to talk with visitors easily. Good audio lets you hear and respond without opening the door. Testing keeps your doorbell ready for every visitor.
Credit: kdfoundation.org
Troubleshooting Tips
Installing the Hello Video Doorbell should be simple. Sometimes, issues happen. These troubleshooting tips help you fix common problems quickly. This way, you can enjoy your doorbell without delays.
Common Installation Issues
Wi-Fi connection problems are the most common. Make sure your signal is strong near the doorbell. Check if the battery is charged or properly installed. Incorrect wiring can stop the doorbell from working. Follow the instructions carefully when connecting wires. The app may not sync with the doorbell at first. Restart the app or your phone if this happens.
Resetting The Device
Resetting the Hello Video Doorbell can solve many issues. Find the reset button on the device. Press and hold it for about 10 seconds. Wait for the light to blink or change color. This means the device is resetting. After reset, set up the doorbell again through the app. This clears old errors and freshens the connection.
Contacting Support
If problems continue, contact Hello Video Doorbell support. Use their official website or app for contact details. Explain your problem clearly and mention what troubleshooting you tried. Support teams can guide you step-by-step. They may offer repairs or replacements if needed. Keep your purchase details ready for faster service.

Credit: www.youtube.com
Frequently Asked Questions
What Tools Do I Need To Install Hello Video Doorbell?
You need a screwdriver, drill, level, and a power tester. These tools help ensure safe and accurate installation.
Can I Install Hello Video Doorbell Without Professional Help?
Yes, the doorbell comes with clear instructions for DIY installation. Basic electrical knowledge is helpful but not mandatory.
How Do I Connect Hello Video Doorbell To Wi-fi?
Use the app to scan the QR code and follow prompts. Ensure your Wi-Fi signal is strong near the doorbell.
Is Hello Video Doorbell Compatible With Existing Doorbell Wiring?
Yes, it works with most standard doorbell wiring. Check the voltage compatibility in the user manual before installation.
Conclusion
Installing the Hello Video Doorbell is simple and quick. Follow each step carefully and take your time. Make sure all wires connect properly for the best results. Test the doorbell to see if it works well. Enjoy better security and convenience at your door.
This small device can make a big difference at home. Keep your family safe with easy video access. Ready to get started? Your new doorbell awaits!