Installing a wired doorbell video can change the way you protect and manage your home. Imagine being able to see who’s at your door without leaving your seat.
It’s not just about convenience—it’s about peace of mind. If you’ve been thinking about upgrading your doorbell, this guide will walk you through every step, making the process simple and stress-free. By the end, you’ll have a clear, secure video doorbell ready to keep your home safer.
Let’s get started and make your front door smarter today.

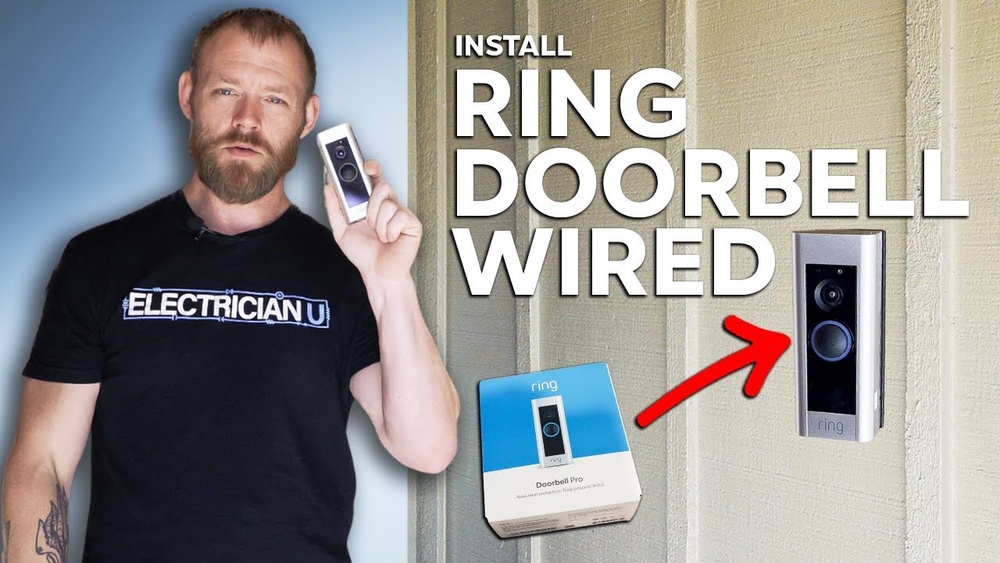
Credit: www.youtube.com
Choosing The Right Wired Doorbell Video
Choosing the right wired doorbell video is important for a smooth installation and use. The perfect doorbell matches your home’s wiring and meets your needs. This section guides you through the main points to consider. It helps you pick a doorbell video that works well and fits your budget.
Key Features To Consider
Look for clear video quality to see visitors well. Night vision is useful for low light conditions. Two-way audio lets you talk to guests from anywhere. Motion detection alerts you to activity outside your door. Easy-to-use apps make managing the doorbell simple.
Compatibility With Existing Wiring
Check your current doorbell wiring before buying. Most wired doorbell videos need a transformer to work. Make sure the voltage and power match your system. Some models require a chime, others work without one. Confirm compatibility to avoid extra costs or work.
Budget And Brand Options
Set a clear budget for your doorbell video. Prices vary based on features and brand reputation. Well-known brands often provide better support and quality. Affordable options exist but may lack some functions. Choose a product that balances cost with your needs.
:strip_icc()/BHG-how-to-install-video-doorbell-6833360-part-01-step-05_30445-c97141832b6541158a12194e97fccded.jpg)
Credit: www.excelcare24.co.uk
Tools And Materials Needed
Installing a wired doorbell video requires specific tools and materials. Having the right items ready makes the process easier and safer. Prepare everything before starting to avoid delays.
Essential Tools
- Drill with bits for making holes in walls
- Screwdriver, both flathead and Phillips
- Wire stripper to remove insulation from wires
- Voltage tester to check electrical current
- Measuring tape for accurate placement
- Level to keep the doorbell straight
Safety Gear
- Insulated gloves to protect from electric shocks
- Safety glasses to guard your eyes
- Dust mask if drilling into walls
- Rubber-soled shoes for better grip
Additional Supplies
- Wired doorbell video kit including camera and chime
- Extra wiring if the existing wires are too short
- Wire connectors or electrical tape
- Mounting screws and anchors
- Sealant to protect outdoor connections
Preparing For Installation
Preparing for the installation of a wired doorbell video is an important first step. It helps ensure safety and smooth setup. Taking time to get ready makes the whole process easier and faster.
This section covers key preparations. It explains how to turn off power safely, find existing doorbell wiring, and plan the placement of the camera and chime. Each step is simple and clear to follow.
Turning Off Power Safely
Always turn off the power before working with electrical wiring. Find the right circuit breaker in your home’s electrical panel. Switch it off to cut power to the doorbell area.
Use a voltage tester to confirm no electricity flows through the wires. This step protects you from shocks and accidents during installation.
Locating Existing Doorbell Wiring
Look for the current doorbell wires near your door. They are usually thin and run from the doorbell button to the chime inside the house. Use a flashlight if needed.
If you do not find any wires, check your home’s blueprint or ask a professional. Knowing the wiring location helps connect the new doorbell video system correctly.
Planning Placement For Camera And Chime
Choose a spot for the doorbell camera that shows your front door clearly. The camera should be at eye level and face visitors directly.
Place the chime inside where you can hear it well. Make sure it is near a power outlet for easy connection.
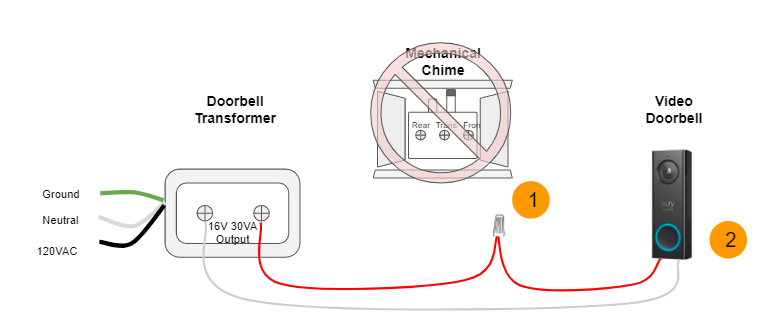
Wiring The Doorbell Video
Wiring the doorbell video is a key step in the installation process. It connects your new device to power and ensures it works properly. Careful wiring keeps the doorbell safe and functional.
This section guides you through removing old parts, connecting wires, and testing the setup. Follow each step to avoid mistakes and enjoy your new doorbell video.
Removing Old Doorbell Components
Start by turning off the power at the breaker. This prevents electric shock. Remove the old doorbell button and chime cover. Use a screwdriver to take out screws carefully. Detach the wires from the old button. Keep the wires straight and untangled. Check that the wires are in good shape. If damaged, trim and strip them for a fresh end.
Connecting The New Doorbell Wires
Match the wires from your wall to the new doorbell terminals. Usually, there are two wires: one for power and one for signal. Attach each wire to the correct terminal. Use the screws on the doorbell to secure wires tightly. Do not let wires touch each other. This can cause a short circuit. If your new doorbell has color-coded wires, follow the instructions carefully.
Securing Connections And Testing
After connecting, use electrical tape to cover exposed wire ends. This adds safety and prevents shorts. Mount the new doorbell on the wall using screws. Turn the power back on at the breaker. Press the doorbell button to test sound and video. Check the live video feed on your phone or monitor. Make sure the doorbell rings clearly without delays. Fix loose connections if the doorbell does not work properly.
Mounting The Doorbell Camera
Mounting the doorbell camera is a key step in your installation process. Proper placement ensures clear video and easy access to the button. This section guides you through choosing the right spot, installing the bracket, and attaching the camera securely.
Choosing The Best Mounting Spot
Select a spot near your front door, about 4 to 5 feet above ground. This height captures faces clearly. Avoid direct sunlight or facing street lights to reduce glare. Make sure the camera view covers the main entry area well. Also, check for a power source nearby for wiring.
Installing The Mounting Bracket
Hold the bracket against the wall at the chosen spot. Use a pencil to mark the screw holes. Drill holes carefully at these marks. Insert wall anchors if mounting on drywall or brick. Secure the bracket with screws, ensuring it feels firm and stable.
Attaching The Doorbell Camera
Align the doorbell camera with the mounting bracket. Slide or snap it into place, depending on your model. Check that it is tightly fixed to avoid movement. Connect the camera wires to the power source as per instructions. Test the camera view before finalizing the installation.
Setting Up The Indoor Chime
Setting up the indoor chime is a key step in installing a wired doorbell video. It alerts you when someone presses the doorbell. The chime needs to be installed in a place where you can hear it clearly. You will also connect it to power and sync it with the doorbell camera. Let’s explore how to do each step correctly.
Installing The Chime Unit
Choose a wall inside your home that is central. Avoid noisy areas where the chime sound may be missed. Mark the spots for mounting holes using the chime unit as a guide. Drill small holes and insert wall anchors if needed. Attach the chime unit securely with screws. Make sure it is level and stable.
Wiring And Powering The Chime
Turn off power at the circuit breaker before handling wires. Connect the chime wires to the doorbell transformer wires. Usually, two wires go into the terminals marked “front” and “trans.” Use wire nuts to secure the connections. Restore power and test if the chime rings. Adjust wiring if the chime does not sound properly.
Syncing With The Doorbell Camera
Follow the doorbell camera’s instruction manual for syncing. Most models require pressing a sync button on the chime and the camera. Wait for the chime to beep or light to flash confirming sync. Test by pressing the doorbell button outside. The chime should ring and the camera should activate. Repeat syncing if needed for a strong connection.
Configuring The Video Doorbell
Configuring your wired video doorbell is the next important step after installation. This ensures the device works smoothly and keeps you connected to your front door. Proper setup lets you see visitors, receive alerts, and control settings easily.
Follow these steps to get your video doorbell ready for daily use. Each step is simple and helps you get the most from your new device.
Connecting To Wi-fi
Start by powering on the video doorbell. Then, access the device’s Wi-Fi setup mode. Usually, the doorbell creates a temporary Wi-Fi network. Use your phone or tablet to join this network.
Open the app or device settings and select your home Wi-Fi network. Enter your Wi-Fi password carefully. Wait for the device to connect. A confirmation message will appear once connected.
Downloading The App
Download the video doorbell app from the App Store or Google Play. Search for the brand or model name to find the correct app. Install it on your smartphone or tablet.
Open the app and create an account if needed. Follow the on-screen instructions to link your doorbell. This app allows you to view the video feed and adjust settings.
Adjusting Settings And Notifications
Inside the app, explore the settings menu. Set your preferred video quality and motion detection zones. Adjust the microphone and speaker volume for clear communication.
Enable notifications to get alerts on your phone. Choose how and when you want to be notified. This keeps you updated on visitors or suspicious activity.
Testing And Troubleshooting
Testing and troubleshooting your wired doorbell video is key after installation. This step ensures your device works correctly and keeps your home safe. Proper checks help catch any problems early. Follow these simple steps to verify everything is running smoothly.
Checking Video And Audio Quality
Start by looking at the video feed on your app or monitor. The picture should be clear and bright. Check for any blurriness or dark spots. Speak near the doorbell and listen to the sound on your device. The audio must be clear and loud enough. Poor video or audio might mean a wiring or camera issue.
Ensuring Doorbell Rings Properly
Press the doorbell button and listen for the chime inside your home. The ring should be loud and distinct. Check all connected chime units. If the bell does not ring, verify the wiring connections at the transformer and doorbell. Use a multimeter to check voltage if needed. Proper power ensures the bell rings every time.
Common Issues And Fixes
Sometimes, the video may freeze or lag. Restart the doorbell and your Wi-Fi router. Loose wires can cause no ring or poor video. Tighten all connections. Low battery or power issues can stop the doorbell from working. Confirm your power source matches the doorbell’s needs. Update the doorbell’s firmware for better performance.
Maintenance Tips
Maintaining your wired doorbell video ensures it works well for a long time. Regular care helps keep the video clear and the system reliable. Small checks and updates prevent bigger problems later.
Regular Cleaning
Clean the doorbell lens often. Dust and dirt can blur the video. Use a soft cloth and gentle cleaner. Avoid harsh chemicals that may damage the lens.
Wipe the button and surrounding area. This stops grime buildup. Keep the sensor clear for best performance.
Firmware Updates
Check for firmware updates regularly. Updates fix bugs and improve security. Visit the manufacturer’s website or app to download updates. Keep your system up to date for smooth operation.
Battery And Power Checks
Inspect the power source frequently. Confirm wires are secure and undamaged. If your doorbell uses a battery backup, test it. Replace batteries as needed to avoid power loss.
Proper power supply ensures your doorbell stays active and responsive.
Credit: vicentetorns.com
Frequently Asked Questions
How Do I Wire A Doorbell Video System?
To wire a doorbell video, connect the doorbell button wires to the transformer and chime. Then, link the video doorbell to the existing wiring, ensuring proper voltage. Follow the manufacturer’s instructions for exact wire connections and safety precautions.
What Tools Are Needed For Installing Wired Video Doorbells?
You will need a drill, screwdriver, wire stripper, voltage tester, and mounting hardware. A ladder may be necessary for high doorframes. Having the right tools ensures a smooth and safe installation process.
Can I Use My Existing Doorbell Wiring?
Yes, most wired video doorbells work with existing doorbell wiring. Check compatibility and voltage requirements before installation. Using existing wiring saves time and avoids additional electrical work.
How Do I Power A Wired Video Doorbell?
A wired video doorbell is powered through your home’s doorbell transformer. Ensure the transformer provides the correct voltage, typically 16-24 volts AC. This setup allows continuous power without needing batteries.
Conclusion
Installing a wired doorbell video can improve your home’s safety. Follow each step carefully for best results. Test the device to ensure it works well. Enjoy seeing visitors from your phone or screen. This simple upgrade adds convenience and peace of mind.
Take your time, and don’t rush the process. Your new doorbell will serve you for years. Stay safe and connected with this easy installation.