
Your safety starts with the right tools, and a wired smoke detector is one of the best ways to protect your home and loved ones. But how do you install it correctly to ensure it works when you need it most?
If you’ve ever felt unsure about handling this important task, you’re not alone. This guide will walk you through each step in simple terms, so you can feel confident and secure. Keep reading, and you’ll learn how to set up your wired smoke detector quickly and safely—because your peace of mind matters.
:max_bytes(150000):strip_icc()/install-hardwired-smoke-detectors-1152329_FINAL-5233cb01c4f34ee1bae5860132624788.png)
Credit: www.thespruce.com
Tools And Materials Needed
Installing a wired smoke detector requires specific tools and materials. Having the right items ready makes the process smoother and safer. Prepare everything before starting the installation.
Basic Tools
You will need a drill to make holes in walls or ceilings. A screwdriver helps secure the detector to the mounting base. Wire strippers are essential for removing insulation from wires.
Electrical Materials
Use electrical tape to cover wire connections safely. Wire nuts join wires without loose ends. A voltage tester checks power and ensures safety before handling wires.
Smoke Detector Kit
The kit should include the smoke detector, mounting bracket, and screws. Follow the manufacturer’s instructions for parts and setup. Choose a detector that fits your home’s wiring system.
Safety Equipment
Wear safety goggles to protect your eyes from debris. Use gloves to avoid cuts and electrical shocks. A ladder may be needed for ceiling installations.
Credit: www.homedepot.com
Choosing The Right Location
Choosing the right location for your wired smoke detector is very important. The right spot helps the detector sense smoke quickly. This can save lives and property by giving early warnings. Poor placement may cause false alarms or delay detection. Take time to pick the best place before installing.
Ideal Placement Tips
Place smoke detectors on the ceiling or high on a wall. Smoke rises, so higher spots catch it first. Install detectors inside each bedroom and outside sleeping areas. Put one on every floor, including the basement. Keep them at least 10 feet away from cooking appliances. Avoid places near windows or vents that can blow smoke away. Make sure detectors are easy to reach for testing and maintenance.
Avoiding Common Mistakes
Do not install detectors in bathrooms or kitchens to avoid false alarms. Avoid placing them near ceiling fans or air ducts. Do not put detectors too close to corners or where the ceiling slopes. Never place detectors near doors or windows that open to the outside. Avoid areas with high humidity, like bathrooms or laundry rooms. Follow manufacturer instructions for the best results.
Turning Off The Power
Turning off the power is a crucial first step before installing a wired smoke detector. It ensures your safety by stopping electricity flow to the area where you will work. This step prevents electric shocks and other accidents.
Always treat electrical work with care. Power should be completely off before handling wires or connections.
Locate The Circuit Breaker Panel
Find the main electrical panel in your home. It is usually in the basement, garage, or utility room. The panel controls power to all rooms and appliances.
Identify The Correct Circuit
Look for the breaker that controls the room where you plan to install the smoke detector. It may be labeled by room or area. If not, test carefully.
Switch Off The Breaker
Flip the breaker switch to the “off” position. This stops electricity from flowing to the wires you will work on. Confirm the power is off before continuing.
Double Check Power Is Off
Use a voltage tester or a small light to check the wires. If no power is detected, it is safe to proceed. Never skip this important safety check.
Removing The Old Detector
Removing the old wired smoke detector is the first step in installing a new one. This process requires care to avoid electrical issues. Safety comes first during removal. Follow clear steps to disconnect and take out the old unit.
Turn Off The Power
Switch off the circuit breaker connected to the smoke detector. This stops electricity flow and prevents shocks. Double-check with a voltage tester to ensure no power is running. Never skip this step.
Detach The Smoke Detector
Gently twist or unscrew the smoke detector from its mounting plate. Hold it firmly to avoid dropping. Some models need a slight push before turning. Keep the mounting plate for the new detector.
Disconnect The Wiring
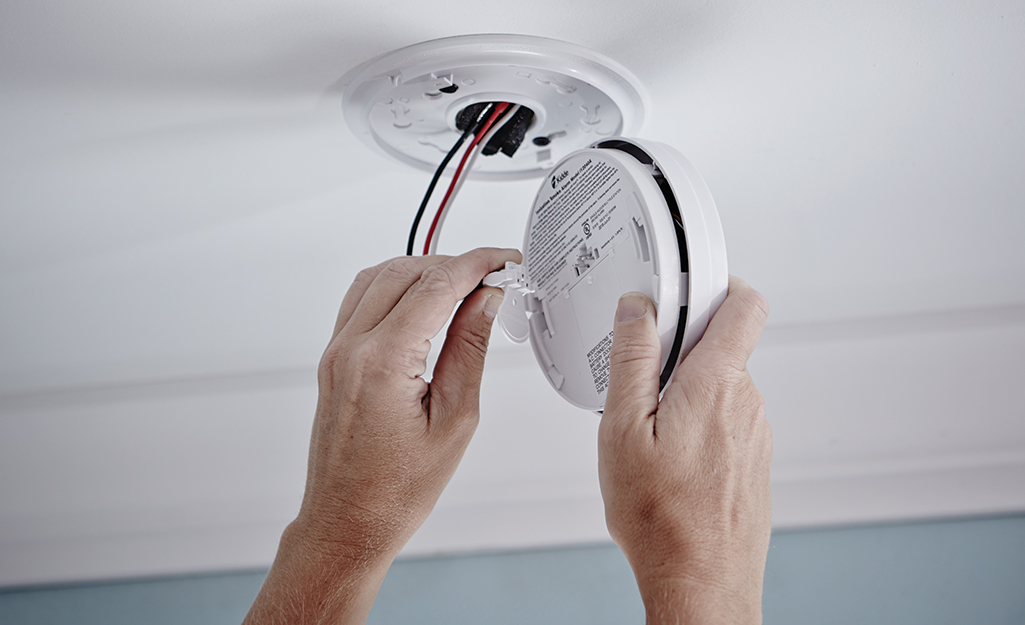
Pull the smoke detector away from the ceiling. Locate the wire connector behind the unit. Press the release tab or unscrew the wire nuts carefully. Separate the wires without pulling hard.
Remove The Mounting Plate
Unscrew the mounting plate from the ceiling. Use a screwdriver that fits the screws well. Keep screws for installing the new plate. Inspect the area for damage or wear before proceeding.
Wiring The New Smoke Detector
Wiring the new smoke detector is a key step in the installation process. It ensures the device works properly and keeps your home safe. This part requires careful handling of electrical wires. The goal is to connect the wires correctly and secure the connections well. Follow these steps for a successful setup.
Connecting The Wires
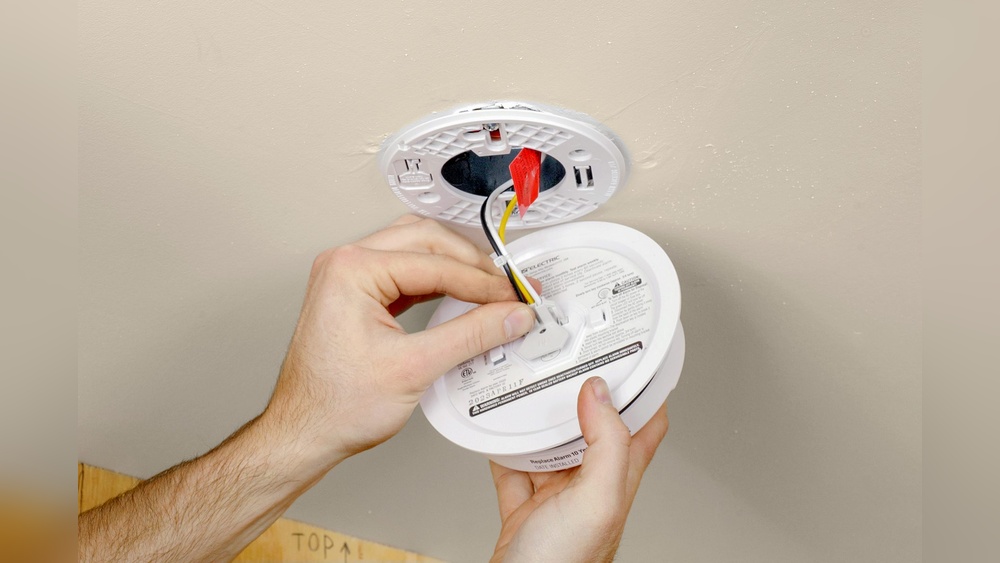
Start by turning off the power at the breaker box. This prevents any electrical shock. Locate the house wiring and the wires from the new smoke detector. Usually, you will find three wires: black (hot), white (neutral), and a red or yellow wire for interconnect. Match each wire from the detector to the same color wire in the house. Twist the wire ends together tightly. Use wire nuts to cover the twisted wires. This protects the connection and stops wires from touching.
Securing The Connections
After connecting the wires, check each wire nut. Make sure they fit snugly and no bare wire shows. Tug gently on the wires to confirm they are secure. Push the connected wires back into the electrical box carefully. Attach the smoke detector base to the box using screws. Do not pinch or strain the wires. Properly securing the connections helps the smoke detector work reliably.
Mounting The Detector
Mounting the wired smoke detector is an important step. It ensures the detector works correctly and stays secure. Proper mounting helps the detector sense smoke early and alert you fast.
Follow the steps carefully. Use the right tools and parts. Make sure the location is suitable for the detector. A good spot is on the ceiling or high on a wall.
Attaching The Base
Start by attaching the base to the ceiling or wall. Use the screws that come with the detector. Mark the holes with a pencil. Drill small pilot holes if needed. This helps screws go in easily and hold tight.
Align the base with the holes. Screw it in firmly but don’t over-tighten. Over-tightening can crack the base or wall. Check that the base is level and stable before moving on.
Installing The Detector Unit
Next, connect the wiring to the detector unit. Match the wires by color or follow the instructions. Push the wires into the slots carefully. Don’t force or bend them too much.
Once wired, attach the detector to the base. Turn or snap it into place until you hear a click. This means it is locked securely. Test the detector by pressing the test button. It should beep loudly if installed correctly.
Testing The Smoke Detector
Testing the smoke detector is a crucial step after installation. It ensures the device works properly to keep your home safe. A tested smoke detector can alert you early during a fire emergency. Follow these steps carefully to verify your wired smoke detector is fully functional.
Powering On
First, restore power to the smoke detector. Turn on the circuit breaker that supplies electricity to the device. The detector should light up or beep briefly, signaling it is receiving power. Check for any error lights or signals. If nothing happens, confirm the wiring connections and power source. Correct power supply is essential for the smoke detector’s operation.
Performing Safety Tests
Press the test button on the smoke detector. Hold it for a few seconds until you hear a loud alarm sound. This test confirms the alarm and battery backup work correctly. Avoid using real smoke for testing to prevent false alarms. Conduct tests monthly to maintain safety. Replace the smoke detector if it fails any test. Regular testing guarantees your detector protects your home effectively.
Maintenance Tips
Maintaining your wired smoke detector is key to keeping your home safe. Regular care ensures it works well when you need it most. Simple steps can extend the life of your smoke detector and avoid false alarms.
Follow these easy maintenance tips to keep your device ready to protect your home and family.
Regular Testing
Test your smoke detector once a month. Press the test button until the alarm sounds loud and clear. This check confirms the device can detect smoke properly. If the alarm does not sound, check the power connection or call an expert.
Battery Replacement
Even wired smoke detectors may have a backup battery. Replace this battery once a year to prevent failure during a power outage. Use the battery type recommended by the manufacturer. Dispose of old batteries safely and keep fresh ones nearby.
:max_bytes(150000):strip_icc()/install-hardwired-smoke-detectors-1152329-08-7adda3e3f25b408ca859f1f792f626e3.jpg)
Credit: www.thespruce.com
Frequently Asked Questions
What Tools Are Needed To Install A Wired Smoke Detector?
You need a screwdriver, wire stripper, drill, voltage tester, and mounting hardware. These tools ensure safe and secure installation. Always turn off power before starting the installation process to avoid electric shock.
How Do I Connect Wires For A Wired Smoke Detector?
Match the wires by color: usually black to black, white to white, and red for interconnection. Use wire nuts to secure connections. Proper wiring ensures the detector functions correctly and communicates with other units.
Where Should I Place Wired Smoke Detectors In My Home?
Install detectors inside bedrooms, outside sleeping areas, and on every home level. Avoid placing them near kitchens or bathrooms to reduce false alarms. Proper placement maximizes safety and early fire detection.
Can I Install A Wired Smoke Detector Myself Safely?
Yes, with basic electrical knowledge and proper safety measures, you can install it yourself. Always turn off power at the breaker and follow manufacturer instructions carefully. If unsure, consult a professional electrician.
Conclusion
Installing a wired smoke detector is a smart step for home safety. Follow each step carefully to avoid mistakes. Test the detector to ensure it works properly. Regular checks keep your system reliable and safe. Proper installation helps protect your family and property.
Stay safe by maintaining your smoke detectors well. Simple actions can save lives and reduce risks. Trust your skills and take your time. Safety starts with small, careful efforts.