
Your home’s safety depends on smoke detectors that work perfectly. But what happens when it’s time to replace those hard wired smoke detectors?
You might feel unsure about where to start or worry about causing damage. Don’t worry—you’re not alone, and replacing them is easier than you think. This guide will walk you through every step, making the process clear and simple. Keep reading, and you’ll gain the confidence to protect your home and loved ones with fresh, reliable smoke detectors.
Tools And Materials Needed
Replacing hard wired smoke detectors requires specific tools and materials. Having the right items ready makes the job safer and easier. This section covers the key tools and materials needed to complete the task.
Essential Tools
You need a screwdriver, usually a flathead or Phillips. A voltage tester helps ensure no live current flows. Wire strippers prepare the wires for new connections. A drill might be necessary for mounting the detector. Keep a ladder nearby to reach ceiling units safely.
Replacement Smoke Detectors
Choose a detector compatible with your existing wiring. Look for models marked as hard wired or AC-powered. Some come with battery backup for extra security. Verify the detector meets safety standards and local codes. Always buy from trusted brands for reliability.
Safety Gear
Wear safety goggles to protect your eyes from dust. Use insulated gloves to avoid electric shock. Ensure your ladder is stable and in good condition. Keep a flashlight handy in case of power outages. Dress in comfortable clothes that cover your arms and legs.
:max_bytes(150000):strip_icc()/install-hardwired-smoke-detectors-1152329_FINAL-5233cb01c4f34ee1bae5860132624788.png)
Credit: www.thespruce.com
Safety Precautions
Safety comes first when replacing hard wired smoke detectors. Taking the right precautions protects you from electric shocks and other risks. Always follow clear steps before starting the replacement.
Turn Off Power
Switch off the power at the circuit breaker. This stops electricity from flowing to the smoke detector. Do not rely on the wall switch alone. Confirm the power is off before touching any wires.
Test For Live Wires
Use a voltage tester to check the wires. Touch each wire carefully with the tester. No light or sound means no electricity. If the tester shows power, turn off the breaker again. Never assume wires are safe without testing.
Removing The Old Detector
Removing the old hard wired smoke detector is the first step in replacement. Safety is key. Turn off the power at the circuit breaker to avoid electric shock. Use a ladder to reach the smoke detector safely. Keep tools nearby for a smooth process.
Detach The Cover
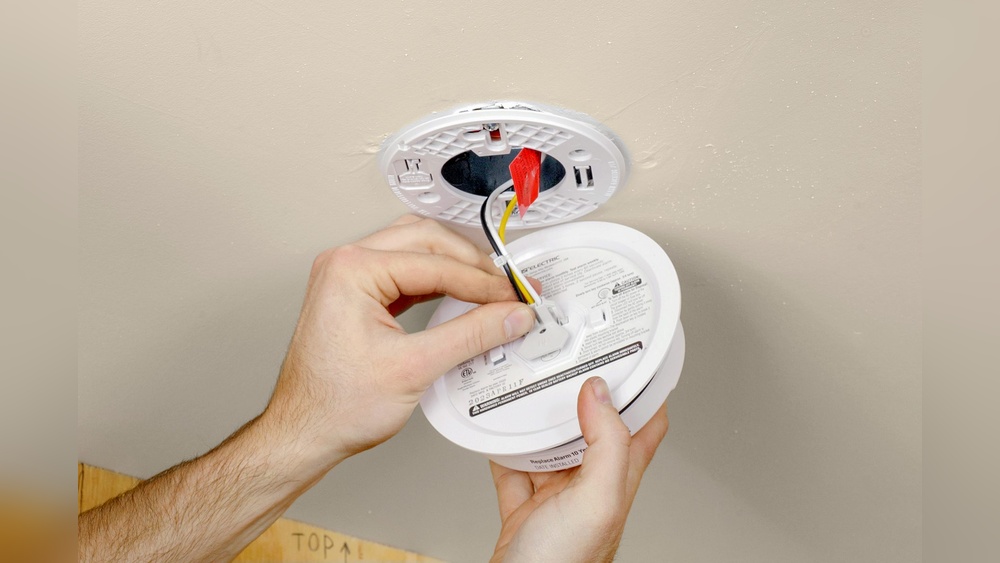
Most smoke detectors have a cover that twists or snaps off. Hold the base firmly. Turn the cover counterclockwise to unlock it. If it snaps, gently pull the cover away from the base. Set the cover aside carefully.
Disconnect Wiring
Inside, you will see wires connected to the detector. They usually have a plug or twist-on connectors. Gently unplug or untwist the wires. Note how the wires connect for the new detector. Use electrical tape to cover exposed wire ends for safety.
Remove Mounting Bracket
The mounting bracket holds the detector on the ceiling or wall. It is often attached with screws. Use a screwdriver to remove these screws. Take down the bracket and keep the screws for the new detector. Clean the area if needed before installing the new unit.
Credit: www.reddit.com
Preparing For The New Detector
Preparing for the new smoke detector is an important step. It ensures a smooth and safe installation process. Taking time to check everything before starting saves trouble later. This preparation helps you avoid common mistakes. Follow these key steps to get ready.
Check Wiring Compatibility
First, examine the existing wiring in your home. Make sure it matches the new detector’s requirements. Most hard-wired detectors use standard wiring, but some models differ. Check the voltage and wire colors carefully. Confirm the wires connect correctly to the new unit. Use a voltage tester to be safe. Turn off power at the circuit breaker before touching wires. This step prevents shocks and accidents.
Install New Mounting Bracket
Remove the old mounting bracket from the ceiling or wall. Clean the area to remove dust and debris. Attach the new bracket supplied with the detector. Use screws or anchors that fit your surface well. Ensure the bracket is level and secure. A loose bracket can cause the detector to fall. Follow the manufacturer’s instructions for proper placement. This step sets a solid base for the detector.
Wiring The New Smoke Detector
Wiring a new hard-wired smoke detector needs care and attention. The connections must be safe and secure. This ensures the detector works properly to protect your home.
Before starting, turn off the power at the circuit breaker. Test the wires with a voltage tester to confirm no electricity flows. Safety first.
Connect Wires Correctly
Match the wires from the smoke detector to the house wiring. Usually, black is the hot wire, white is neutral, and red is for interconnect.
Strip about half an inch of insulation off each wire. Twist the ends to keep strands together. Connect black to black, white to white, and red to red.
Use wire nuts to hold the wires together. Make sure no bare wire shows outside the nut. A loose connection can cause failure or sparks.
Secure Wire Connections
After twisting wires and applying wire nuts, tug gently to check tightness. Wires should not slip or loosen.
Push wires neatly into the electrical box. Avoid sharp bends or pinching. Arrange wires so the detector sits flat against the ceiling or wall.
Finally, attach the smoke detector to the mounting bracket. Screw it firmly, but do not overtighten. Restore power and test the alarm.
Mounting The New Detector
Mounting the new smoke detector is a critical step in ensuring your home stays safe. This process involves securely attaching the device and confirming it works properly. Careful handling and correct placement keep your detector reliable and effective.
Attach Detector To Bracket
Start by aligning the new smoke detector with the mounting bracket. Match the slots or tabs on the detector with those on the bracket. Push the detector gently but firmly until it clicks into place. Make sure it feels secure and does not wobble. A loose detector can cause false alarms or fail to detect smoke.
Test Detector Functionality
After mounting, test the smoke detector to confirm it works. Press the test button on the device. Listen for a loud, clear alarm sound. This sound means the detector is powered and ready. If no sound occurs, check the wiring and power supply. Testing ensures your detector will alert you in an emergency.
Final Safety Checks
Final safety checks are crucial after replacing hard wired smoke detectors. They ensure the device works correctly and keeps your home safe. Skipping these steps can leave your family at risk.
Restore Power
Turn the circuit breaker back on to restore power to the smoke detector. Check the detector’s power light to confirm it has power. Do not skip this step, as the device will not work without electricity.
Conduct Alarm Test
Press the test button on the smoke detector. Hold it for a few seconds until you hear a loud alarm. Test each smoke detector in your home to ensure all are working. Replace batteries if the alarm sounds weak or does not sound at all.
Troubleshooting Common Issues
Troubleshooting hard wired smoke detectors is key to keeping your home safe. Many issues can occur during replacement or normal use. Identifying the problem early saves time and effort. This section covers common problems and easy solutions. Follow these tips to fix your smoke detector quickly.
Detector Won’t Power On
Check the circuit breaker first. A tripped breaker may cut power to the detector. Ensure the smoke detector is properly connected to the wiring. Loose wires cause power loss. Use a voltage tester to confirm the power supply. Replace the backup battery if the detector still won’t turn on. Some models need a new battery after replacement. Make sure the unit is firmly attached to the mounting bracket. A poor connection stops power flow. If none of these work, the detector might be faulty and need replacement.
False Alarms
False alarms happen when the detector senses non-smoke particles. Dust and insects inside the detector trigger false alerts. Clean the detector gently with a vacuum or a soft brush. Avoid spraying cleaners directly on the unit. High humidity or steam can also cause false alarms. Keep detectors away from bathrooms and kitchens. Check for nearby strong chemicals or aerosols. Smoke detectors near these can go off unexpectedly. If false alarms continue, replace the detector with a newer model designed to reduce false alerts.

Credit: www.youtube.com
Frequently Asked Questions
How Do You Safely Disconnect Hard Wired Smoke Detectors?
Turn off the power at the circuit breaker first. Remove the detector from its mounting bracket. Carefully unplug the wiring harness to avoid damage. Always use a voltage tester to confirm power is off before handling wires.
Can I Replace Hard Wired Smoke Detectors Myself?
Yes, if you have basic electrical skills and follow safety guidelines. Always cut power at the breaker before starting. If unsure, hire a licensed electrician to ensure proper installation and code compliance.
What Tools Are Needed To Replace Smoke Detectors?
You’ll need a screwdriver, voltage tester, wire stripper, and possibly wire connectors. These tools help safely remove the old detector and install the new one. Having a ladder is also essential for ceiling-mounted units.
How Do I Test A New Hard Wired Smoke Detector?
Restore power at the breaker after installation. Press the test button on the detector to check its alarm. You can also use smoke test spray to verify sensor functionality. Regular testing ensures your detector works in emergencies.
Conclusion
Replacing hard wired smoke detectors is a simple but important task. Always turn off power before starting. Carefully disconnect old detectors and connect new ones following instructions. Test the new smoke detector to ensure it works. Regular checks keep your home safe from fire risks.
Taking small steps today helps protect your family tomorrow. Safety is worth the effort and time spent. Stay alert and keep your smoke alarms in good shape.