
Is your hardwired smoke detector showing signs of age or malfunction? Replacing it might seem tricky, but you can do it safely and quickly with the right steps.
Your home’s safety depends on having a working smoke detector, so don’t wait until it’s too late. In this guide, you’ll learn exactly how to replace your hardwired smoke detector without stress or confusion. Keep reading to protect your home and loved ones with confidence.
Tools And Materials Needed
Replacing a hardwired smoke detector needs the right tools and materials. These help make the job safe and smooth. Having everything ready saves time and avoids mistakes.
This section lists what you need before starting. Gather these items for a quick and easy replacement.
Basic Tools
- Screwdriver (flathead and Phillips)
- Wire stripper
- Voltage tester
- Drill (optional for new holes)
- Ladder or step stool
Materials For Replacement
- New hardwired smoke detector
- Wire nuts
- Electrical tape
- Mounting bracket (often included with detector)
Safety Gear
- Insulated gloves
- Safety glasses
- Dust mask (for old dust and debris)
Safety Precautions
Replacing a hardwired smoke detector requires careful attention to safety. Electricity and wiring pose risks during this task. Taking proper safety steps protects you and your home. Follow these precautions before starting the replacement process.
Turn Off The Power
Switch off the circuit breaker that controls the smoke detector. Confirm the power is off using a voltage tester. Never work on live electrical wires. This step prevents electric shock or injury.
Use A Ladder Safely
Choose a stable ladder that reaches the smoke detector easily. Place the ladder on a flat, solid surface. Avoid overreaching or leaning while on the ladder. Keep three points of contact for balance.
Handle Wiring Carefully
Do not pull or tug on wires. Gently disconnect the wires from the old detector. Label wires if needed for correct reconnection. Use wire nuts to secure connections safely.
Wear Protective Gear
Wear safety goggles to protect your eyes from dust. Use insulated gloves to prevent electrical shocks. Avoid loose clothing that could catch on fixtures.
Turning Off Power
Turning off the power is the first step to safely replace a hardwired smoke detector. This step stops electricity from flowing to the smoke detector. It prevents electric shock and protects the wiring during the replacement process.
Always treat electrical work with care. Even a small mistake can cause injury. Turning off power is simple but very important. Follow these steps carefully for safety.
Locate The Circuit Breaker Panel
Find the main circuit breaker panel in your home. It is usually in a basement, garage, or utility room. The panel holds switches that control electricity to different parts of your house.
Identify The Correct Breaker
Look for the breaker that powers the smoke detector. It might be labeled as “smoke detector” or “fire alarm.” If not labeled, check the breaker that controls the room where the detector is installed.
Switch Off The Breaker
Flip the breaker switch to the “off” position. This stops electricity from reaching the smoke detector. Use a flashlight if the room becomes dark after switching off power.
Test For Power
Use a voltage tester or a non-contact voltage detector near the smoke detector’s wires. Make sure there is no electrical current. Confirming power is off keeps you safe during replacement.
Credit: www.reddit.com
Removing The Old Detector
Start by turning off the power at the circuit breaker to avoid shocks. Gently twist and pull the old detector from its mounting bracket. Carefully disconnect the wiring, noting how it is connected for the new installation.
Turn Off The Power
Safety is the top priority. Locate your home’s circuit breaker panel. Switch off the breaker that powers the smoke detector. Double-check by pressing the test button on the detector. It should not beep. This step stops electric shock risks during removal.
Remove The Detector From The Ceiling
Most hardwired smoke detectors twist off from their mounting bracket. Grip the base firmly and turn it counterclockwise. Pull the unit gently away from the ceiling. Some models may have clips or screws. Use a screwdriver if needed to release the detector.
Disconnect The Wiring Harness
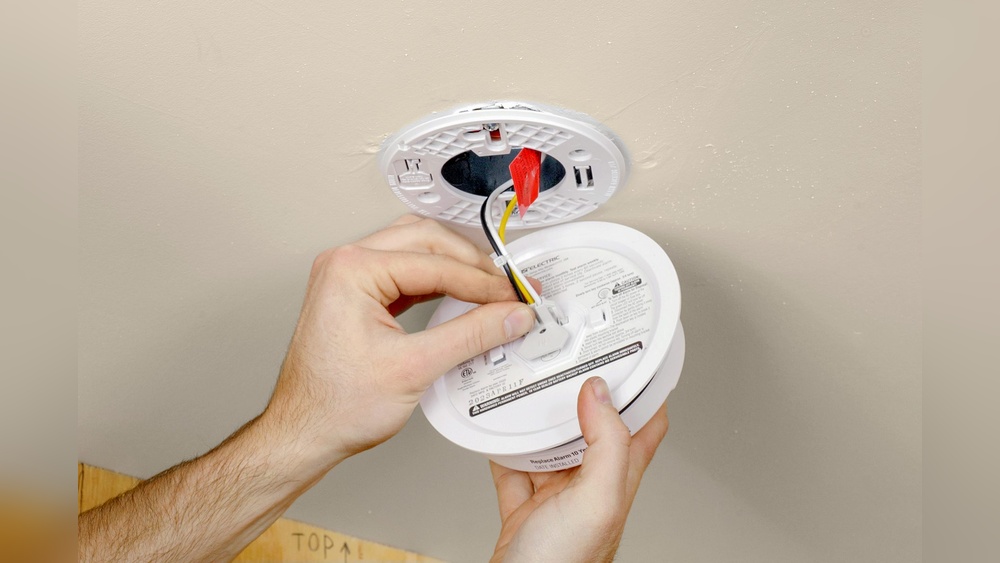
Look at the back of the detector. You will find a small wiring connector. Press the release tab or pull apart the connector carefully. Avoid pulling on the wires directly. Set the old detector aside once wires are detached.
Inspect The Wiring And Mounting Plate
Check wires for any damage or fraying. Make sure the mounting plate is clean and intact. Remove any debris or dust. This prepares the area for the new detector. Repair or replace any damaged parts before installing the new unit.
Disconnecting Wiring
Disconnecting the wiring is a key step in replacing a hardwired smoke detector. Safety must come first. Power must be off before touching any wires. This prevents electric shock and damage to the system.
Prepare your tools and follow clear steps. Careful handling of wires keeps everything intact for the new detector.
Turn Off Power At The Circuit Breaker
Locate the circuit breaker for your smoke detector. Switch it off to cut power to the device. Double-check by testing the detector light or using a voltage tester. This step ensures no electricity flows to the wiring.
Remove The Smoke Detector Base
Twist or unscrew the smoke detector base from the ceiling or wall. Gently pull it down to expose the wiring. Avoid yanking or pulling hard to stop wire damage.
Identify And Label Wires
Look closely at the wires connected to the detector. Usually, you will see black, white, and sometimes red wires. Use tape and a marker to label each wire. This helps connect them correctly later.
Disconnect The Wires Safely
Carefully unscrew wire nuts or connectors joining the wires. Separate the detector wires from the house wires. Keep the house wires apart and secure them with wire nuts. This prevents accidental contact or short circuits.
:max_bytes(150000):strip_icc()/install-hardwired-smoke-detectors-1152329_FINAL-5233cb01c4f34ee1bae5860132624788.png)
Credit: www.thespruce.com
Preparing The New Detector
Preparing the new smoke detector is a key step in the replacement process. Proper preparation ensures your new device works safely and correctly. Take time to check all parts and understand the installation needs.
Start by unpacking the new detector carefully. Inspect it for any damage or missing parts. A complete and intact detector makes installation easier and safer.
Check The Compatibility
Verify that the new detector fits your home’s wiring system. Most hardwired smoke detectors require a 120-volt connection. Ensure the model matches your existing setup to avoid installation issues.
Read The Manufacturer’s Instructions
Every smoke detector comes with a manual. Read it fully to understand installation steps and safety tips. Follow these instructions closely for the best results.
Test The Battery Backup
Many hardwired detectors have a battery backup. Insert fresh batteries and test the backup feature before installation. This step adds extra safety during power outages.
Prepare The Mounting Plate
Attach the mounting plate to the new detector as shown in the instructions. This plate will secure the device to the ceiling or wall. Make sure it fits snugly for stable mounting.
Connecting The Wires
Connecting the wires is a key step in replacing a hardwired smoke detector. Proper wiring ensures the smoke detector works correctly and safely. This step requires careful attention and some basic tools.
Turn off the power at the circuit breaker before touching any wires. Use a voltage tester to confirm no electricity flows to the wires. Safety first.
Identify The Wires
Most hardwired smoke detectors have three wires: black, white, and red. The black wire is the hot wire. The white wire is the neutral wire. The red wire connects to other detectors in the system. Make sure you know which wire is which before proceeding.
Connect The Wires To The New Detector
Match the black wire from the ceiling to the black wire on the detector. Connect the white wire to the white wire on the detector. Attach the red wire to the red wire on the detector. Use wire nuts to secure the connections tightly.
Secure The Wire Connections
After twisting the wires together, screw on the wire nuts firmly. Tug gently on each wire to check the connection is secure. Wrap electrical tape around the wire nuts and wires for extra safety. This prevents loose connections and sparks.
Mounting The New Detector
Mounting the new smoke detector is a key step in ensuring your home stays safe. A proper mount keeps the device secure and working well. Follow clear steps to place the detector correctly on your ceiling or wall.
Prepare The Mounting Plate
Start by attaching the mounting plate to the ceiling or wall. Use screws that fit your home’s surface. Align the plate so the detector will sit flat and stable.
Connect The Wires
Match the wires from the smoke detector to the house wires. Usually, black connects to black, white to white, and the red wire links alarms. Twist the wires together and cover with wire nuts for safety.
Attach The Smoke Detector
Push the detector onto the mounting plate. Turn it clockwise until it locks in place. Check that it is secure and does not wobble.
Test The Detector
Press the test button to check the alarm sound. A loud beep means it is working. If no sound, recheck the wires and mount.
Restoring Power And Testing
Restoring power and testing your new hardwired smoke detector is a crucial final step. It confirms the device works properly and keeps your home safe. Follow simple steps carefully to avoid any issues.
Restore Power To The Smoke Detector Circuit
First, turn the circuit breaker back on. This supplies electricity to the smoke detector. Check that the power switch in your electrical panel is in the ON position. Doing this reactivates the system immediately.
Test The Smoke Detector Sound
Press the test button on the detector. Hold it for a few seconds. Listen for a loud, clear alarm sound. This sound means the detector is working well. No sound means a problem needs fixing.
Check The Detector’s Indicator Lights
Look at the smoke detector’s LED lights. A green or red light usually shows the device is active. No light can mean no power or a defect. Make sure the lights behave as the manual describes.
Test Interconnected Smoke Detectors
Press the test button on one detector if you have many. All other detectors should sound the alarm. This check ensures the network is connected. It helps keep your whole house safe.
Clean Up And Final Inspection
After testing, clear any dust or tools from the area. Inspect the detector mount and wiring for tightness. Make sure the detector is firmly attached. A secure device performs better and lasts longer.

Credit: www.youtube.com
Troubleshooting Common Issues
Common problems with hardwired smoke detectors include power issues and false alarms. Checking the wiring and battery backup often solves these problems. Replacing the detector carefully ensures safety and proper function.
Replacing a hardwired smoke detector can sometimes bring up issues. Knowing how to fix common problems saves time and stress. This section covers simple checks and quick fixes. These tips help ensure your new smoke detector works properly and keeps your home safe.
Smoke Detector Won’t Power On
Check the circuit breaker first. It may have tripped during the replacement. Make sure the wiring connects firmly to the detector terminals. Loose wires prevent power flow. Also, test the backup battery. A dead battery can stop the detector from turning on.
Detector Keeps Beeping Or Chirping
Continuous beeping often means low battery power. Replace the backup battery with a fresh one. Clean the detector’s sensor with a soft brush or vacuum. Dust can cause false alarms. Ensure the detector is mounted on a stable surface. Vibration can trigger beeps.
Detector Fails The Test Button
Press the test button firmly and hold it for a few seconds. No sound means a wiring or unit issue. Double-check all electrical connections. If wiring is correct, replace the smoke detector. Faulty units do not respond to tests and need changing.
False Alarms Occur Frequently
Keep the detector away from kitchens and bathrooms. Steam and cooking smoke can cause false alarms. Clean the detector regularly to remove dust and insects. Adjust the detector’s sensitivity if possible. Proper placement and maintenance reduce false alarms.
Frequently Asked Questions
How Do I Safely Replace A Hardwired Smoke Detector?
Turn off power at the circuit breaker. Remove the old detector carefully. Disconnect wires and connect the new detector. Restore power and test the new unit to ensure proper function.
What Tools Do I Need For Replacing Smoke Detectors?
You will need a screwdriver, wire strippers, electrical tape, and a voltage tester. These tools help safely remove and install the new smoke detector.
Can I Replace Hardwired Smoke Detectors Myself?
Yes, if you have basic electrical knowledge and follow safety steps. Always turn off the power and handle wiring carefully. If unsure, consult a professional electrician.
How Often Should I Replace Hardwired Smoke Detectors?
Replace smoke detectors every 10 years or if they malfunction. Regularly test alarms monthly and replace batteries annually to ensure reliability.
Conclusion
Replacing a hardwired smoke detector keeps your home safe and secure. Follow the steps carefully to avoid mistakes. Always turn off power before starting any work. Test the new detector to make sure it works well. Regular checks help keep your safety devices ready.
A simple task that protects your family every day. Stay alert and keep your home protected. Safety first, always.