Are you ready to give your bathroom a simple, stylish upgrade? Installing an Ikea towel rack might seem tricky, but with the right steps, you can do it yourself quickly and easily.
Imagine having your towels organized and within reach, adding both function and charm to your space. In this guide, you’ll discover exactly how to install your Ikea towel rack without any hassle. Keep reading, and by the end, you’ll feel confident to tackle this project on your own—no special tools or skills needed.
Let’s get started!
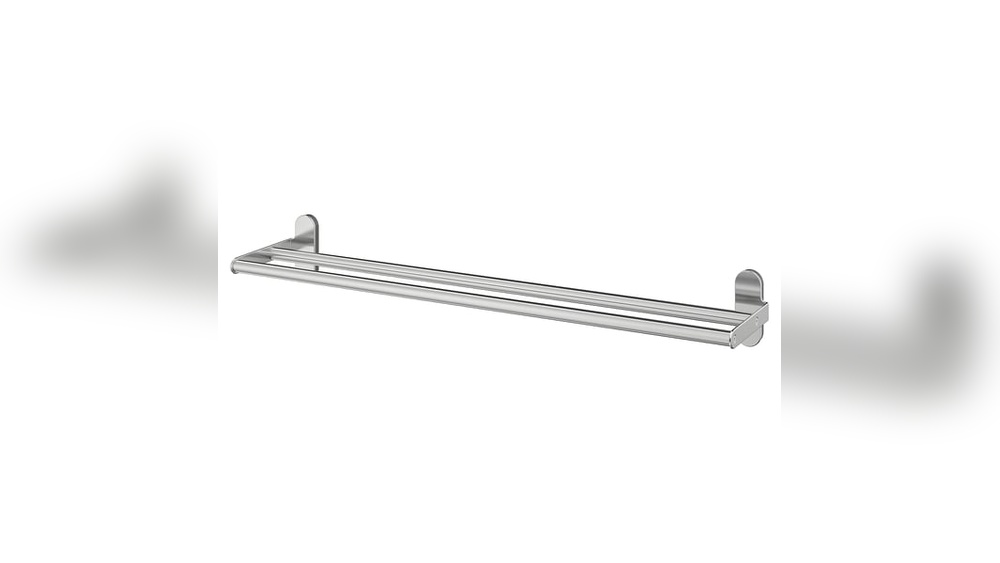
Choosing The Right Towel Rack
Choosing the right towel rack is important for a neat and functional bathroom. It affects how your towels dry and how your space looks. This guide helps you pick the best towel rack for your needs.
Measuring Your Space
Start by measuring the wall space where you want to install the towel rack. Use a tape measure to find the width and height available. Leave some extra space around the rack for easy towel hanging. Check for any obstacles like light switches or vents. Accurate measurements prevent buying a rack that is too big or too small.
Selecting The Style
Choose a style that fits your bathroom’s design. Simple bars suit modern bathrooms. Ladder racks add a stylish touch. Ring racks work well in small spaces. Consider how many towels you need to hang. Think about using racks with shelves for extra storage. Pick a style that matches your daily use and room size.
Considering Material And Finish
Look for materials that resist water and rust. Stainless steel and aluminum last long in wet areas. Wood adds warmth but needs sealing. Plastic is budget-friendly and easy to clean. Match the finish with your bathroom fixtures. Chrome, brushed nickel, or matte black are popular choices. Choose a finish that stays clean and looks good over time.
Gathering Necessary Tools
Before installing your Ikea towel rack, gather all necessary tools. Having the right tools makes the job easier and faster. It helps avoid mistakes and keeps you safe. Prepare your workspace and check each tool carefully.
Basic Tools Checklist
Start with these basic tools:
- Drill with drill bits
- Screwdriver (flathead and Phillips)
- Measuring tape
- Level
- Pencil for marking
- Wall anchors and screws (usually in the Ikea package)
These tools are essential for most towel rack installations. They help you measure, mark, and secure the rack properly.
Optional Tools For Ease
Optional tools can make the job smoother:
- Stud finder for locating wall studs
- Power screwdriver to save effort
- Masking tape for marking drill points
- Rubber mallet for gentle adjustments
- Protective gloves to keep hands safe
These tools are not required but improve accuracy and comfort during installation.
Preparing The Installation Area
Preparing the installation area is a key step before mounting your Ikea towel rack. This step ensures the rack is secure and looks neat. Proper preparation saves time and prevents damage to your walls.
Focus on cleaning the wall surface and finding the right spots for mounting. These tasks create a strong base for your towel rack. Let’s explore these steps in detail.
Cleaning The Wall Surface
Start by wiping the wall where you will install the towel rack. Use a damp cloth to remove dust and dirt. Clean surfaces help the rack stick better if you use adhesive parts.
Let the wall dry completely before moving to the next step. A clean, dry wall prevents slipping and ensures a secure fit.
Locating Studs Or Using Anchors
Find studs behind the wall for a stronger hold. Use a stud finder or tap the wall to listen for a solid sound. Mark the stud locations lightly with a pencil.
If studs are not in the right spots, use wall anchors. Anchors support the towel rack in drywall or plaster. Choose anchors that match the weight of your towel rack.
Mark where you will drill holes. Correct placement keeps the rack steady and safe.
Credit: www.ikeaddict.com
Marking Mounting Points
Marking mounting points is a vital step in installing your Ikea towel rack. It ensures the rack stays secure and straight on the wall. Careful marking prevents mistakes and saves time later. Take your time to get this step right for a neat finish.
Using A Level For Accuracy
Start by placing a level on the wall where you want the towel rack. Adjust the level until the bubble is centered. This shows the line is perfectly horizontal. Mark light pencil dots along the level’s edge. These marks will guide your mounting points. A level keeps the rack from tilting sideways.
Measuring And Marking Correctly
Measure the distance between the rack’s mounting holes. Use a tape measure for exact numbers. Transfer these measurements onto the wall using the level marks as a base. Mark the points clearly with a pencil. Double-check measurements before drilling holes. Accurate marks lead to secure, well-balanced installation.
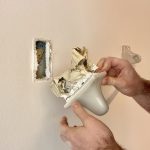
Drilling And Fixing Supports
Drilling and fixing supports is a key step in installing your Ikea towel rack. This step ensures the rack stays strong and safe on your wall. Doing it right makes your towel rack last longer and hold towels securely. Follow these steps carefully to avoid damage to your wall or the rack.
Choosing The Right Drill Bit
Select a drill bit that matches your wall type. For drywall, use a bit for soft materials. For concrete or brick, choose a masonry bit. The drill bit size should fit the wall anchor diameter. Using the wrong size can cause loose or weak support.
Installing Wall Anchors
Wall anchors hold the towel rack firmly. Mark the holes on the wall before drilling. Drill holes that match the anchor size exactly. Gently tap the anchors into the holes with a hammer. Make sure anchors sit flush with the wall surface.
Securing The Mounting Brackets
Place the mounting brackets on the anchors. Insert screws through the bracket holes into the anchors. Tighten screws with a screwdriver until the brackets feel tight. Check that brackets do not wiggle or move. Properly secured brackets provide a strong base for your towel rack.

Credit: www.youtube.com
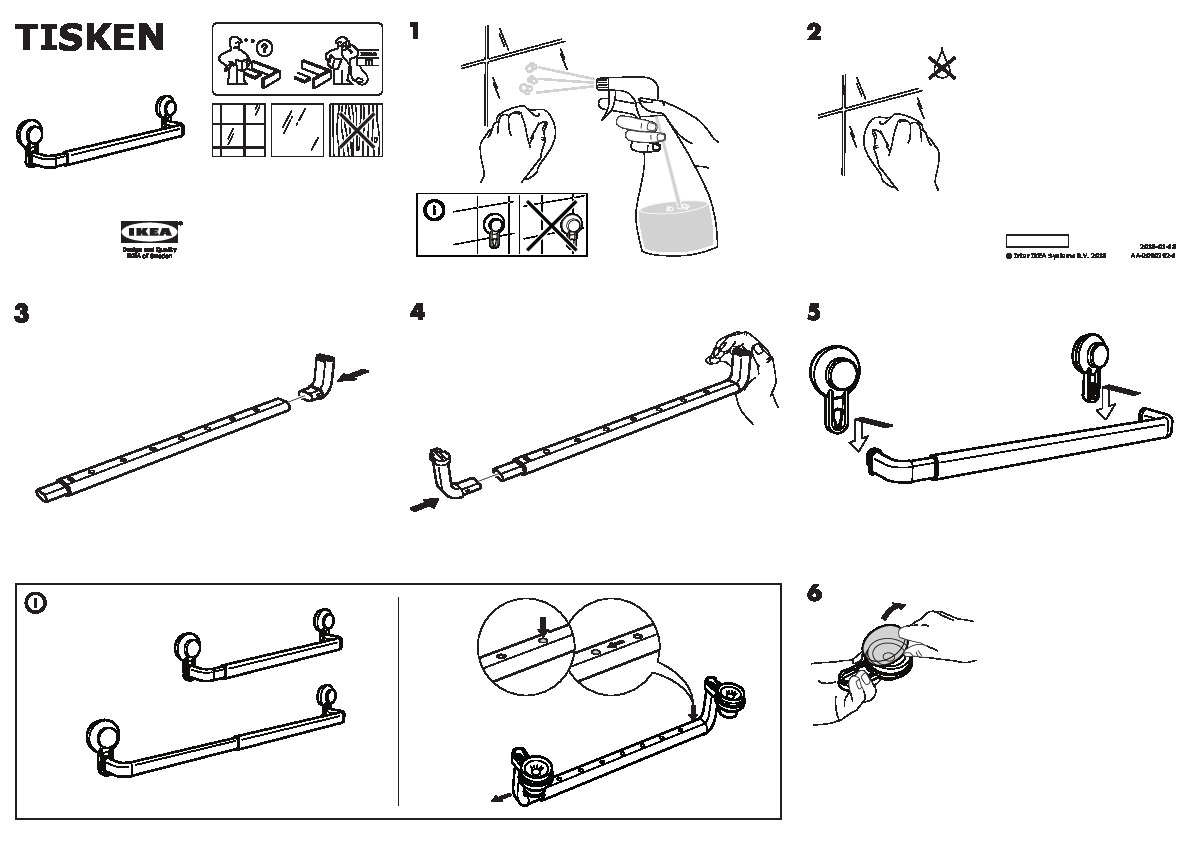
Attaching The Towel Rack
Attaching the towel rack is a crucial step in your Ikea installation process. This step ensures your towel rack stays firmly in place. Follow these instructions carefully to secure it properly.
Aligning The Rack With Brackets
Start by positioning the towel rack close to the mounted brackets. Hold it steady and check if the holes on the rack match the brackets’ screws. Adjust the rack until it fits perfectly over the brackets. Proper alignment avoids damage and keeps the rack level. Take your time here; a small shift can make a big difference.
Tightening Screws Safely
Use a screwdriver or drill to tighten the screws attaching the rack to the brackets. Turn the screws slowly to avoid stripping them. Ensure the screws are firm but not over-tightened. Over-tightening may crack the rack or strip the screw holes. Check the rack’s stability by gently pulling it. If it feels loose, tighten the screws a bit more.
Final Adjustments And Checks
After installing your Ikea towel rack, some final adjustments and checks are essential. These steps ensure the rack stays secure and works well for daily use. Taking a few minutes now saves trouble later.
Ensuring Stability
Check that the towel rack does not wobble. Use your hands to gently shake it. Tighten any screws or bolts that feel loose. The rack must be firmly attached to the wall. If it moves, it may fall and cause damage.
Testing The Rack Load
Hang a few towels on the rack to test its strength. Start with light towels, then add heavier ones. Watch for any signs of bending or loosening. The rack should hold the weight without any problem. This test confirms your installation is safe and reliable.

Credit: www.youtube.com
Maintenance Tips
Maintaining your Ikea towel rack keeps it looking good and working well for years. Regular care stops dirt buildup and damage. This section shares simple steps to keep your rack clean and rust-free.
Cleaning The Rack
Use a soft cloth to wipe the rack often. Warm water and mild soap work best. Avoid harsh chemicals that can harm the finish. Dry the rack well after cleaning. This stops water spots and mold from forming.
Preventing Rust And Damage
Keep the rack dry to avoid rust. Wipe off water after showers or spills. Check screws and mounts regularly. Tighten any loose parts to keep the rack stable. Avoid hanging heavy items that may bend or break it.
Frequently Asked Questions
How Do I Install An Ikea Towel Rack On Drywall?
Use wall anchors and screws for drywall installation. Mark drill points, drill holes, insert anchors, then attach the rack. Ensure the rack is level for a secure fit.
What Tools Are Needed To Install Ikea Towel Rack?
You need a drill, screwdriver, level, measuring tape, pencil, and wall anchors. These tools help ensure precise and secure installation.
Can I Install Ikea Towel Rack Without Drilling?
Yes, use adhesive strips or suction mounts for a no-drill option. However, these methods may hold less weight and are less durable.
How High Should I Mount An Ikea Towel Rack?
Mount the towel rack about 48 inches from the floor. This height is ergonomic and allows easy towel access for most users.
Conclusion
Installing an Ikea towel rack is simple and quick. Follow the steps carefully and use the right tools. Make sure the rack is level and firmly attached to the wall. A well-installed towel rack keeps your bathroom neat and towels dry.
Take your time, and don’t rush the process. You will enjoy the added convenience and style in your space. This small project can make a big difference. Try it yourself and see how easy it can be.