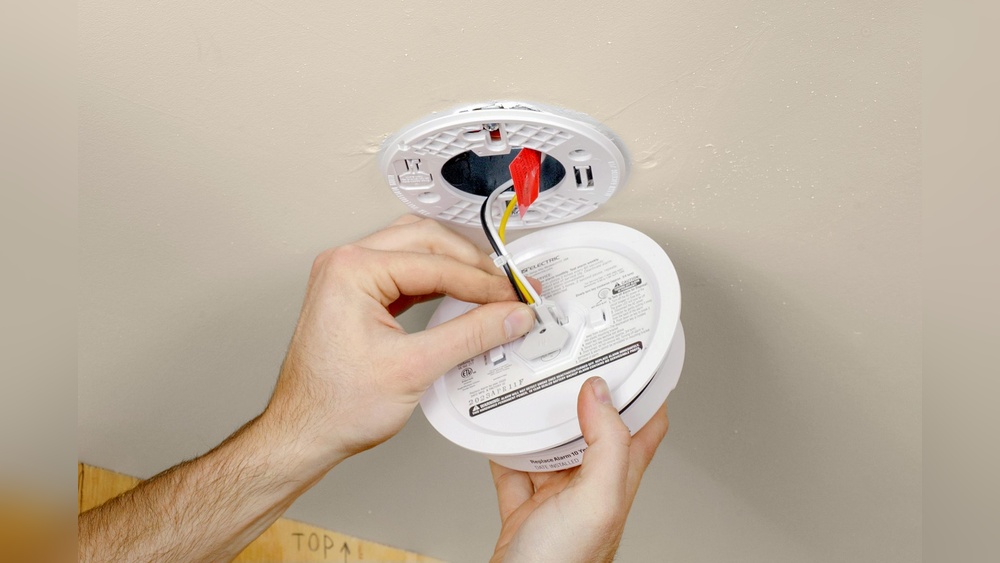

Are you looking to make your home safer by installing hard-wired smoke detectors? Knowing how to hard wire smoke detectors can give you peace of mind and protect your loved ones from fire hazards.
But if you’re unsure where to start or worried about the wiring process, don’t worry—you’re not alone. This guide will walk you through each step, breaking down the technical stuff into simple actions you can follow. By the end, you’ll feel confident handling the installation yourself or knowing exactly what to ask a professional.
Keep reading to learn how easy it can be to upgrade your home’s safety with hard-wired smoke detectors.
Tools And Materials Needed
Hard wiring smoke detectors needs specific tools and materials. Having them ready makes the job easier and safer.
These tools help with cutting, connecting, and securing wires. Materials include the smoke detectors and necessary wiring parts.
Essential Tools For Hard Wiring Smoke Detectors
- Screwdriver (flathead and Phillips)
- Wire stripper
- Voltage tester
- Drill with bits
- Electrical tape
- Wire nuts
- Ladder
- Measuring tape
Materials Required For Installation
- Hard wired smoke detectors
- Electrical wire (usually 14/3 or 14/2 gauge)
- Wire connectors
- Mounting brackets or plates
- Power source connection box
- Electrical boxes (if needed)
Safety Gear To Use
- Insulated gloves
- Safety goggles
- Dust mask (for drilling)
- Non-slip shoes
Credit: www.homedepot.com
Safety Precautions
Safety is the top priority when hard wiring smoke detectors. Taking proper precautions protects you from electrical hazards and ensures the device works correctly. Always prepare before starting any wiring work.
Understanding and following safety steps keeps the installation smooth and secure. Avoid rushing and double-check all connections. Small mistakes can cause serious problems.
Turn Off Power At The Circuit Breaker
Always switch off the power before touching wires. This stops electric shocks that can cause injury or worse. Use a voltage tester to confirm power is off.
Use Proper Tools And Equipment
Select tools designed for electrical work. Insulated screwdrivers and wire strippers reduce risk of shocks. Wear safety glasses to protect your eyes.
Follow Manufacturer Instructions
Read the smoke detector’s manual carefully. Each model may have different wiring needs. Correct installation ensures reliable operation.
Check Local Electrical Codes
Rules vary by area. Check local codes for wiring requirements. Compliance keeps your home safe and avoids legal issues.
Handle Wires Carefully
Do not force wires into connectors. Avoid nicking or damaging insulation. Loose or damaged wires can cause shorts or fires.
Test The Detector After Installation
Once wired, restore power and test the smoke detector. Press the test button to verify it sounds. This confirms proper wiring and function.
Turn Off Power Supply
Turning off the power supply is the first and most important step before hard wiring smoke detectors. It keeps you safe from electric shocks while working with wires. Never start any electrical work without cutting off the electricity.
Safety is the top priority. Always double-check that the power is off before handling any wires. This simple step prevents accidents and damage to your device.
Locate The Main Electrical Panel
Find your home’s main electrical panel or circuit breaker box. It is usually in the basement, garage, or utility room. This panel controls the power for your entire home.
Identify The Correct Circuit Breaker
Look for the breaker switch that controls the room or area where you will install the smoke detector. The breaker should be labeled. If not, turn off the main breaker to cut power everywhere.
Switch Off The Circuit Breaker
Flip the breaker switch to the “off” position. This stops the electricity from flowing to the wires you will work on. Use a flashlight if needed to see clearly.
Verify The Power Is Off
Test the wires with a voltage tester or a non-contact voltage detector. Make sure there is no electric current. If the tester shows power, turn off the main breaker immediately.
:max_bytes(150000):strip_icc()/install-hardwired-smoke-detectors-1152329_FINAL-5233cb01c4f34ee1bae5860132624788.png)
Credit: www.thespruce.com
Remove Old Smoke Detector
Removing the old smoke detector is the first step in hard wiring a new one. This step ensures safety and prepares the wiring for the new device. Take your time and follow the steps carefully.
Always turn off the power at the breaker box before starting. This prevents electric shocks while working with wires.
Turn Off The Power
Find the breaker that controls the smoke detector circuit. Switch it off to cut power. Double-check by pressing the test button on the old detector. No sound means power is off.
Remove The Detector From The Ceiling
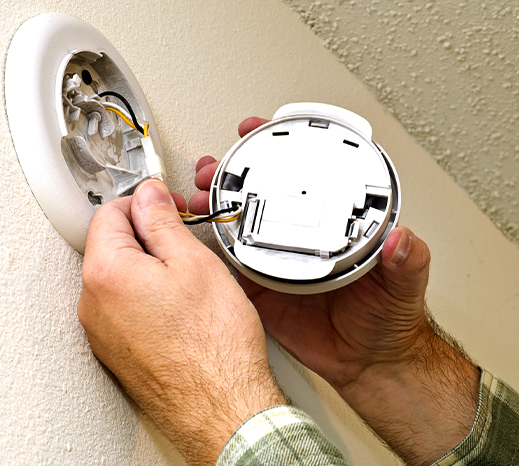
Most smoke detectors twist off the mounting plate. Hold the detector firmly and turn counterclockwise. Gently pull it away from the ceiling. Avoid yanking to protect the wires.
Disconnect The Wiring
Look at the wires connected to the detector. Usually, there are three: black, white, and a red or yellow wire. Carefully unplug the wire connector or unscrew wire nuts to separate the wires.
Check The Wiring Condition
Inspect the wires for damage or corrosion. Clean or trim any frayed ends. Good wire condition is important for a safe connection to the new detector.
Check Electrical Wiring
Checking electrical wiring is a key step when hard wiring smoke detectors. It ensures safety and proper function. Faulty wiring can cause the detector to fail or create hazards. Take time to inspect all connections and cables carefully.
Turn Off Power At The Breaker
Start by switching off power to the circuit. This stops electrical current and keeps you safe. Use a circuit tester to confirm no power flows through wires. Never work on live wires.
Inspect The Existing Wiring
Look for damaged or frayed wires in the smoke detector box. Check for loose connections or exposed copper. Replace any damaged wires before proceeding. Good wiring avoids shorts or fire risks.
Identify Wire Colors And Functions
Know the color codes: black is hot, white is neutral, and green or bare is ground. Correctly matching wires ensures the detector works well. Label wires if unsure to avoid mistakes.
Use Proper Connectors And Tools
Twist wires together tightly with wire nuts or connectors. Avoid using tape alone to secure connections. Tools like wire strippers and pliers help prepare wires correctly. Strong connections last longer and stay safe.
Connect New Smoke Detector
Connecting a new smoke detector is a key step in your home safety upgrade. This process ensures your detector will work reliably. It involves matching the wires correctly and securing the connections firmly. Proper wiring helps the detector receive power and communicate with other units.
Take your time to follow each step carefully. This will prevent wiring mistakes and improve the detector’s performance.
Match Wire Colors
Start by identifying the wire colors from the new smoke detector and your home wiring. Typically, black wires carry power, white wires are neutral, and red wires connect to other detectors. Match each color from the new unit to the same color in the house wiring. This keeps the circuit safe and functional.
Double-check the instructions from the detector’s manual. Sometimes, colors may differ slightly, so verify before connecting.
Secure Wire Connections
After matching wires, twist them together tightly. Use wire nuts to cover the connections fully. This prevents loose wires that can cause failure or fire hazards. Tug gently on each wire to make sure it stays in place.
Wrap electrical tape around the wire nuts for extra security. Good connections improve the smoke detector’s reliability over time.
Mount The Detector
Mounting the smoke detector is a key step in the installation process. Proper placement ensures the device works correctly and alerts you quickly in case of fire. Follow the steps carefully to secure the detector on the ceiling or wall.
Choose The Right Location
Select a spot on the ceiling or high on a wall. Avoid corners and areas near windows or vents. Smoke rises, so higher placement helps the detector sense smoke faster.
Mark The Mounting Holes
Use the mounting bracket as a guide. Hold it against the chosen spot. Mark the screw holes with a pencil for easy drilling.
Drill Holes And Insert Anchors
Drill small holes where you marked. Insert plastic anchors if mounting on drywall. Anchors keep the screws secure and the detector stable.
Attach The Mounting Bracket
Align the bracket with the drilled holes. Screw it tightly to the ceiling or wall. Make sure it does not move or wiggle.
Connect The Detector To Wiring
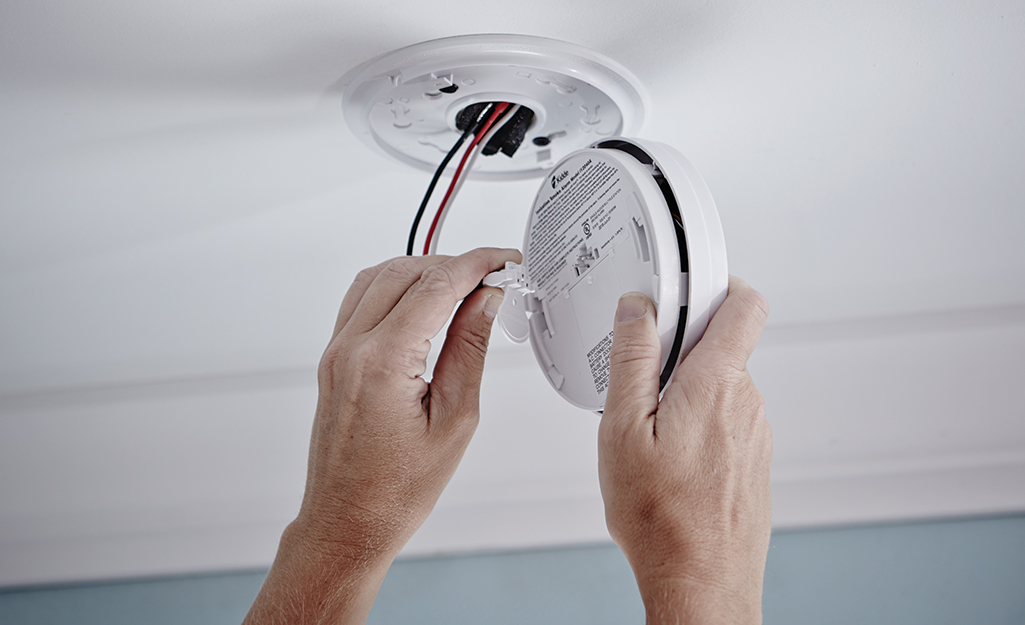
Attach the smoke detector wires to the house wiring. Match the colors: black to black, white to white, and connect the interconnect wire if present. Use wire nuts to secure connections.
Secure The Smoke Detector On The Bracket
Line up the detector with the mounting bracket. Twist or snap it into place. Check that it fits firmly and does not fall off.
Restore Power And Test
After hard wiring your smoke detectors, restoring power and testing them is vital. This step ensures the devices work correctly and keep your home safe. Never skip this part. It confirms the installation was successful and the alarms respond to danger.
Restore Power To The Circuit
Turn the main power switch back on at your home’s breaker box. This restores electricity to the smoke detectors. Check that the detectors light up or beep briefly. This signals they have power and are ready to operate.
Perform A Manual Test
Press the test button on each smoke detector. Hold it until the alarm sounds. This checks the internal battery and wiring. A loud, continuous beep means the alarm works well.
Check Interconnected Units
If your smoke detectors are linked, testing one should trigger all alarms. This feature alerts the whole house during smoke or fire. Confirm all units sound together to ensure proper connection.
Replace Batteries If Needed
Even hard wired alarms use backup batteries. If the test shows a weak or no sound, replace the batteries. This keeps the alarm working during power outages.
Regular Testing Schedule
Test your smoke detectors monthly. Regular checks keep them reliable. Replace detectors every 10 years for best safety.
Troubleshooting Common Issues
Hard wiring smoke detectors can sometimes lead to common issues. These problems can stop your smoke alarms from working properly. Knowing how to fix these issues keeps your home safe. This section helps you solve the most frequent troubles quickly.
Checking Power Supply Problems
First, verify the circuit breaker is on. A tripped breaker can cut power to the detectors. Next, check the fuse box for blown fuses. Also, inspect wiring connections for loose or damaged wires. Tighten or replace any faulty wiring to restore power.
Fixing Interconnection Failures
Smoke detectors often link together for better safety. If alarms do not sound together, check the interconnect wire. Ensure it is connected to all units. Look for breaks or poor connections in the wire. Repair or replace wires as needed.
Resolving False Alarms
False alarms can be annoying and drain batteries. Dust and dirt inside the detector can cause false alerts. Clean the detector with a soft brush or vacuum. Avoid placing alarms near kitchens or bathrooms where steam triggers alarms. Move detectors if needed.
Resetting The Smoke Detector
Sometimes detectors need a reset to work properly. Turn off the power at the breaker. Remove the detector from its base. Press and hold the test button for 15 seconds. Reattach the detector and restore power. This often clears errors and resets the system.
Credit: www.westridgeelectric.com
Frequently Asked Questions
How Do You Hard Wire Smoke Detectors Safely?
Turn off power at the breaker before starting. Connect the smoke detector’s wires to the house wiring using wire nuts. Follow the manufacturer’s instructions carefully. Securely mount the detector on the ceiling or wall. Restore power and test the alarm to ensure functionality.
What Tools Are Needed For Hard Wiring Smoke Detectors?
You will need a voltage tester, wire strippers, screwdrivers, wire nuts, and a drill. Always have a ladder for ceiling access. Use safety gear like gloves and goggles. These tools help ensure a safe and efficient installation process.
Can I Hard Wire Smoke Detectors Without An Electrician?
Yes, if you have basic electrical knowledge and follow safety guidelines. Always turn off power before starting. Read the manufacturer’s instructions carefully. If unsure, consult a professional to avoid risks and ensure code compliance.
How Do You Connect Multiple Hard Wired Smoke Detectors?
Use interconnect wiring to link detectors. This allows all alarms to sound if one detects smoke. Follow the wiring diagram in the installation manual. Ensure correct polarity and secure connections for reliable operation.
Conclusion
Hard wiring smoke detectors keeps your home safe and sound. It ensures constant power without battery worries. Connecting them properly lets alarms work together well. This way, if one detects smoke, all will warn you. Always follow safety steps and local rules.
If unsure, ask a professional for help. Taking time to install right means peace of mind. Protect your family with reliable smoke alarms today. Safety starts with smart choices.