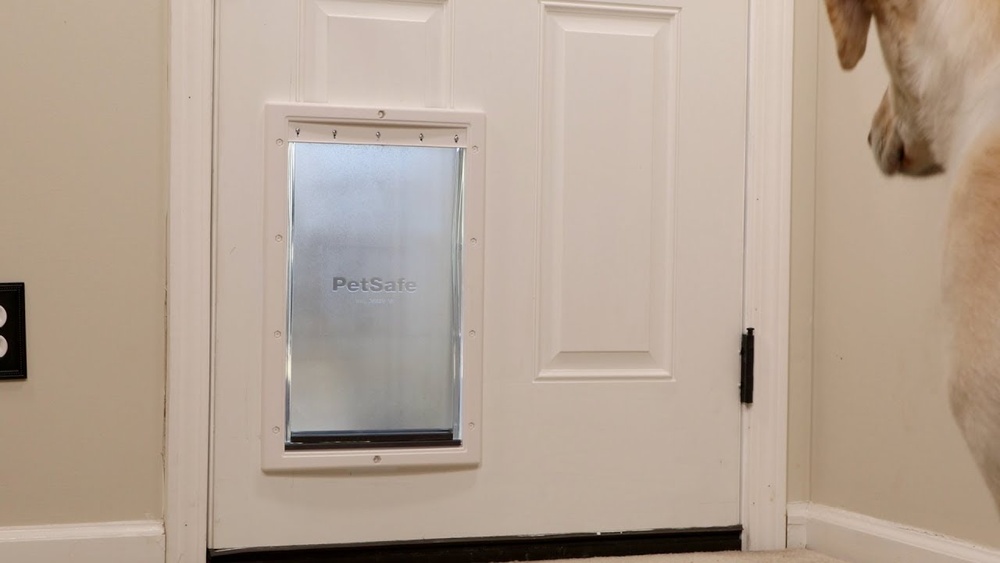

Are you tired of constantly opening the door for your dog? Installing a Pet Safe dog door could be the perfect solution for both you and your furry friend.
Imagine giving your dog the freedom to come and go as they please while saving yourself time and effort. In this guide, you’ll learn exactly how to install a Pet Safe dog door step by step—no confusion, no hassle. By the end, you’ll have a secure, easy-to-use door that fits perfectly in your home.
Ready to make life easier for you and your pet? Let’s get started!

Credit: www.pwmachineservices.com
Choosing The Right Dog Door
Choosing the right dog door is the first step for a smooth installation. It helps your pet move freely and keeps your home safe. The right door fits your dog’s size and suits your home’s design. This section guides you through the key points to consider before buying a dog door.
Measuring Your Dog
Start by measuring your dog’s height and width. Measure from the ground to the top of their shoulders. Also, check the widest part of their body. Add a few inches to these measurements. This ensures your dog can pass easily without squeezing.
Measure your dog while standing. Avoid measuring while sitting or lying down. Accuracy here prevents buying a door that is too small or too big.
Selecting Door Type
Choose between flap doors, electronic doors, or sliding glass doors. Flap doors are simple and affordable. Electronic doors open with a sensor on your dog’s collar. Sliding glass doors fit large dogs and blend with your home’s style.
Think about your budget and your dog’s habits. Some dogs may not like flap doors. Others might need a door that keeps out weather or insects.
Considering Installation Location
Pick a spot that is easy for your dog to reach. Common places include walls, patio doors, or fences. Check if the location allows for a clean and secure installation.
Think about the weather and safety. Avoid places with heavy wind or rain. A sheltered spot helps keep the door working well for longer.
Tools And Materials Needed
Installing a Pet Safe dog door needs some tools and materials. Having the right items makes the job easier and faster. Preparation helps avoid mistakes during installation.
Gather everything before starting. This saves time and stress. Check that all tools work well and materials fit your door size.
Essential Tools List
- Measuring tape for accurate door and wall measurements
- Pencil to mark cutting lines clearly
- Power drill with drill bits for pilot holes
- Jigsaw or handsaw to cut the door or wall
- Screwdriver to secure the dog door frame
- Level to keep the door straight
- Sandpaper to smooth rough edges after cutting
- Safety goggles to protect your eyes
- Work gloves for hand safety
Preparing The Work Area
Clear the space around the door. Remove furniture or obstacles for easy access. Keep pets and children away to stay safe.
Lay down a drop cloth to catch dust and debris. Good lighting helps see markings and cuts clearly. Double-check measurements before cutting.
Preparing The Door Or Wall
Preparing the door or wall is the first step to install a Pet Safe dog door. It sets the stage for a perfect fit and smooth operation. Proper preparation ensures your pet door works well and lasts long. Take time to do this part carefully.
Marking The Cut Area
Start by measuring your dog door’s size. Use a pencil to mark the outline on the door or wall. Double-check the measurements to avoid mistakes. Mark the cut area clearly and straight. This guides your cutting tool and keeps the edges neat.
Ensuring Safety Precautions
Wear safety goggles to protect your eyes. Use gloves to guard your hands from sharp edges. Clear the area of any obstacles or pets. Turn off power tools and handle them with care. Safety keeps you and your pet safe during installation.
Cutting The Opening
Cutting the opening is a key step in installing a Pet Safe dog door. It needs to be precise and smooth to fit the door perfectly. Measure carefully before you start. Mark the area clearly. This helps avoid mistakes and ensures a clean cut.
Using The Right Saw
Choose a saw that works well with your door material. A jigsaw is best for most wood or metal doors. It allows for curved and straight cuts. Use a fine-toothed blade for smooth edges. Secure the door to stop it from moving while cutting. Cut slowly to stay on the marked lines. Take breaks to check your progress.
Smoothing Edges
After cutting, the edges may be rough. Use sandpaper or a file to smooth them. This prevents splinters and helps the door fit better. Sand gently around the entire opening. Check that the edges are even and clean. A smooth edge makes installation easier and safer for your pet.
Installing The Dog Door Frame
Installing the dog door frame is an important step in setting up your Pet Safe dog door. The frame holds the door securely and ensures it fits well in the wall or door. Taking time to place the frame correctly will help your dog use the door easily and keep your home safe from drafts or pests.
Aligning The Frame
Start by placing the frame in the cutout opening. Check that it sits flush against the wall or door surface. The frame should be level and straight. Use a level tool to confirm the alignment. Make small adjustments until the frame fits perfectly without gaps. This step is key to avoid problems when attaching the frame.
Securing With Screws
Once the frame is aligned, use screws to secure it in place. Begin by drilling pilot holes through the frame into the wall or door. This prevents splitting or damage to the material. Insert screws and tighten them evenly around the frame. Avoid over-tightening, which can warp the frame. The frame must be firm and stable for safe use.

Credit: www.youtube.com
Attaching The Flap
Attaching the flap is a key step in installing your Pet Safe dog door. The flap lets your dog move in and out easily. Proper attachment ensures the flap hangs well and moves smoothly. Take your time here. A well-attached flap helps keep weather and bugs outside.
Hanging The Flap Correctly
Begin by lining up the flap with the door frame. The flap should hang straight down without twisting. Attach the flap to the hinges or clips provided. Make sure the flap is centered. Use screws or fasteners to secure it tightly. Check that the flap covers the entire opening. This stops drafts and keeps your home cozy.
Testing Movement
Push the flap gently to check its swing. It should open easily with little force. Let the flap fall back to the closed position on its own. The flap must seal the opening fully. Adjust the hinges if the flap sticks or swings too freely. Ensure your dog can push through without trouble. Smooth movement means your dog door is ready to use.
Sealing And Weatherproofing
Sealing and weatherproofing your Pet Safe Dog Door keeps your home comfortable. It stops cold air, rain, and bugs from entering through gaps. Proper sealing also improves energy efficiency. This step ensures your dog door works well in all seasons.
Applying Weather Stripping
Weather stripping creates a tight seal around the dog door flap. Choose a weather strip that fits your door size. Clean the area around the door frame before applying. Press the weather stripping firmly to avoid gaps. Check the flap moves smoothly after installation.
Checking For Drafts
Check for drafts by feeling around the door edges. Use your hand or a lit candle to spot air leaks. Seal any gaps with extra weather stripping or caulk. Test again until no drafts are detected. This keeps your home warm and dry.

Credit: www.ifixit.com
Training Your Dog To Use The Door
Training your dog to use the Pet Safe Dog Door is important for a smooth transition. Dogs need time to understand how the door works. Patience and positive reinforcement help your dog learn quickly. Start slow and keep sessions short to avoid frustration.
Introducing The Door
Let your dog see and sniff the new door first. Keep the door open so your dog feels safe. Show your dog how the flap moves by pushing it gently. Use a calm voice to encourage curiosity. Let your dog explore at its own pace.
Encouraging Usage
Use treats to guide your dog through the door. Stand on the other side and call your dog. Praise your dog when it passes through the flap. Repeat this several times a day in short sessions. Gradually close the door flap so your dog learns to push it.
Troubleshooting Common Issues
Installing a Pet Safe dog door is simple, but some issues can appear. These problems may stop the door from working right. Knowing how to fix them saves time and keeps your pet happy.
Below are common issues and easy solutions to try. Follow these tips to make sure your dog door works smoothly every day.
Door Not Closing Properly
Check if the door frame is level and square. Uneven installation can stop the door from closing fully. Tighten any loose screws holding the door frame.
Look for dirt or debris on the flap edges. Clean the flap with a damp cloth to remove buildup. This helps the door seal tightly.
Inspect the magnetic strip or locking mechanism. If weak or broken, replace it to ensure proper closing. A strong magnet keeps the door secure against wind or pets.
Flap Getting Stuck
Make sure the flap swings freely without hitting anything. Remove any objects blocking its path. Trim nearby carpet or door trim if needed.
Check the hinges or pivot points for rust or stiffness. Apply a small amount of lubricant to smooth movement. Use a pet-safe lubricant to avoid harm.
Examine the flap material for damage or warping. Replace the flap if it is bent or cracked. A damaged flap often sticks and frustrates pets.
Frequently Asked Questions
How Do I Measure My Dog For A Pet Safe Door?
Measure your dog’s height and width at the shoulders and chest. Choose a door size slightly larger for easy access. Accurate measurements ensure your dog fits comfortably through the Pet Safe dog door.
What Tools Are Needed To Install The Pet Safe Dog Door?
Basic tools include a drill, jigsaw, screwdriver, measuring tape, and level. These tools help cut and secure the dog door properly. Having the right tools simplifies installation and ensures a secure fit.
Can I Install A Pet Safe Dog Door In A Glass Door?
Yes, but you need a specific model designed for glass doors. These models include a frame to hold the door securely. Follow manufacturer instructions to avoid damaging the glass during installation.
How Long Does It Take To Install The Dog Door?
Installation usually takes between 1 to 3 hours. Time varies depending on door type and your DIY experience. Proper installation ensures functionality and durability of the Pet Safe dog door.
Conclusion
Installing a Pet Safe Dog Door is simple and helpful. You give your dog freedom to go outside anytime. Measure carefully and follow each step for best results. Use the right tools to make the door fit well. Check the door often to keep it working smoothly.
Your pet will enjoy the new door every day. A small effort brings big comfort for both of you. Enjoy the peace of mind knowing your dog can move freely.