Looking to add a sleek and practical touch to your bathroom? Installing the Ikea Tisken towel rack is a simple way to keep your towels organized and your space looking neat.
If you’ve ever felt frustrated by complicated instructions or unsure about tools, this guide is made just for you. You’ll learn easy, step-by-step tips to get your towel rack up quickly and securely. Keep reading, and you’ll have your new Ikea Tisken rack ready to use in no time—no hassle, no guesswork.
Tools And Materials Needed
Gathering the right tools and materials makes installing the Ikea Tisken towel rack easier. Preparation saves time and prevents mistakes. This section lists everything needed for a smooth installation process.
Tools Required
You will need a drill for making holes in the wall. A screwdriver helps to fix screws tightly. Use a level to keep the towel rack straight. A measuring tape ensures accurate placement. Pencil marks the spots on the wall. A hammer may be necessary for wall plugs.
Materials Needed
Start with the Ikea Tisken towel rack package. It contains the rack and mounting screws. Wall plugs are needed for secure fixing on drywall. Choose plugs suitable for your wall type. Keep extra screws and plugs in case of errors.
Credit: www.ikeaddict.com
Preparing The Installation Area
Preparing the installation area is the first step to install your Ikea Tisken towel rack. This step makes the whole process smoother and faster. A clean, well-prepared space helps you avoid mistakes and keeps the towel rack secure.
Take time to clear the space where you want to install the rack. Remove any old fixtures, towels, or decorations. Make sure the wall surface is dry and clean. Dirt or moisture can stop the rack from sticking well.
Choosing The Right Spot
Pick a spot that is easy to reach and fits your daily routine. The rack should be near the sink or shower. Check the height so everyone can use it comfortably. Avoid places where water can drip directly on the rack.
Checking Wall Material
Identify the type of wall you have. It could be drywall, tile, or plaster. Different walls need different tools and anchors. Knowing your wall type helps you use the right screws and avoid damage.
Gathering Tools And Materials
Collect all tools before starting. You will need a drill, screwdriver, level, and measuring tape. Have the Ikea Tisken rack and its hardware ready. This saves time and keeps the work steady.
Marking The Drill Points
Use a pencil to mark where to drill holes. Measure carefully to keep the rack straight and balanced. Use a level to check the marks. This step ensures the rack hangs evenly and looks neat.
Marking The Mounting Points
Marking the mounting points is a key step in installing the Ikea Tisken towel rack. This step ensures the rack will be level and secure on the wall. Taking time here prevents mistakes that could cause the rack to hang unevenly or fall off.
Start by holding the towel rack against the wall. Position it at the height you want. Use a level to make sure it is straight. Mark the spots where the screws will go.
Use A Pencil To Mark Points
Choose a sharp pencil for clear marks. Lightly mark the wall through the holes on the rack. Avoid heavy marks that can be hard to erase later. These marks guide you when drilling holes.
Double-check The Position
Step back and look at the marks. Check if they are even and aligned. Use a level again to confirm. Adjust marks if needed before drilling.
Measure Distance Between Marks
Measure the distance between the pencil marks. It should match the distance between the rack’s holes. Use a tape measure for accuracy. This helps avoid mistakes during mounting.
Credit: www.ikea.com
Drilling Holes And Anchoring
Drilling holes and anchoring are key steps to securely install the Ikea Tisken towel rack. Proper drilling ensures the rack stays firm on the wall. Anchors provide extra support, especially on drywall or hollow walls. Follow clear steps to avoid mistakes and ensure safety.
Choose The Right Drill Bit
Select a drill bit size that matches the wall anchors. Check the anchor package for the correct size. Using the wrong bit can cause loose or damaged holes. A drill bit that fits perfectly makes installation easier.
Mark The Drill Points
Use a pencil to mark where to drill. Hold the towel rack against the wall. Mark each hole on the wall through the rack’s mounting holes. Double-check the marks for level and spacing before drilling.
Drill Carefully
Use a steady hand to drill holes at the marked points. Drill straight into the wall to prevent angled holes. Stop once you reach the correct depth. Avoid pushing too hard to protect the wall.
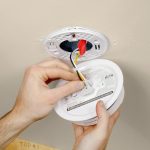
Insert Wall Anchors
Push the wall anchors into the drilled holes. Tap gently with a hammer if needed. Make sure anchors sit flush with the wall. Anchors hold screws tight and prevent the rack from falling.
Attaching The Towel Rack
Attaching the Ikea Tisken towel rack is a simple step in the installation process. This part ensures your towel rack stays secure and holds towels firmly. Following the right steps will help you avoid damage to your walls and make the rack stable.
Gather The Necessary Tools
First, collect all tools needed for attaching the towel rack. You will need a drill, screwdriver, level, and screws. Ikea usually includes screws, but check before starting.
Mark The Drill Points
Hold the towel rack against the wall at your desired height. Use a pencil to mark where the screws will go. Double-check the marks with a level to keep the rack straight.
Drill The Holes
Use a drill bit suitable for your wall type to make holes. Drill carefully on the marked points. Avoid drilling too deep or wide to keep the screws tight.
Attach The Rack To The Wall
Place the towel rack over the drilled holes. Insert screws into the holes and tighten them with a screwdriver. Ensure the rack is secure and does not wiggle.
Final Adjustments And Checks
Final adjustments and checks are important to ensure your Ikea Tisken towel rack is safe and steady. This step makes sure the rack works well and looks good on your wall.
Take time to check every part. Small tweaks can improve the rack’s strength and appearance. This helps avoid problems later, like the rack becoming loose or uneven.
Check The Stability Of The Towel Rack
Gently shake the rack to see if it moves. It should feel firm and steady. If it wobbles, tighten the screws a little more. Use a screwdriver for better control.
Ensure The Rack Is Level
Use a spirit level to check the rack’s alignment. Place it on the rack bar. The bubble should be in the center. Adjust the rack if it tilts to one side.
Tighten All Screws Properly
Go over every screw one more time. Tighten them but avoid over-tightening. Too much force can damage the wall or rack parts.
Test The Weight Capacity
Hang a few towels to test the rack’s hold. It should carry the weight without bending. If it feels weak, review the installation steps.
Clean The Rack And Surrounding Area
Remove dust or fingerprints from the rack. Use a soft cloth to wipe it clean. A neat rack looks better and lasts longer.
Maintenance Tips For Longevity
Maintaining your Ikea Tisken towel rack helps it last longer. Simple care keeps it looking good and working well. Follow easy steps to protect the rack from damage and wear.
Cleaning The Towel Rack Regularly
Wipe the rack with a soft, damp cloth. Use mild soap if needed. Avoid harsh cleaners that can damage the surface. Dry the rack completely after cleaning to stop rust.
Preventing Rust And Corrosion
Keep the rack dry after use. Avoid hanging wet towels for long periods. Check the rack often for any signs of rust. Remove rust spots quickly with a gentle scrub.
Tightening Screws And Fittings
Check screws and fittings every few months. Tighten any loose parts to keep the rack stable. Loose screws can cause the rack to fall or break. Use a screwdriver that fits well to avoid damage.
Avoiding Overloading The Rack
Hang only towels within the rack’s weight limit. Heavy items can bend or break the bars. Use the rack as intended to maintain its shape and strength. Spread towels evenly to balance the load.

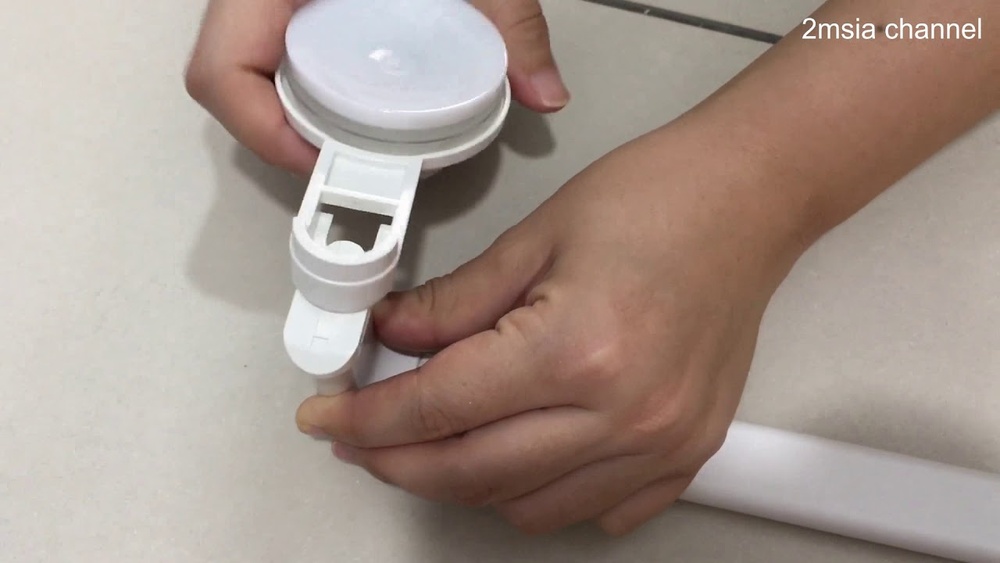
Credit: www.youtube.com
Frequently Asked Questions
How Do I Install Ikea Tisken Towel Rack?
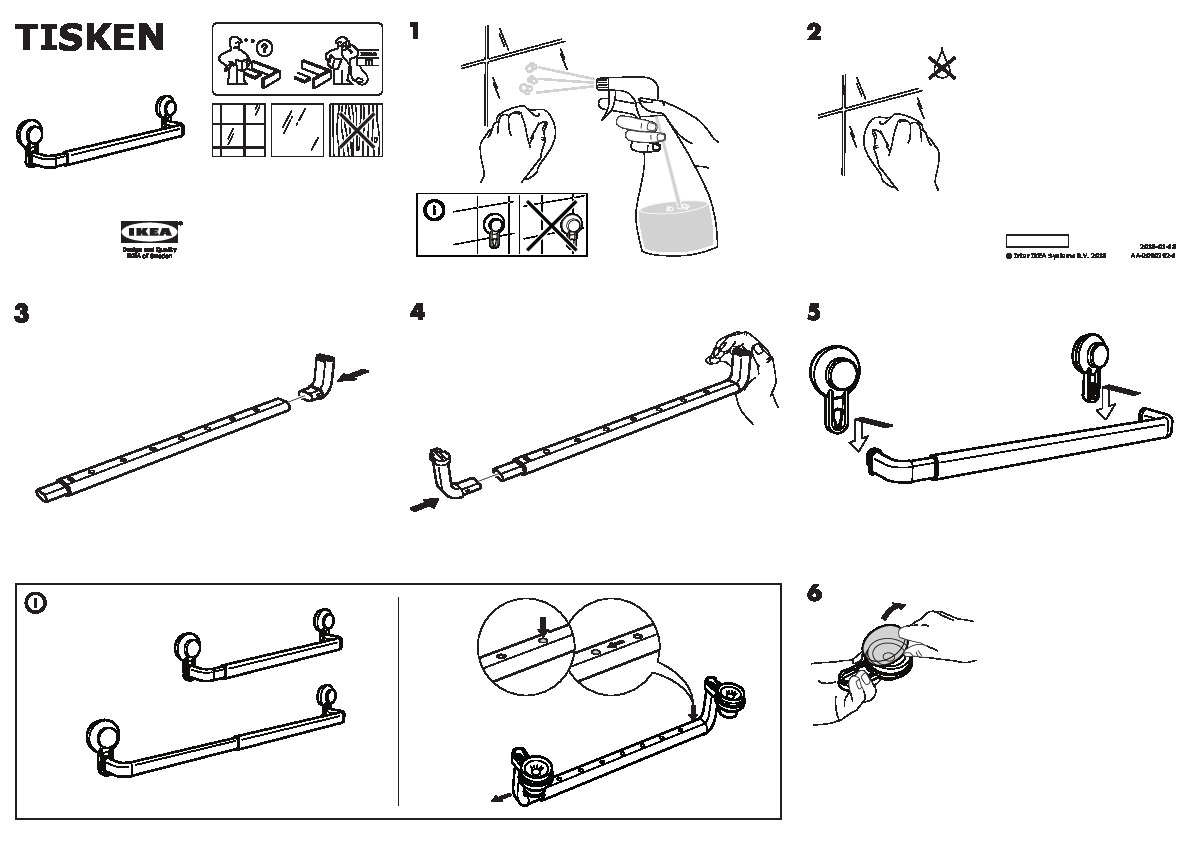
To install the Ikea Tisken towel rack, mark holes on the wall using the rack as a template. Drill holes, insert wall plugs, and screw the rack firmly. Follow the included instructions for precise placement and secure mounting.
What Tools Are Needed For Tisken Towel Rack Installation?
You need a drill, screwdriver, pencil, level, and wall plugs. These tools ensure accurate hole drilling and secure attachment of the towel rack to the wall.
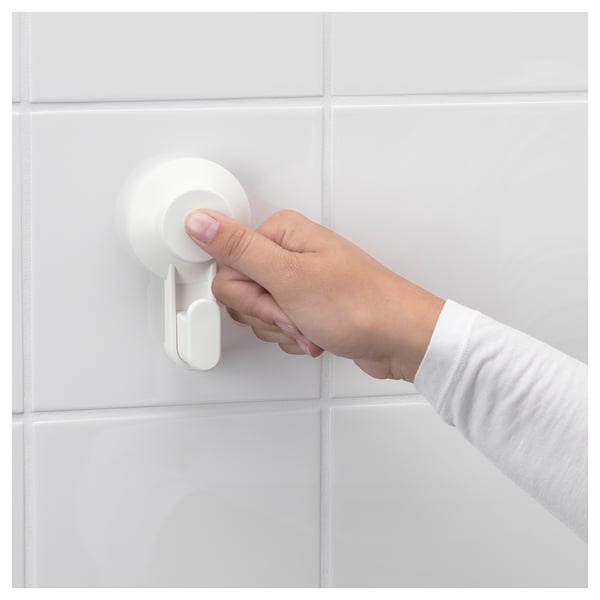
Can I Install Tisken Towel Rack Without Drilling?
Yes, you can use strong adhesive hooks or mounting strips. However, drilling provides a more secure and durable installation, especially for heavier towels.
How High Should I Mount The Tisken Towel Rack?
Mount the Tisken towel rack about 48 to 52 inches from the floor. This height is comfortable for most users to reach and hang towels easily.
Conclusion
Installing the Ikea Tisken towel rack is simple and quick. Follow each step carefully for the best results. Use the right tools to avoid damage and ensure a secure fit. The rack adds neat storage to your bathroom or kitchen.
You can hang towels easily and keep spaces tidy. This project suits beginners and saves money on professional help. Enjoy your new towel rack and a clutter-free room. Try this easy installation for a practical home upgrade.