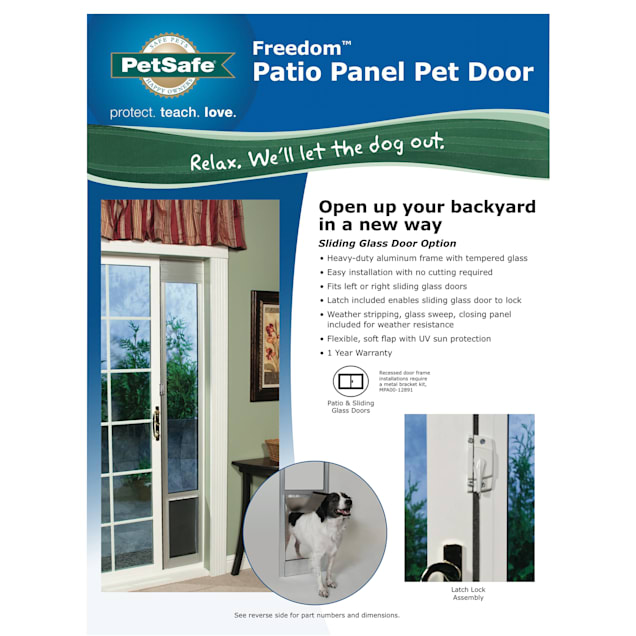
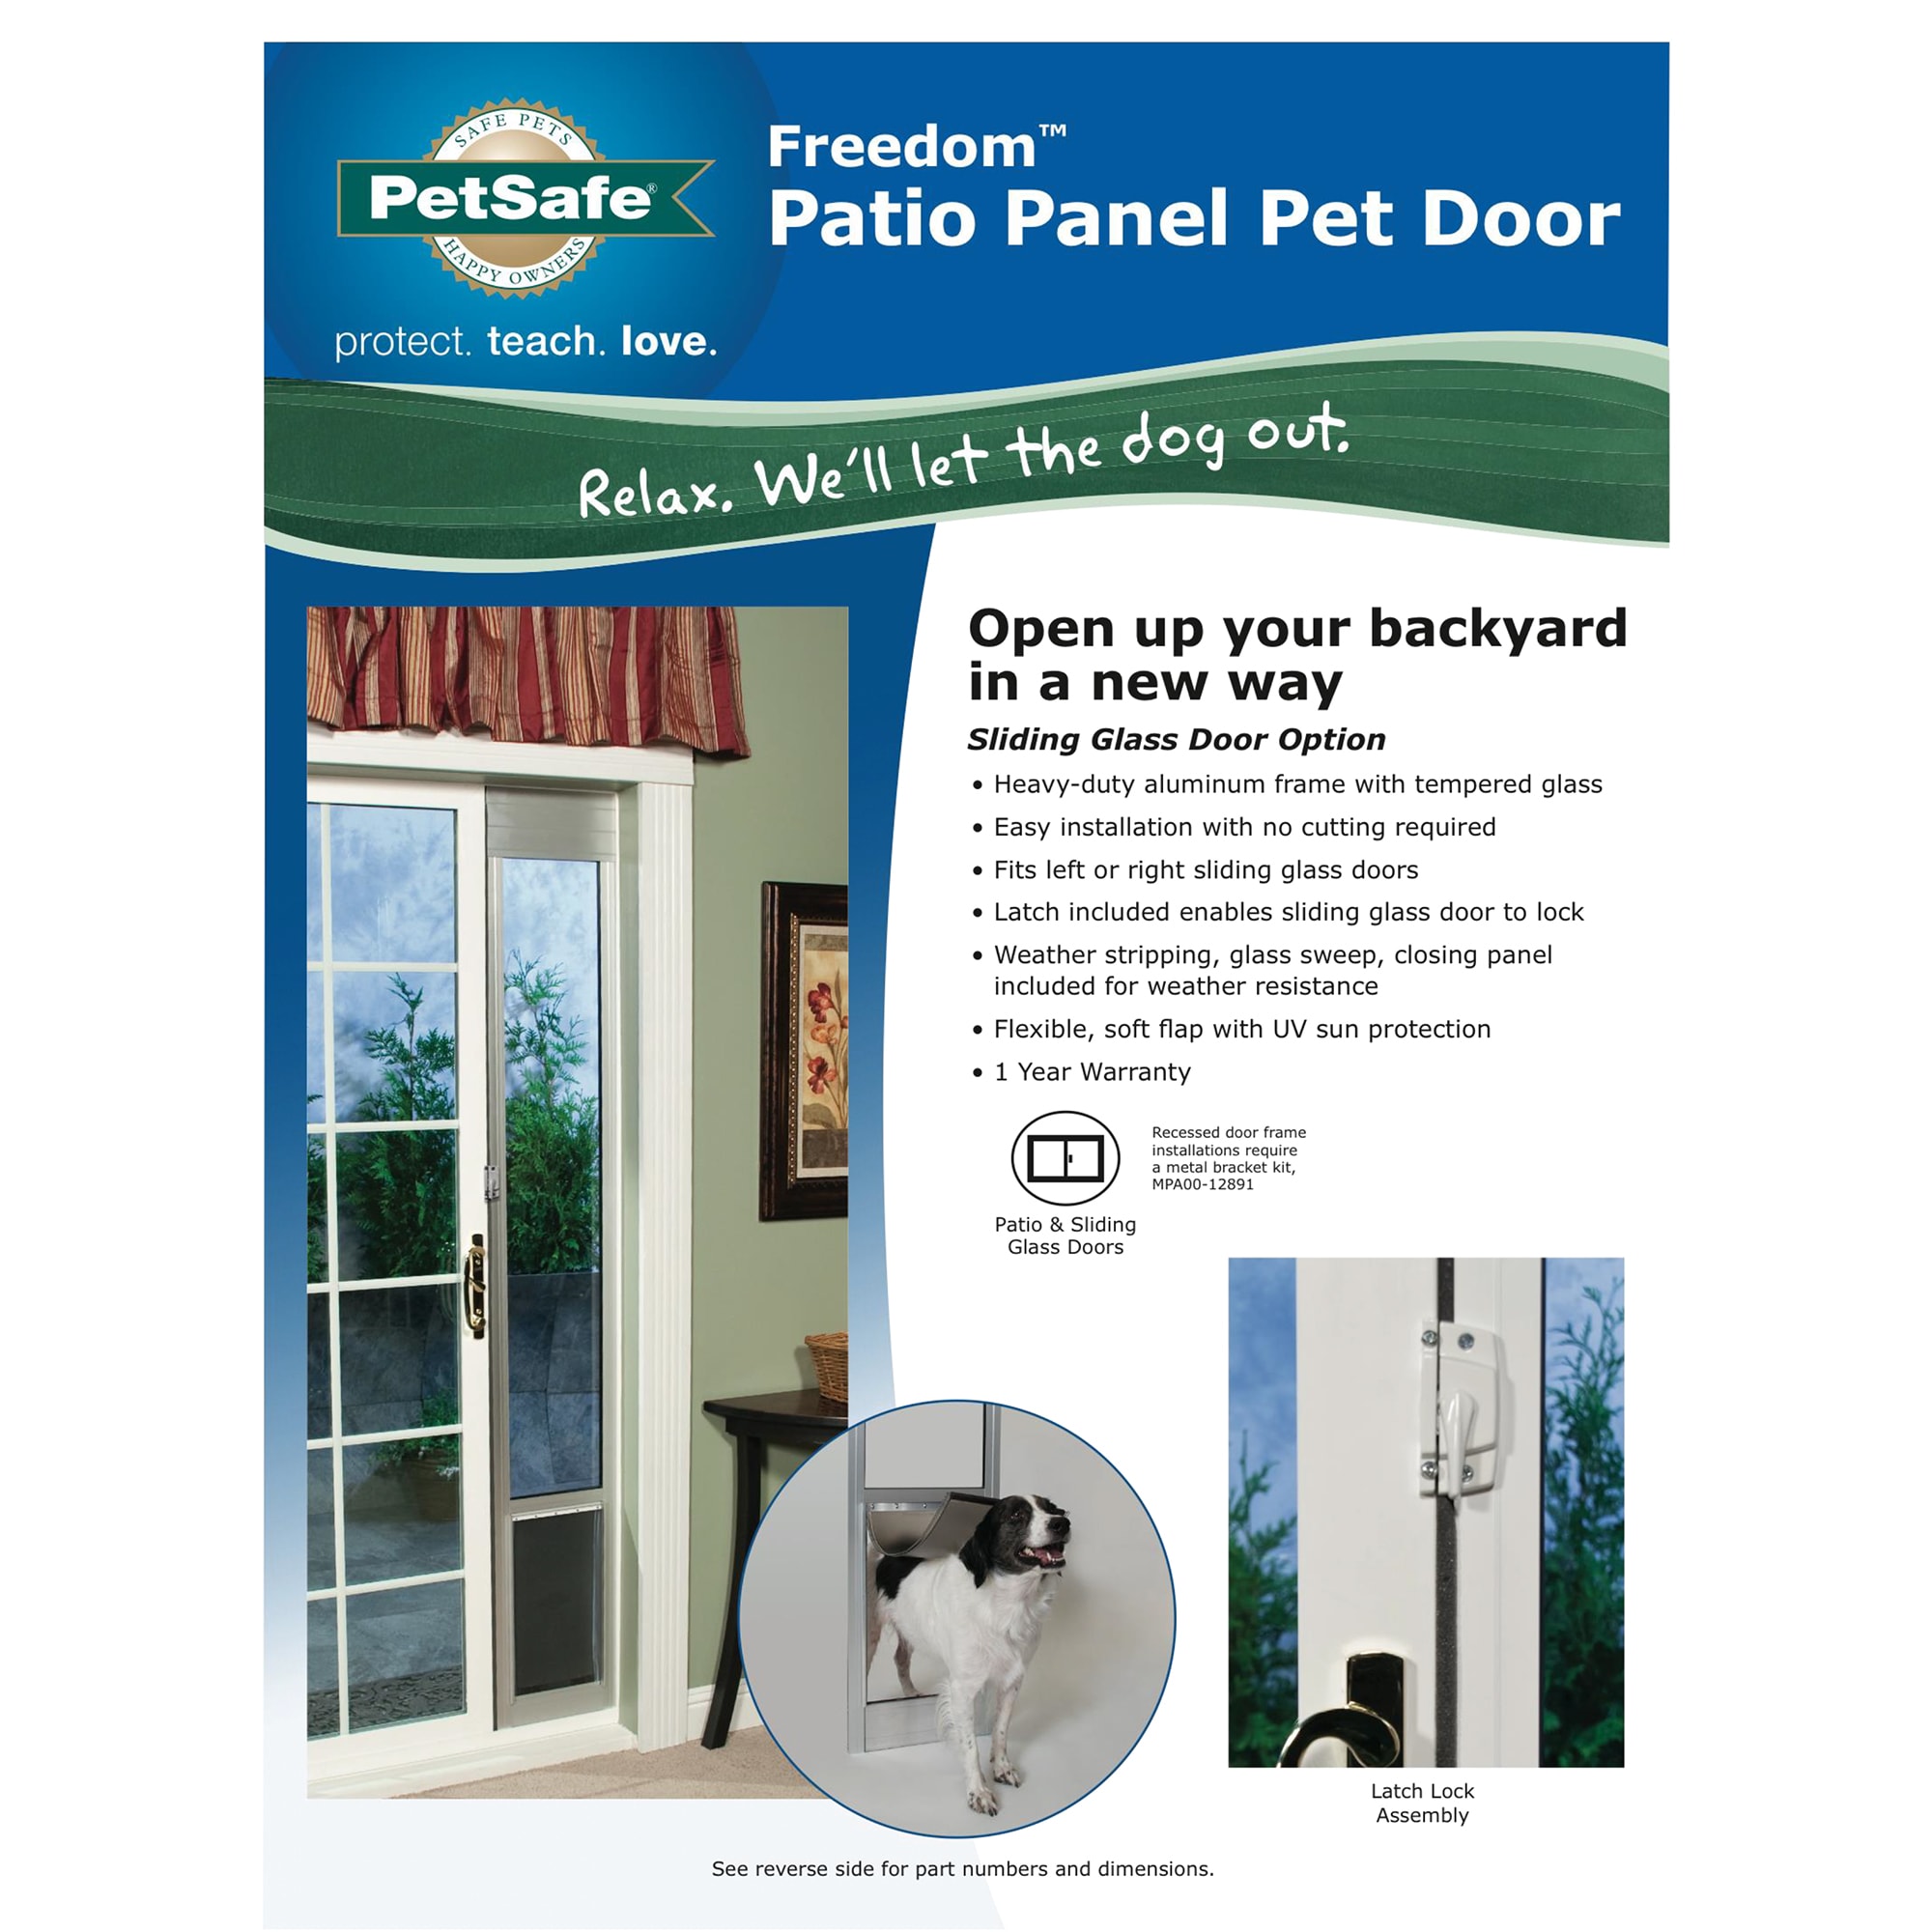
Are you looking for a simple way to give your pet more freedom while keeping your home secure? Installing the Petsafe Patio Pet Panel Door could be the perfect solution for you.
Imagine letting your furry friend come and go as they please, without worrying about open doors or letting in bugs and drafts. In this guide, you’ll learn exactly how to install the Petsafe Patio Pet Panel Door step by step.
By the end, you’ll have a safe, convenient pet door that fits seamlessly into your patio. Keep reading, and you’ll discover how easy it is to make your home more pet-friendly today.
Credit: kdfoundation.org
Tools And Materials Needed
Before installing the Petsafe Patio Pet Panel Door, gather all tools and materials. This step saves time and avoids interruptions. Having everything ready helps the process go smoothly.
Here is a list of essential tools and materials needed for installation. Each item plays a key role in fitting the pet door correctly.
Tools Needed
- Measuring tape – to get accurate door panel size
- Pencil – for marking cut lines and positions
- Jigsaw or handsaw – to cut the door panel
- Drill with bits – to make holes for screws
- Screwdriver – to tighten screws securely
- Level – to ensure the panel is straight
- Sandpaper – to smooth rough edges after cutting
Materials Needed
- Petsafe Patio Pet Panel Door kit – includes frame and flap
- Screws – usually provided in the kit
- Weatherstripping – to seal gaps and prevent drafts
- Protective gloves – for safe handling of tools
- Drop cloth or newspaper – to protect floor during work
Credit: kdfoundation.org
Preparing The Patio Door
Preparing the patio door is the first step to install the PetSafe Patio Pet Panel Door. It ensures a smooth fit and proper function. Taking time to prepare helps avoid problems during installation. Two key tasks are measuring the door frame and cleaning the area. Both must be done carefully for the best results.
Measuring The Door Frame
Start by measuring the width and height of the patio door frame. Use a tape measure for accuracy. Measure at several points to check for any unevenness. Write down the smallest measurements. The pet panel door should fit within these dimensions. Double-check your numbers before buying the door. Correct measurements prevent gaps and ensure a tight fit.
Cleaning The Installation Area
Clear the door frame of dust, dirt, and debris. Use a brush or cloth to clean all surfaces. Check corners and edges for hidden dirt. A clean area helps the door panel attach securely. Avoid using oily or wet cleaners. Let the area dry completely before starting installation. Clean surfaces improve adhesion and door stability.
Assembling The Pet Panel Door
Assembling the PetSafe Patio Pet Panel Door is the first step in creating a safe outdoor space for your pet. This process is straightforward and requires basic tools. Follow the instructions carefully to ensure the door fits perfectly in your patio door frame.
Unpacking The Components
Start by opening the box carefully. Remove all parts and lay them on a flat surface. Check the list of components to make sure nothing is missing. You should see the frame pieces, pet panel, screws, and installation guide. Keep small parts in a container to avoid losing them. This step saves time and prevents mistakes during assembly.
Attaching The Frame Pieces
Identify the top, bottom, and side frame pieces. Align the corners and connect the pieces by sliding them together. Use the provided screws to secure each joint tightly. Make sure the frame forms a perfect rectangle. Tighten all screws evenly for a strong, stable frame. This ensures the pet door will hold up well over time.

Credit: www.youtube.com
Installing The Panel Door
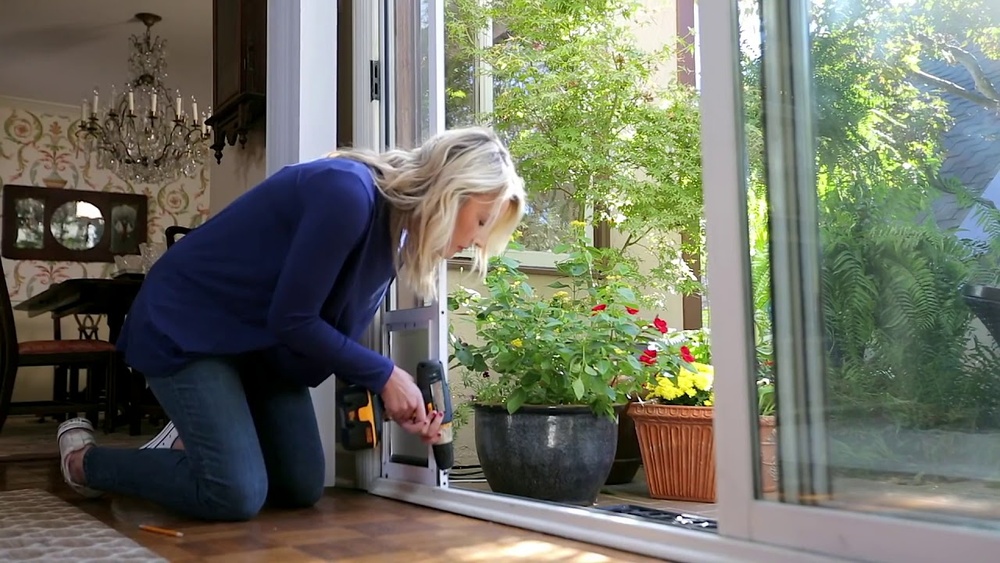
Installing the Petsafe Patio Pet Panel Door is a simple process. It allows your pet to move freely between indoors and outdoors. Follow clear steps to ensure a secure and proper fit. This section guides you through the installation.
Positioning The Door Panel
Start by placing the door panel in the patio door track. Make sure the panel slides smoothly. Align it with the existing door frame. Check that the pet door is at a comfortable height for your pet. Position it so your pet can enter and exit easily.
Securing The Door Frame
Next, lock the panel door in place. Use the included screws and brackets to secure the frame. Attach brackets to the top and bottom for stability. Tighten screws firmly but avoid over-tightening. The door frame must stay steady during use.
Adjusting The Door For Proper Fit
Test the sliding panel to confirm it moves well. Adjust the door if it sticks or gaps appear. Use the adjustment screws to fine-tune the fit. Ensure the door closes fully without force. The pet door should seal properly to keep weather out.
Testing The Pet Door
Testing the Petsafe Patio Pet Panel Door is a key step after installation. It ensures the door works smoothly and keeps your pet safe. This step helps spot any problems early before your pet uses the door regularly.
Checking The Flap Movement
Start by gently pushing the flap to see how it moves. The flap should swing freely without sticking. Check both sides to ensure it opens easily for your pet. Make sure the flap closes fully on its own after pushing. A stuck or slow flap can confuse your pet or let in cold air.
Ensuring Safety And Security
Look for any gaps around the door frame that might let in wind or bugs. The door should fit tightly to keep your home secure. Check the locking mechanism if your model has one. Lock and unlock it to confirm it works properly. This step keeps your pet safe and your home protected from intruders.
Maintenance Tips
Keeping your Petsafe Patio Pet Panel Door in good shape helps it work longer. Regular care stops damage and keeps it clean. Small checks can prevent big problems.
Cleaning The Door Panel
Use a soft cloth to wipe the door panel. Mild soap and water work best. Avoid harsh chemicals that can harm the material. Clean both sides to remove dirt and dust. Dry the panel well to stop water spots.
Troubleshooting Common Issues
Check the door panel if it sticks or does not close well. Look for dirt or debris blocking the track. Clear any objects and test the door again. If the panel is loose, tighten screws carefully. For broken parts, contact the manufacturer for replacements.
Frequently Asked Questions
How Do I Install A Petsafe Patio Pet Panel Door?
To install the Petsafe Patio Pet Panel Door, measure your sliding door panel first. Then, follow the included instructions to cut and fit the panel. Secure it tightly to ensure your pet can safely use the door without gaps or loose parts.
What Tools Are Needed For Installation?
You’ll need a tape measure, utility knife, screwdriver, and a drill. These tools help accurately measure, cut, and secure the pet panel door. Always follow safety guidelines while using tools to avoid damage or injury during installation.
Can I Install The Door Without Professional Help?
Yes, the Petsafe Patio Pet Panel Door is designed for DIY installation. The step-by-step instructions are easy to follow, requiring basic tools. Most pet owners complete the setup within an hour without professional assistance.
Will The Pet Door Fit All Sliding Doors?
The Petsafe Patio Pet Panel Door fits most standard sliding glass doors. However, it’s essential to measure your door panel thickness before purchase. Custom sizes may be available for unique door dimensions.
Conclusion
Installing the Petsafe Patio Pet Panel Door is simple and quick. Follow each step carefully for best results. This door helps your pet enjoy fresh air safely. No special tools or skills are needed. Take your time to measure and fit the panel right.
Your pet will thank you for the freedom. A well-installed door makes life easier for both you and your pet. Enjoy watching your pet move freely and stay secure. This small project brings big comfort to your home.