Your smoke detector is one of the most important devices in your home. It keeps you and your loved ones safe by alerting you to danger.
But what happens when it falls off the ceiling? You might feel unsure about how to fix it quickly and safely. Don’t worry—putting a smoke detector back on the ceiling is easier than you think. In this guide, you’ll learn simple steps to get it back in place fast, so your home stays protected.
Keep reading to find out how to do it right!

Credit: www.youtube.com
Tools And Materials Needed
Putting a smoke detector back on the ceiling needs some basic tools and materials. These help ensure the device is secure and works well. Having the right items ready makes the job easier and safer.
Essential Tools
- Screwdriver: Usually a Phillips head works best.
- Drill: Needed if new holes are required.
- Step ladder: Helps reach the ceiling safely.
- Voltage tester: Checks electrical connections if wired.
- Measuring tape: Ensures correct placement.
- Pencil: Marks drilling spots.
Required Materials
- Smoke detector mounting bracket or base.
- Screws and wall anchors for secure fitting.
- Fresh batteries, if the smoke detector uses them.
- Wire nuts and electrical tape for wired units.
- Cleaning cloth to clear the mounting area.
Safety Precautions
Always turn off the power before handling the smoke detector. Check that the mounting bracket is secure on the ceiling to avoid falls. Handle the device gently to prevent damage.
Power Off The Detector
Always turn off the smoke detector before handling it. This stops accidental alarms and electrical risks. Remove the battery or unplug the detector from its power source. Doing this keeps you safe from shocks. It also prevents the alarm from ringing loudly while you work.
Use A Stable Ladder
Choose a strong, steady ladder to reach the ceiling. Avoid standing on chairs or unstable objects. Place the ladder on a flat surface. Check the ladder’s condition before climbing. Keep your body centered and move slowly. This reduces the chance of falls or injuries during the installation.
Removing The Smoke Detector
Removing the smoke detector from the ceiling is the first step to put it back properly. This process is simple but needs care. You must handle the device gently to avoid damage. Follow the steps below for safe removal.
Disconnect The Power
Turn off the power supply to the smoke detector. This stops any electric current and keeps you safe. For battery-operated models, remove the battery instead. Check twice to ensure no power is running to the unit before proceeding.
Twist And Detach
Hold the smoke detector firmly. Twist it counterclockwise to unlock it from the mounting bracket. It should come loose with a gentle turn. Pull the detector away from the ceiling carefully to avoid pulling wires.
Preparing The Mounting Base
Preparing the mounting base is the first step to put a smoke detector back on the ceiling. This step ensures the smoke detector fits securely and works properly. A clean and stable base helps the detector stay in place for a long time. Follow these simple steps to prepare the mounting base.
Check The Mounting Plate
Start by looking at the mounting plate that holds the smoke detector. Make sure it is not cracked or broken. The plate should be flat and fit well against the ceiling. If the plate is damaged, replace it with a new one. A good mounting plate keeps the smoke detector stable and safe.
Clean The Ceiling Area
Next, clean the ceiling area where the mounting plate will sit. Remove dust, dirt, and old paint flakes. Use a damp cloth and let the area dry completely. A clean surface helps the mounting plate stick better. This step stops the smoke detector from falling off later.
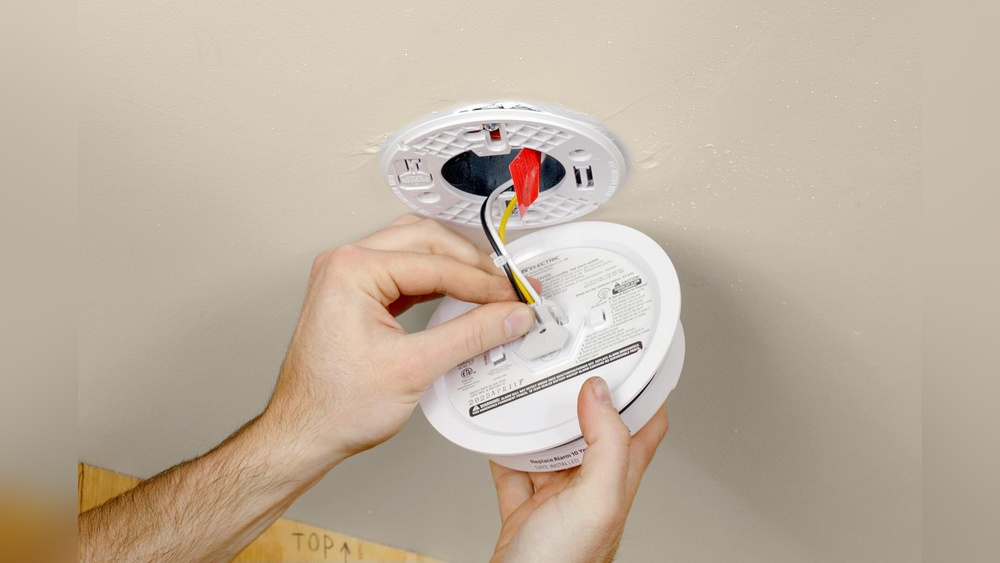
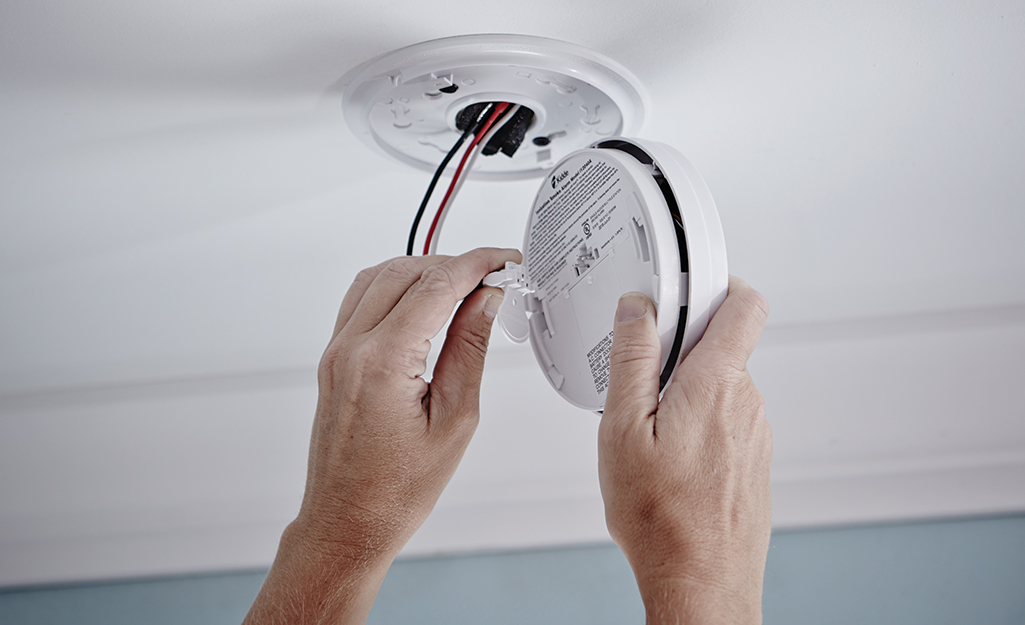
Reattaching The Smoke Detector
Reattaching a smoke detector to the ceiling is a simple task. It ensures your home stays safe and your device works properly. This part focuses on how to fix the detector back securely. Proper reattachment keeps it stable and ready to detect smoke.
Aligning The Base
Start by positioning the smoke detector base against the ceiling. Match the holes on the base with the anchors or marks on the ceiling. Check the orientation to ensure the sensor faces the right direction. A proper fit avoids gaps where dust can enter.
Securing With Screws Or Clips
Use screws or clips to fasten the base firmly. Insert screws into the aligned holes and tighten them gently. Avoid over-tightening to prevent damage. If clips hold the detector, press them until they snap into place. The detector should not wobble once secured.
Testing The Smoke Detector
Testing the smoke detector is a crucial step after placing it back on the ceiling. This process ensures the device works properly and keeps your home safe. A smoke detector that does not function correctly may fail to warn you during a fire emergency. Follow these simple steps to test your smoke detector effectively.
Restore Power
First, restore power to the smoke detector. If it uses batteries, insert new ones and close the battery compartment. For hardwired units, turn the circuit breaker back on. Ensure the smoke detector receives power and shows no error lights or signals.
Perform A Function Test
Press the test button on the smoke detector. Hold it for a few seconds. The alarm should sound loudly and clearly. This confirms the smoke detector is working. If no sound comes, check the batteries or wiring again. Repeat the test until the alarm works properly.
Troubleshooting Common Issues
Troubleshooting common issues after putting a smoke detector back on the ceiling can save time and ensure safety. Problems may appear even after careful installation. Knowing how to fix these helps keep your home protected. Below are solutions to frequent problems you might face.
Detector Won’t Stay Attached
Check if the mounting bracket is secure. Sometimes, screws may be loose or missing. Tighten all screws firmly to hold the detector in place. The ceiling surface must be clean and dry. Dirt or dust can stop the detector from sticking well. Use a cleaner and dry cloth to prepare the surface.
Use the right anchors for your ceiling type. Drywall or plaster needs specific anchors to support the detector’s weight. If the bracket is damaged, replace it. Avoid forcing the detector onto the bracket as it may break or not fit properly.
False Alarms After Reinstallation
False alarms can happen if the detector is dusty. Clean the detector gently with a vacuum or soft brush. Avoid using water or cleaners inside the device. Check if the detector is too close to kitchen or bathroom vents. Steam and cooking smoke may trigger false alarms.
Make sure the battery is fresh and inserted correctly. Weak batteries often cause false alerts. Reset the detector after reinstalling it. Press the test button to ensure it works properly. If false alarms continue, consider replacing the detector.

Credit: www.youtube.com
Maintenance Tips
Maintaining your smoke detector is key to keeping your home safe. Proper care helps the device work well and last longer. Follow simple steps to keep it ready for any emergency.
Regular Cleaning
Dust and dirt can block the smoke detector’s sensors. Clean your smoke detector every month to keep it clear. Use a soft brush or vacuum with a soft nozzle. Avoid spraying cleaners directly on the device. Keep the vents free from dust for better sensitivity.
Battery Replacement Schedule
Smoke detectors need fresh batteries to work well. Change the batteries at least once a year. Some models beep when the battery is low; don’t ignore this sound. Use good quality batteries for longer life. Mark the battery change date on your calendar to remember.
Credit: www.homedepot.com
Frequently Asked Questions
How Do I Reattach A Smoke Detector To The Ceiling?
To reattach a smoke detector, align its base with the ceiling mount. Twist or snap it securely into place. Ensure the detector is firmly fixed to avoid falling. Test the detector after installation to confirm it’s working properly.
What Tools Are Needed To Mount A Smoke Detector Again?
Typically, you need a screwdriver, screws, and possibly anchors. Some detectors use a twist-lock mechanism needing no tools. Always check the manufacturer’s instructions. Use a ladder for safe ceiling access during installation.
Can I Reuse Old Screws To Mount The Detector?
Yes, if the screws and mounting holes are intact. Make sure they fit tightly and securely hold the base. Replace any damaged screws or anchors to ensure stability and safety.
How To Test A Smoke Detector After Remounting?
Press the test button on the smoke detector. It should emit a loud alarm sound. If no sound occurs, check the battery or wiring. Regular testing ensures the detector functions correctly for safety.
Conclusion
Putting a smoke detector back on the ceiling is simple and important. Make sure the base is secure first. Then, attach the detector carefully and test it right away. A working smoke detector keeps your home safe. Check the batteries often and clean the device regularly.
Small steps like these can protect your family from danger. Stay safe and keep your smoke detectors in good shape. It only takes a few minutes to do. Safety matters every day.