Are your LED Christmas lights too long for the space you want to decorate? Instead of struggling to tuck extra strands away or deal with tangled wires, you can easily shorten your LED Christmas light string.
This simple trick saves you time, keeps your decorations neat, and helps your lights shine just where you want them. Keep reading to discover how you can quickly and safely adjust your LED light string to fit perfectly—no special tools or skills needed!

Credit: www.reddit.com
Tools And Materials Needed
Shortening a LED Christmas light string needs the right tools and materials. Using correct items makes the job safe and easy. It helps keep lights working well after cutting.
Gather all tools before starting. This saves time and avoids mistakes. Prepare your workspace for neat and safe work.
Essential Tools
First, you need wire cutters to trim the string cleanly. A pair of pliers helps twist and hold wires tightly. Electrical tape keeps connections safe and insulated. A soldering iron is useful for strong wire joins. A multimeter checks if lights work after cutting.
Choosing The Right Led Lights
Select LED lights made for easy cutting and rejoining. Look for strings that show safe cutting points. Choose lights with thicker wires for better strength. Pick LED bulbs with low heat to avoid damage. Brightness and color should fit your decoration needs.
Safety Gear
Wear safety glasses to protect your eyes from wire pieces. Use gloves to avoid cuts or electric shocks. Work in a dry area to prevent accidents. Keep a fire extinguisher nearby for emergencies. Always unplug lights before starting any work.
Preparing The Light String
Preparing the LED Christmas light string is the first step before shortening it. This part ensures safety and helps avoid damage to the lights. It also makes the cutting process easier. Follow these steps carefully for the best results.
Inspecting The Lights
Check the light string for any broken or damaged bulbs. Look for frayed wires or loose connections. Replace or fix any problems before continuing. This prevents electrical hazards and keeps the lights working well.
Measuring Desired Length
Decide how long you want the shortened light string to be. Use a tape measure to get the exact length. Measure twice to avoid cutting too short. Keep in mind the power source location and where you want to hang the lights.
Marking Cut Points
Find the safe spots to cut the string. These are usually between groups of bulbs or at specific intervals. Use a marker or tape to mark these points clearly. Do not cut near bulbs or electrical components to prevent damage.
Cutting The Led String
Cutting an LED Christmas light string helps fit your decoration space. It also prevents extra lights from wasting power. Doing it carefully keeps the string safe and working well. This section explains how to cut the string without causing damage.
Where To Cut Safely
Look for marked cut points on the string. These spots are usually shown by scissors icons. Cut only at these points to avoid breaking the circuit. Cutting elsewhere can cause the string to stop working.
Check the distance between cut marks before cutting. Make sure your desired length matches a cut point. This keeps the lights working properly after shortening.
Using Proper Cutting Techniques
Use sharp scissors or wire cutters for a clean cut. Avoid crushing or twisting the wires. Cut straight across the marked point to keep connections intact.
After cutting, seal the ends with electrical tape or heat shrink tubing. This protects the wires from moisture and short circuits. Handle the string gently to avoid pulling or bending the wires.
Reconnecting The Wires
Reconnecting the wires is a key step when shortening a LED Christmas light string. Properly joining wires ensures the lights work safely and stay bright. Take care to make strong, clean connections to avoid flickering or shorts.
Stripping Wire Ends
Start by removing the plastic coating from the wire ends. Use a wire stripper or a sharp knife. Strip about half an inch of insulation. Be careful not to cut the metal wire inside. Expose enough wire to create a good connection.
Soldering Vs. Twisting
Twisting wires together is quick but less secure. Twisted wires may loosen over time. Soldering melts metal to join wires firmly. It creates a strong, lasting bond. Use solder and a soldering iron carefully. Heat only the wire, not the insulation. Soldering gives the best electrical connection.
Using Connectors
Wire connectors offer a neat, safe way to join wires. Push the stripped wire ends inside the connector. Twist the connector to lock wires tightly. Some connectors snap shut for extra security. They prevent wires from touching each other. Connectors work well if soldering tools are not available.
Testing The Modified String
Testing the modified LED Christmas light string ensures it works safely and properly. After shortening the string, checking its function is important. This step prevents electrical problems and keeps the lights bright.
Checking Electrical Continuity
Use a multimeter to test electrical continuity. Set the meter to the continuity mode. Touch the probes to both ends of the wire. A beep or low reading means the circuit is complete. No sound or high reading shows a break in the wire. Fix any breaks before powering the lights.
Powering The Lights Safely
Plug the modified string into a power source carefully. Use a low voltage adapter made for LED lights. Avoid using damaged plugs or cords. Watch for flickering or dim lights. Turn off power immediately if sparks or smoke appear. Always test the lights in a safe area away from flammable materials.
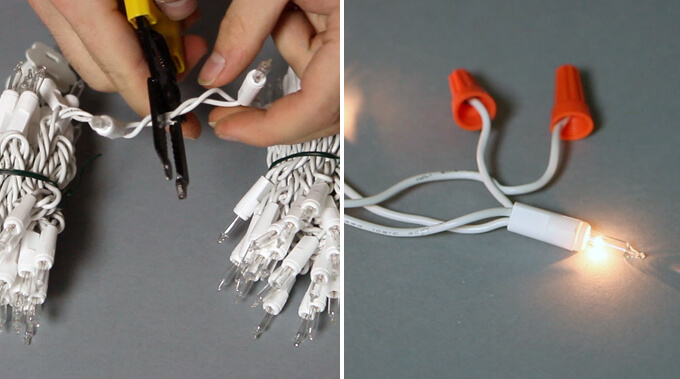
Credit: grayhousestudio.com
Securing And Insulating Connections
Securing and insulating connections is key when shortening a LED Christmas light string. Proper insulation stops electric shocks and keeps the lights working well. It also protects the wires from moisture and damage. This step ensures safety and durability for your DIY project.
Applying Electrical Tape
Electrical tape is a simple way to cover wire joints. Start by wrapping the tape tightly around the exposed wires. Overlap the tape as you wrap to create a strong seal. This prevents air and water from reaching the wires. Use high-quality tape to avoid it peeling off over time.
Using Heat Shrink Tubing
Heat shrink tubing offers a secure and neat finish. Slide the tubing over the wire connection before joining the wires. Once connected, move the tubing over the joint. Use a heat source like a hair dryer to shrink the tubing. It tightens around the wires, creating a waterproof seal.
Tips For Maintaining Led Light Strings
Taking care of LED Christmas light strings helps them last longer and stay bright. Proper maintenance saves money and effort. Simple steps can keep your lights in great condition for many holidays.
Keep the strings clean, safe, and stored correctly. Avoid damage from bending or pulling. Follow these tips to enjoy your LED lights every year.
Storage Advice
Store LED light strings in a cool, dry place. Avoid areas with high heat or moisture. Use a spool or a reel to wrap the lights neatly. This prevents tangling and breaks.
Label the storage container to find your lights easily next season. Keep the plug ends protected to avoid dust and dirt.
Avoiding Common Damage
Do not bend light strings sharply. This can break the wires inside. Avoid pulling the strings too hard. Always hold the plug when unplugging.
Check for damaged bulbs before use. Replace any broken bulbs quickly. Keep lights away from pets and children to prevent accidents.

Credit: www.youtube.com
Frequently Asked Questions
How Can I Safely Shorten Led Christmas Lights?
To shorten LED Christmas lights safely, avoid cutting wires. Use insulated wire connectors or a wire stripper to adjust length. Always unplug lights before modification. Ensure connections remain insulated to prevent electrical hazards.
Can I Cut Led Christmas Light Strings Without Damage?
Cutting LED light strings can damage circuits. Only cut at manufacturer-designated points. Check the product manual for safe cut locations. Improper cutting can cause the entire string to fail.
What Tools Are Needed To Shorten Led Light Strings?
You need wire strippers, insulated connectors, and electrical tape. Also, have scissors or wire cutters ready. These tools help maintain safety and ensure proper reconnection after shortening.
Will Shortening Led Light Strings Affect Brightness?
Shortening LED strings usually does not affect brightness. The remaining LEDs will operate normally if wiring is intact. Ensure connections are secure to avoid flickering or power issues.
Conclusion
Shortening LED Christmas light strings saves space and prevents tangles. It keeps your decorations neat and easier to store. Always handle the wires gently to avoid damage. Use simple tools and follow safety tips for best results. A tidy string means less hassle next holiday season.
Enjoy your bright, organized lights without extra clutter. Remember, small steps make decorating fun and stress-free.