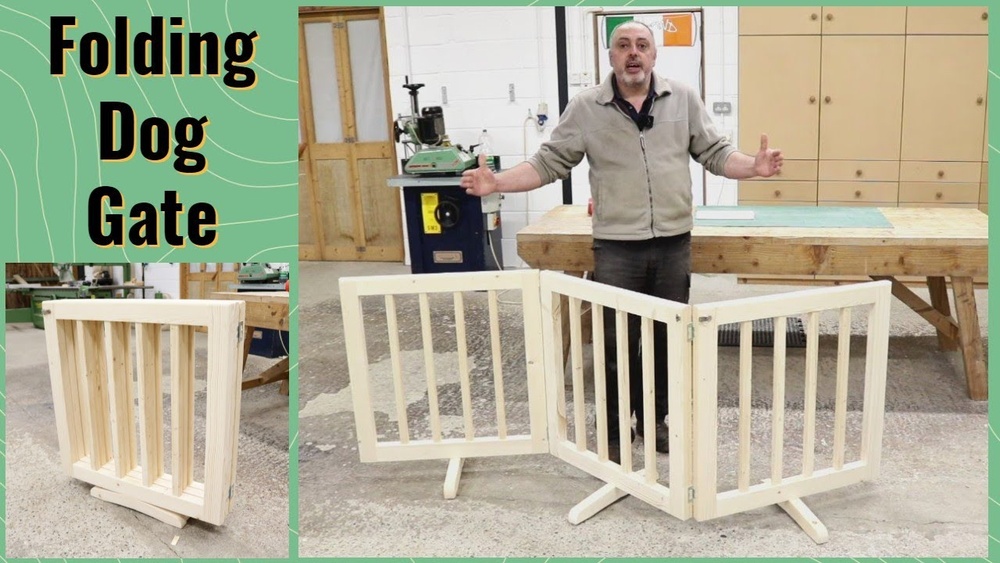

Are you tired of your pet wandering into rooms where they shouldn’t be? A folding pet gate could be the perfect solution for your home.
It gives you control over your pet’s space while being easy to use and store. In this guide, you’ll learn simple steps to make your own folding pet gate that fits your needs perfectly. Keep reading to discover how you can create a safe and stylish barrier for your furry friend without spending a fortune.

Credit: www.youtube.com
Materials Needed
Gathering the right materials is the first step in making a folding pet gate. The materials affect the gate’s strength, safety, and look. Choose items that fit your space and pet’s needs. Select quality parts to ensure the gate lasts a long time.
Types Of Wood
Wood is the main material for your gate. Pine and cedar are popular choices. Pine is light, easy to cut, and affordable. Cedar resists moisture and insects, making it more durable. Hardwood like oak is strong but heavier and costlier. Choose smooth, knot-free wood for safety. Sand the wood to avoid splinters.
Hinges And Fasteners
Hinges connect the gate panels and allow folding. Use sturdy metal hinges for durability. Brass or stainless steel resist rust and last longer. Screws should be strong and fit the hinges. Use screws that are not too long to avoid wood damage. Fasteners must hold the gate securely without wobbling.
Safety Features
Safety is key for pets and family. Round the wood edges to prevent injuries. Use non-toxic paint or finish to protect the wood. Avoid small parts that pets can swallow. Add rubber stoppers to prevent pinching fingers. Check that hinges and fasteners do not have sharp edges.
Tools Required
Building a folding pet gate needs some basic tools. These tools help you cut, measure, and put parts together. Having the right tools makes the job easier and faster. Here is a list of tools you will need for each step of the project.
Cutting Tools
You need sharp cutting tools to shape the wood or metal. A handsaw or a power saw works well. A jigsaw helps to cut curves or small pieces. Sandpaper or a sanding block smooths rough edges. Keep blades sharp for clean, safe cuts.
Measuring Tools
Accurate measurements are important for a good fit. Use a tape measure to check lengths. A ruler or a square helps mark straight lines. A pencil or marker makes clear marks on material. Double-check measurements before cutting to avoid mistakes.
Assembly Tools
Put the gate parts together with assembly tools. Screwdrivers or a drill fit screws quickly. A hammer is useful for nails or small taps. Clamps hold pieces steady while you work. Hinges and screws are needed to join panels.
Design Planning
Design planning is the first step in making a folding pet gate. It helps create a clear plan. A good design saves time and materials. It also ensures the gate fits your space and needs perfectly.
Gate Dimensions
Measure the width of the doorway or space for the gate. Add a few extra inches for comfort and safety. The height should be tall enough to stop your pet from jumping over. Consider the size of your pet when deciding dimensions. Accurate measurements prevent mistakes during building.
Folding Mechanism
Choose a folding method that is easy to use. Common options include hinges or sliding panels. The mechanism must be strong to hold the gate in place. It should fold smoothly for easy storage. Test the folding action before final assembly.
Aesthetic Considerations
Select materials that match your home decor. Wood offers a warm, natural look. Metal gives a modern, sleek style. Choose colors that blend well with your room. A neat design makes the gate look like part of your home.
Cutting The Wood
Cutting the wood is a key step in making your folding pet gate. It shapes the pieces that will form the gate’s frame. Precise cuts ensure the gate fits well and works smoothly.
Use the right tools and take your time. Careful cutting helps avoid mistakes and keeps the wood strong. Follow simple steps for best results.
Measuring And Marking
Start by measuring the wood twice. Check the size needed for each part of the gate. Mark the lines clearly with a pencil. Use a ruler or tape measure for accuracy. Clear marks guide your cuts and reduce errors.
Safe Cutting Techniques
Wear safety goggles and gloves before cutting. Use a saw that fits the wood thickness. Keep your hands away from the blade. Cut slowly and steadily along the marked lines. Support the wood on a stable surface. Stop and check your progress often to stay on track.
Assembling The Frame
Assembling the frame is a key step in making a folding pet gate. This part shapes the gate’s structure and makes it strong. It needs careful work to fit all parts well. The frame should be steady and smooth to fold easily. Follow clear steps to join the wood and add hinges. This will help create a safe gate for your pet.
Joining Wood Pieces
Start by arranging the wood pieces on a flat surface. Match the pieces by size and shape. Use wood glue on the edges for a firm hold. Press the pieces together and wipe off extra glue. Next, nail or screw the pieces at the corners. This keeps the frame strong and steady. Check all joints to make sure they fit tight. Let the glue dry before moving to the next step.
Attaching Hinges
Place the hinges where the frame panels meet. Mark the screw holes with a pencil. Use a drill to make small guide holes. Attach the hinges with screws using a screwdriver. Test the movement of the panels. They should fold smoothly without sticking. Tighten or loosen screws if needed. Proper hinge placement helps the gate fold easily and last long.

Credit: arloren.com
Finishing Touches
Finishing touches give your folding pet gate a polished, professional look. They also protect the wood and make it safe for your pet. Take time to complete these steps carefully. This ensures the gate lasts longer and looks great in your home.
Sanding And Smoothing
Start by sanding the entire gate with fine-grit sandpaper. Smooth all surfaces and edges to remove rough spots. This prevents splinters that can hurt your pet. Sanding also helps paint or stain stick better. Wipe away dust with a clean cloth before moving on.
Painting Or Staining
Choose paint or stain that is safe for pets. Apply thin, even coats with a brush or cloth. Let each coat dry completely before adding another. Painting adds color and hides imperfections. Staining highlights the wood’s natural beauty while adding color.
Adding Protective Coating
Apply a clear protective coating after paint or stain dries. Use a water-based, non-toxic sealant for safety. This coating guards against scratches, moisture, and dirt. It also makes cleaning easier. Apply two coats for the best protection, allowing drying time in between.
Installation Tips
Installing a folding pet gate correctly makes it safe and easy to use. Follow these simple tips to get the best fit. Proper installation helps keep pets secure and gates stable. Take your time with each step for great results.
Positioning The Gate
Place the gate where you want to block your pet. Choose a spot with flat, clean surfaces. Avoid uneven floors or walls to keep the gate steady. Measure the width to match the gate size. Make sure the gate covers the entire opening fully.
Securing To Doorframes
Use strong screws or brackets to fix the gate to the doorframe. Check that the frame is solid enough to hold the gate. Tighten screws firmly but do not damage the wood. Test the gate’s hold by gently pushing it. Secure both sides for extra safety.
Adjusting Folding Angles
Set the folding panels to the right angle for your space. Open the gate fully to check the folds move smoothly. Adjust the hinges to tighten or loosen the fold. Keep the angles steady to prevent the gate from collapsing. Make small changes and test often.
Maintenance And Safety
Maintaining your folding pet gate is key to keeping pets safe and the gate working well. Regular care helps prevent accidents and extends the gate’s life.
Safety is a top priority. Check the gate often to catch issues early. Clean it to keep materials in good shape. Strong materials mean a secure barrier for your pet.
Regular Inspections
Look over the gate every week. Check hinges, locks, and joints for wear or damage. Tighten screws and bolts that feel loose. Watch for cracks or sharp edges that can hurt pets. Fix problems right away to avoid accidents.
Cleaning Advice
Wipe the gate with a damp cloth to remove dirt. Use mild soap for tougher stains. Avoid harsh cleaners that can damage materials or leave harmful residues. Dry the gate fully to stop rust or mold. Clean often to keep the gate safe and fresh.
Ensuring Durability
Choose strong materials for your folding gate. Wood or metal work well if treated properly. Apply a sealant or paint to protect wood from moisture. Lubricate hinges to keep them moving smoothly. Store the gate indoors during harsh weather to avoid damage.

Credit: carlsonpetproducts.com
Frequently Asked Questions
What Materials Are Needed To Make A Folding Pet Gate?
You need wood panels, hinges, screws, a latch, sandpaper, and paint. Choose durable, pet-safe materials for safety and longevity. Tools like a drill, saw, and measuring tape will help with precise assembly.
How Do I Ensure The Pet Gate Fits My Doorway?
Measure the doorway’s width and height accurately. Design the gate panels to fold and fit within these dimensions. Adjustable hinges can help customize the fit for different door sizes.
Is A Folding Pet Gate Safe For All Pets?
Yes, if built with sturdy materials and secure locks. Ensure there are no sharp edges or gaps pets can squeeze through. Regularly inspect the gate for wear and stability to maintain safety.
Can I Customize The Folding Pet Gate Design?
Absolutely! You can paint it any color, add decorative trim, or choose different wood types. Customizing enhances the gate’s look and matches your home décor while keeping it functional.
Conclusion
Making a folding pet gate is easier than it seems. You only need a few tools and some basic steps. This gate helps keep your pets safe and your home tidy. You can customize it to fit your space perfectly.
It saves money compared to buying one. Try building one yourself and enjoy the satisfaction. Your pet will appreciate the safe space too. Start your project today and see the difference it makes. Simple, useful, and fun to create.