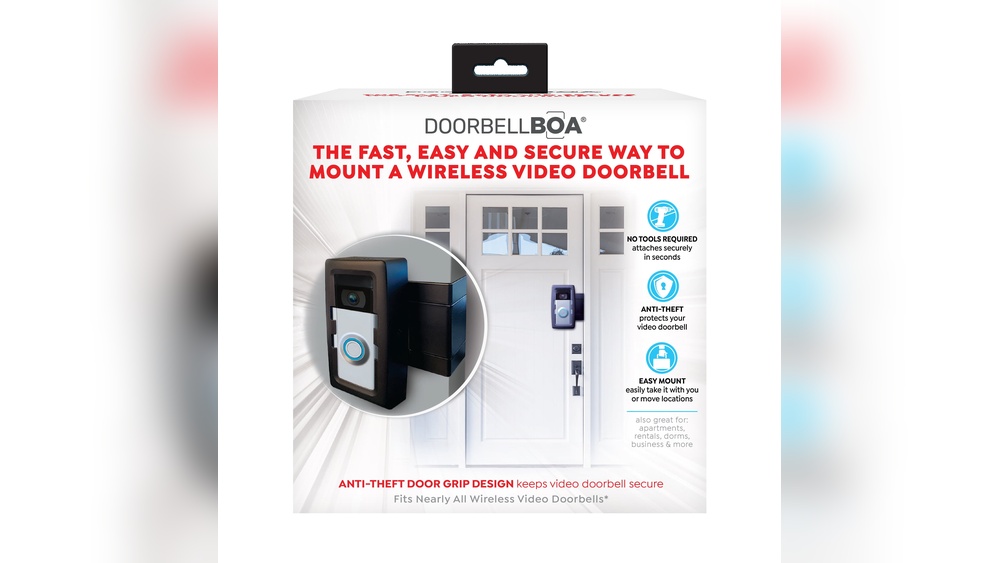
Are you worried about your video doorbell being stolen or damaged? Installing an anti-theft mount can protect your device and give you peace of mind.
In this guide, you’ll learn simple steps to securely install your anti-theft video doorbell mount quickly and easily. By the end, your doorbell will be safer than ever, and you’ll know exactly how to keep it that way. Ready to protect your investment?
Let’s get started!

Credit: www.amazon.com
Choosing The Right Mount
Choosing the right mount for your anti-theft video doorbell is very important. It affects how well the doorbell works and how secure it stays. The right mount keeps the doorbell steady and protects it from theft or damage. Knowing what options exist helps you pick the best one for your needs.
Types Of Mounts Available
There are several types of mounts for video doorbells. Wall mounts are the most common. They attach directly to the wall near your door. Corner mounts let you place the doorbell at an angle. This can give a wider view of your porch. Surface mounts fit on flat surfaces like wood or metal. Some mounts include adjustable brackets. These help you change the angle of the doorbell easily.
Compatibility With Doorbell Models
Not all mounts fit every video doorbell. Check your doorbell’s brand and model before buying a mount. Manufacturers often design mounts for specific models. Using the wrong mount can make installation hard or impossible. It might also affect the doorbell’s performance. Always pick a mount that matches your doorbell exactly.
Material And Durability Considerations
Mount materials affect how long they last outside. Metal mounts are strong and resist damage. Plastic mounts are lighter but may break faster. Look for mounts with weatherproof coatings. They protect against rain, sun, and cold. A durable mount keeps your doorbell safe from theft and harsh weather. Choose a mount built for outdoor use to ensure it lasts.
Tools And Materials Needed
Installing an anti-theft video doorbell mount requires the right tools and materials. Having everything ready helps the process go smoothly. It saves time and prevents mistakes. This section lists what you need for a safe and strong installation.
Basic Tools List
- Electric drill with drill bits
- Screwdriver (Phillips and flathead)
- Measuring tape
- Level
- Pencil or marker
- Adjustable wrench
- Wire stripper (if wiring is needed)
Safety Equipment
- Safety goggles to protect your eyes
- Work gloves to protect your hands
- Dust mask for drilling dust
- Non-slip shoes for stable footing
Additional Supplies
- Anchors and screws (usually included with the mount)
- Sealant or weatherproof tape
- Extension cord (if power source is far)
- Step ladder for reaching high spots
- Cleaning cloth to wipe surfaces
Preparing The Installation Site
Preparing the installation site is the first step to a secure and stable video doorbell mount. It ensures the device works well and stays in place. Taking time to prepare properly saves effort later and avoids common problems.
Selecting The Optimal Location
Choose a spot near your front door with a clear view of visitors. The area should be easy to reach for installation and maintenance. Avoid places exposed to direct sunlight or heavy rain. The height should allow the camera to capture faces clearly. Pick a location where the Wi-Fi signal is strong for smooth video streaming.
Cleaning And Surface Preparation
Clean the surface thoroughly before mounting. Remove dust, dirt, and grease with a damp cloth and mild soap. Let the area dry completely to ensure strong adhesion. For rough or uneven surfaces, consider sanding or smoothing the area. This step helps the mount stick firmly and prevents it from falling.
Checking For Wiring And Obstacles
Look for any hidden wires or cables behind the wall. Use a wire detector to avoid damage during drilling. Check for pipes or other obstacles that could block installation. Ensure there is enough space for the mount and cables. Planning this step prevents accidents and costly repairs later.
Mount Installation Steps
Installing an anti-theft video doorbell mount is simple with clear steps. Follow each step carefully for a secure setup. Proper mounting keeps your doorbell safe and working well.
Marking Mounting Points
Start by holding the mount where you want to place it. Use a pencil to mark the holes on the wall. Check the marks to make sure they are level. Adjust if needed for a straight fit.
Drilling And Anchoring
Choose a drill bit size that fits your anchors. Drill holes at the marked points gently. Insert wall anchors into the holes for a tight hold. Tap anchors in fully with a hammer if needed.
Securing The Mount Firmly
Align the mount with the drilled holes. Use screws to attach the mount to the wall anchors. Tighten screws with a screwdriver until the mount feels stable. Avoid over-tightening to prevent damage.
Attaching The Video Doorbell
Attaching the video doorbell is a key step in securing your home. This process ensures the device works correctly and stays safe. Follow these simple steps to attach the doorbell properly.
Aligning The Doorbell With The Mount
First, hold the video doorbell close to the mount. Check that the edges of the doorbell line up with the mount slots. Make sure it fits snugly without gaps. Proper alignment helps the doorbell stay secure. Press gently but firmly until you hear a click.
Connecting Power And Wiring
Next, connect the wires to the video doorbell. Match the wires to the correct terminals on the device. Tighten screws to hold wires in place. If your doorbell uses batteries, insert them now. Double-check the connections before moving on.
Testing The Device Placement
Turn on the power to test the doorbell. Look at the camera feed on your phone or monitor. Adjust the angle if the view is blocked or off-center. Make sure the device detects motion clearly. Confirm sound and video work well before finalizing the mount.

Credit: www.amazon.com
Enhancing Security Features
Enhancing the security features of your anti-theft video doorbell mount ensures better protection. This section covers simple ways to increase safety. These steps help keep your device safe from theft or damage.
Using Anti-theft Screws
Anti-theft screws are special screws that are hard to remove. They prevent thieves from easily taking your doorbell. Use these screws to secure the mount tightly. Choose screws that fit your doorbell model. Tighten them with the proper tools for a firm hold.
Setting Up Alerts And Notifications
Most video doorbells offer alert features for activity detection. Set up notifications on your phone or email. This lets you know when someone approaches your door. Customize alert settings for motion or sound detection. Quick alerts help you respond to threats fast.
Regular Maintenance Tips
Keep your doorbell and mount clean and in good shape. Check screws and mounts regularly for looseness. Clean the camera lens to maintain clear video quality. Test alert functions often to confirm they work properly. Regular care extends your doorbell’s life and security.

Credit: www.walmart.com
Frequently Asked Questions
How Do I Install An Anti-theft Video Doorbell Mount?
First, select a sturdy wall near your door. Use a drill to create holes for screws. Attach the mount securely and fix the doorbell. Tighten all screws to prevent theft and test the device for stability and proper function.
What Tools Are Needed For Installation?
You will need a drill, screwdriver, screws, anchors, and a level. Additionally, have a pencil to mark drill points. Ensure you have the correct drill bit size for your wall type. Safety gear like gloves and glasses is also recommended.
Can I Install The Mount On Any Surface?
The mount can be installed on wood, brick, or concrete surfaces. Use appropriate anchors and drill bits for each surface type. Avoid drywall or weak surfaces to ensure security and stability of the doorbell mount.
How To Secure The Doorbell Against Theft?
Use tamper-proof screws included with your mount. Tighten all screws firmly to prevent easy removal. Consider adding an alarm or camera alert for tampering. Regularly check the mount’s stability and replace any worn parts promptly.
Conclusion
Installing an anti-theft video doorbell mount helps protect your device. It keeps your doorbell safe from theft and damage. The process is simple and does not take much time. Follow the steps carefully for a secure fit. A well-installed mount improves your home’s security.
Enjoy peace of mind knowing your doorbell stays in place. Regular checks ensure the mount remains strong and reliable. Protect your investment with this easy, smart solution.