Are your string lights flickering or some LEDs not shining as bright as before? Replacing LED lights in string lights might seem tricky, but you can do it yourself with just a few simple steps.
Imagine bringing your favorite lights back to life without spending extra money on a whole new set. In this guide, you’ll discover easy, clear instructions to fix your string lights quickly. Keep reading, and you’ll learn how to save time and get that warm glow back exactly when you want it.

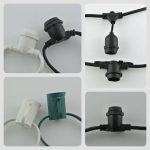
Credit: www.amazon.com
Tools And Materials Needed
Replacing LED lights in string lights needs a few simple tools and materials. Having the right items makes the process smooth and safe.
Prepare everything before starting. This helps avoid delays or mistakes. Each tool has a clear role in the replacement task.
Safety Gloves
Wear safety gloves to protect your hands. They prevent cuts and electric shocks. Gloves also improve grip on small parts.
Replacement Led Bulbs
Use LED bulbs that match your string lights. Check the size and voltage to avoid damage. Using correct bulbs ensures good light quality.
Small Screwdriver
A small screwdriver helps open the bulb holder. Choose one that fits the screws well. This tool makes removing bulbs easier.
Wire Stripper
Wire strippers remove insulation from wires if needed. They help expose wires for proper connection. Use a size that fits your wire thickness.
Multimeter
A multimeter tests the electrical circuit. It shows if wires carry power or have faults. This tool helps find problems quickly.
Electrical Tape
Electrical tape insulates wire connections. It keeps wires safe from moisture and contact. Use good quality tape for lasting protection.

Credit: www.ifixit.com
Safety Precautions
Replacing LED lights in string lights needs care. Safety comes first to avoid accidents. Follow simple steps to keep yourself safe and protect the lights.
Turn Off And Unplug The Lights
Always switch off the string lights before starting. Unplug them from the power source. This stops electricity flow and lowers shock risk.
Work In A Dry Place
Choose a dry area to replace LEDs. Water and electricity do not mix well. Dry hands and surface help prevent slips and shocks.
Use The Right Tools
Grab tools made for small electronics work. Tweezers or small pliers work best. Avoid using sharp or heavy tools that can break the lights.
Handle Leds With Care
LED bulbs are small and fragile. Hold them gently by the base, not the glass. This reduces the chance of damage.
Wear Protective Gloves
Use thin gloves to protect hands. Gloves stop cuts and electric shocks. They also keep oils from fingers off the bulbs.
Identifying The Problem
Before replacing LED lights in string lights, you must find the exact problem. This step saves time and effort. Identifying the issue helps you fix only what is necessary. It avoids wasting parts or money on unnecessary replacements.
Start by carefully checking the bulbs and wiring. Both are common sources of failure in string lights. A clear understanding of the problem leads to a faster, easier repair.
Checking For Burned Out Bulbs
Look closely at each bulb in the string lights. Burned out bulbs often look dark or blackened inside. Some bulbs may flicker or not light at all. Replace any bulbs that seem damaged or dark.
Test the bulbs by gently pressing them in their sockets. Sometimes a loose bulb causes a break in the circuit. Tighten any bulbs that feel loose. This step may restore the lights without further work.
Inspecting Wiring And Connections
Examine the wiring along the entire string. Look for cuts, cracks, or exposed wires. Damaged wires cause shorts or breaks in the electrical flow. Replace or repair damaged sections carefully.
Check all connections, including plugs and sockets. Loose or dirty connections can stop the lights from working. Clean any dirt or debris and secure all plugs tightly. Good connections are key to proper function.
Removing Old Led Bulbs
Removing old LED bulbs from string lights is the first step in keeping your lights bright and functional. It requires care to avoid damage to the bulbs or the wiring. Follow simple steps to make the process safe and easy.
Turning Off The Power
Always switch off the power before touching any bulbs. Unplug the string lights from the outlet to avoid electric shock. Confirm the lights are off by pressing the switch. Safety first. Never skip this step.
Gently Extracting Bulbs
Hold the base of the bulb firmly but gently. Pull the bulb straight out with a slow, steady motion. Avoid twisting or yanking to prevent damage. If the bulb feels stuck, wiggle it slightly. Take your time to protect the socket and wires.
Choosing Replacement Leds
Choosing the right replacement LEDs is important for your string lights. The correct LED bulbs keep your lights working well and looking good. Picking the wrong ones can cause problems like flickering or no light at all.
Focus on key factors like voltage, size, color, and brightness. These details help you find the best match for your string lights. This guide makes the choice easier and helps you enjoy your lights longer.
Matching Voltage And Size
Voltage must match the original LED bulb. Too high or too low voltage can damage the lights. Check the number on the old bulb or the string light label. This number shows the voltage needed.
Size also matters. Replacement LEDs should fit the socket perfectly. Bulbs too big or too small won’t work well. Measure the bulb or check the packaging for size details. This ensures easy installation and good contact.
Selecting Color And Brightness
Pick a color that matches your existing lights. Using different colors can make the string look uneven. Common colors include warm white, cool white, red, green, and blue.
Brightness affects how your lights look at night. Check the lumen or candlepower rating. A bulb too bright or too dim can spoil the effect. Choose one close to your original LED’s brightness for a balanced look.
Installing New Led Bulbs
Installing new LED bulbs in string lights is a simple task that brightens up any space. Proper installation ensures the lights work well and last longer. Follow these clear steps to replace bulbs safely and correctly.
Inserting Bulbs Correctly
Hold the new LED bulb by its base. Avoid touching the glass part to keep it clean. Align the bulb with the socket carefully. Push the bulb gently but firmly into the socket. Make sure it fits snugly without forcing it. A loose bulb may flicker or not light up.
Securing Connections
Check the bulb’s connection after insertion. Wiggle the bulb lightly to test stability. Tighten any loose sockets if possible. Secure wires near the bulb to prevent pulling. Proper connections stop flickering and power loss. This keeps your string lights glowing brightly for longer.
Testing The String Lights
Testing string lights is a key step before replacing any LED bulbs. It helps find which bulbs work and which need replacement. This saves time and effort. Testing also ensures the entire string lights up correctly after repair.
Powering On And Checking Lights
Plug in the string lights carefully. Watch for any lights that fail to turn on. Check the whole string, not just one section. Note any bulbs that flicker or stay dark. These bulbs may be faulty or loose in their sockets. Make sure the power source is secure and working.
Troubleshooting Common Issues
Start by tightening loose bulbs. Loose connections often cause lights to go out. Replace any burned-out bulbs with the same type and size. Check the fuse inside the plug if many lights are off. A blown fuse needs replacement to restore power. Inspect the wire for breaks or damage. Damaged wires can stop electricity flow and cause dark spots.
Maintaining String Lights
Maintaining string lights is key to keeping them bright and safe. Proper care helps the lights last longer and shine better. Regular checks and smart storage prevent damage and save money.
Regular Inspections
Check your string lights before and after use. Look for broken bulbs, frayed wires, or loose connections. Replace any damaged parts quickly to avoid hazards. Clean the bulbs gently to keep the glow strong. These small steps keep your lights working well.
Proper Storage Tips
Store string lights in a dry, cool place. Avoid twisting or tangling the wires during storage. Use a spool or a hanger to keep them neat. Keep lights away from sharp objects or heavy items. Proper storage stops damage and makes setup easier next time.

Credit: www.youtube.com
Frequently Asked Questions
How Do I Safely Replace Led Bulbs In String Lights?
Always unplug the string lights before replacing LEDs. Use matching bulbs to ensure compatibility. Handle bulbs gently to avoid damage. Replace one bulb at a time to identify faulty ones. Test the lights after replacement to ensure proper functioning.
What Tools Are Needed To Replace Led String Light Bulbs?
You typically need no special tools to replace LED bulbs. Sometimes, a small flathead screwdriver helps remove clips. Use gloves to protect bulbs and hands. Ensure you have replacement bulbs matching your string light model for easy installation.
Can I Replace Led Bulbs With Different Colors?
Yes, but ensure the new bulbs fit your string lights. Different colors may affect light output and aesthetics. Use bulbs designed for your light model to avoid electrical issues. Mixing colors can create unique lighting effects but may reduce uniformity.
How Do I Identify A Faulty Led Bulb In String Lights?
Look for bulbs that don’t light up when powered. Inspect for visible damage or discoloration. Remove and test bulbs individually if possible. Replacing the faulty bulb usually restores the entire string’s function. Faulty bulbs often cause sections of lights to go out.
Conclusion
Replacing LED lights in string lights is simple and saves money. Start by unplugging the lights for safety. Find the faulty bulb and gently remove it. Insert the new LED bulb carefully, matching the size and type. Test the string lights before hanging them again.
Regular checks keep your lights bright and working well. Small steps make your decorations last longer. Enjoy your refreshed, glowing string lights all year round. Easy fixes bring big smiles.