Are you ready to upgrade your home security with the Ring Video Doorbell 2? Installing a diode might sound tricky, but it’s actually a simple step that can make a big difference in your doorbell’s performance.
In this guide, you’ll learn exactly how to install the diode quickly and safely, even if you’re not a tech expert. Keep reading, and you’ll have your Ring Video Doorbell working perfectly in no time.
Tools And Materials Needed
Before starting the installation of your Ring Video Doorbell 2 diode, gather all necessary tools and materials. Proper preparation makes the process smoother and faster. Having everything ready avoids interruptions during installation.
Essential Tools
- Electric drill with drill bits for making holes
- Screwdriver, preferably a Phillips head
- Wire stripper to prepare electrical wires
- Voltage tester to check power status
- Measuring tape for accurate placement
- Level to ensure the doorbell is straight
- Safety gloves to protect your hands
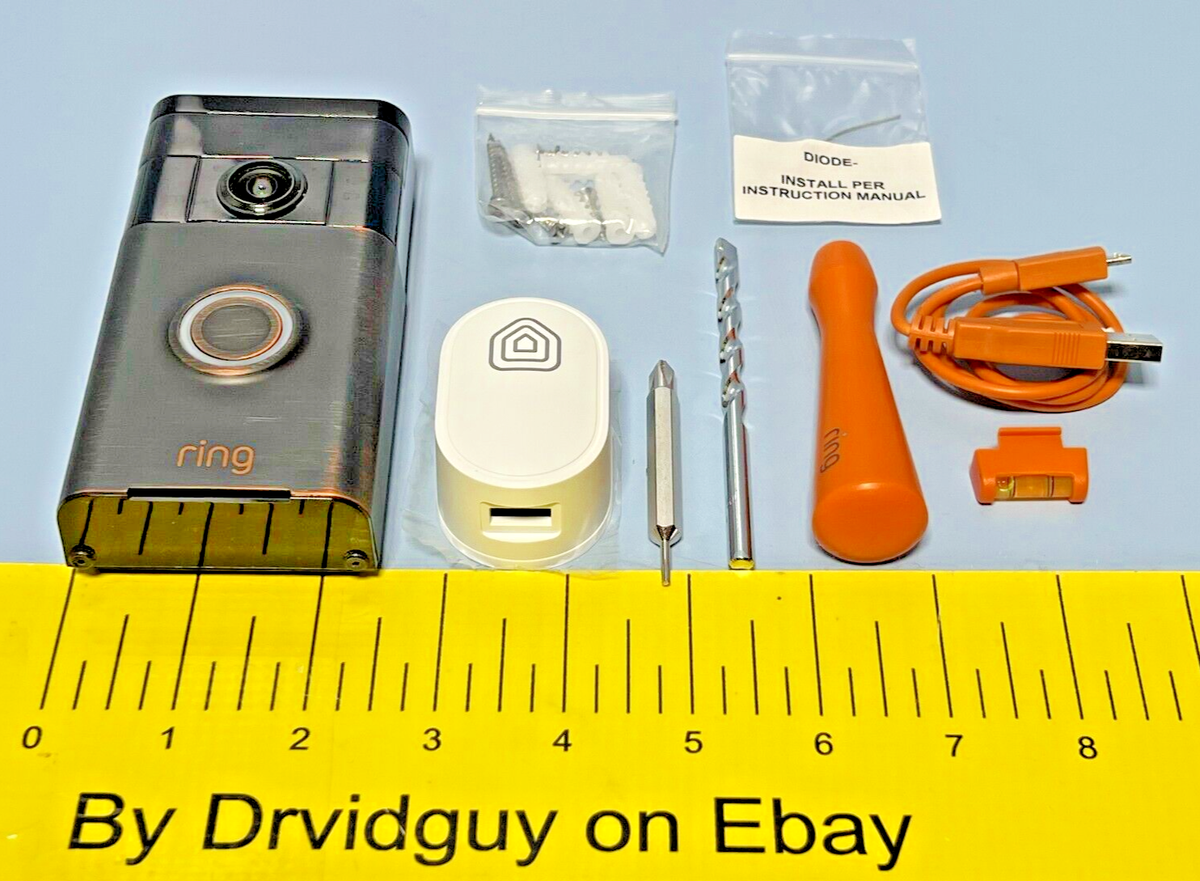
Required Materials
- Ring Video Doorbell 2 diode unit
- Mounting bracket included with the doorbell
- Diode component for electrical connection
- Mounting screws and anchors
- Electrical tape for securing wires
- Battery or existing doorbell wiring for power
Preparing Your Doorbell
Preparing your Ring Video Doorbell 2 diode is the first step for a smooth installation. This process ensures safety and sets a solid base for your new device. Taking time to prepare helps avoid mistakes and damage. Follow these steps carefully to get started.
Turn Off Power
Safety is key. Switch off power to your doorbell at the circuit breaker. This stops electrical shocks during installation. Double-check by pressing your old doorbell button. It should not ring. If it still rings, power is not off yet.
Remove Existing Doorbell
Next, remove your old doorbell carefully. Unscrew the button from the wall. Hold the wires firmly to avoid damage. Disconnect the wires and keep them ready. Keep the screws and mounting bracket for reuse if possible.
Installing The Diode
Installing the diode on your Ring Video Doorbell 2 is a simple but important step. The diode helps protect your doorbell from electrical issues. This guide breaks down the process into easy parts.
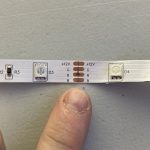
Locate The Terminals
First, find the terminals on your doorbell. These are small screws or connectors inside the back panel. Remove the doorbell from its mount to see them clearly. The terminals connect the wires from your doorbell system. Identifying them correctly is key to a safe installation.
Connect The Diode Correctly
Next, take your diode and look for the marked side. The diode has a line that shows its direction. Attach the diode across the terminals, matching the line to the correct terminal. Usually, the line goes to the positive terminal. Tighten the screws to hold the diode firmly. Double-check the connection for a secure fit. A proper connection keeps your doorbell working well.

Credit: www.youtube.com
Mounting The Ring Doorbell 2
Mounting the Ring Doorbell 2 is a simple step that sets up your device securely. Proper installation ensures clear video and reliable operation. The process starts with attaching the mounting bracket to your chosen spot. Then, you secure the doorbell to the bracket firmly. Follow these steps to place your Ring Doorbell 2 correctly and safely.
Attach The Mounting Bracket
First, select a flat surface near your door. Use the screws and anchors that come with the doorbell kit. Hold the mounting bracket against the surface. Mark the screw holes with a pencil. Drill holes at the marks if needed. Insert anchors for extra hold on drywall or brick. Screw the bracket tightly to the wall. Make sure it does not move or wiggle.
Secure The Doorbell
Align the bottom of the Ring Doorbell 2 with the bracket. Tilt the doorbell onto the mounting bracket until it clicks. Use the included security screws to lock the doorbell in place. Tighten the screws with the special screwdriver provided. Check the doorbell is firm and does not fall off. This step helps keep your device safe and stable.
Wiring The Doorbell
Wiring the Ring Video Doorbell 2 diode is a key step for proper function. Correct wiring ensures the doorbell rings and the diode protects your system from power issues. Follow clear steps to connect wires safely.
Focus on secure connections and correct diode placement. This will help avoid common problems like no sound or damage to your doorbell.
Connect Wires To Terminals
Start by turning off power at the breaker. This keeps you safe during installation. Take the existing doorbell wires and connect them to the screw terminals on the back of the Ring Video Doorbell 2.
Loosen the screws, insert the wires, then tighten the screws firmly. Check that wires do not touch each other. Loose or crossed wires can cause short circuits or no ring sound.
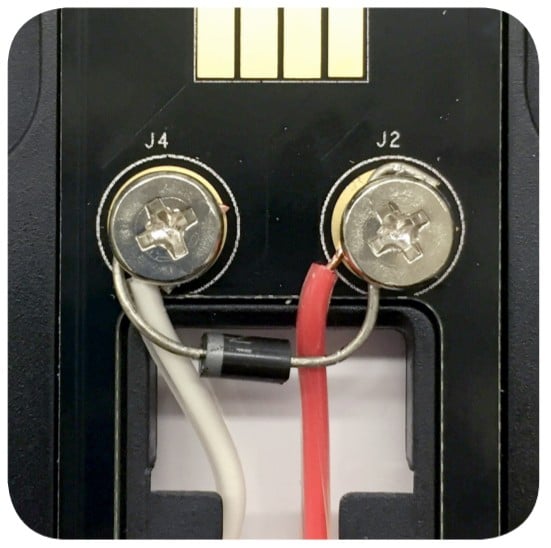
Ensure Proper Diode Orientation
The diode must be placed in the right direction. It has a small line marking the cathode side. Connect this side to the wire coming from the transformer.
Wrong diode placement stops the doorbell from working. Double-check the line on the diode before tightening wires. A properly oriented diode protects your doorbell from electrical surges.
Credit: www.arloren.com
Restoring Power And Testing
After installing the diode for your Ring Video Doorbell 2, restoring power is the next step. This process ensures your doorbell works correctly and safely. Testing the doorbell confirms the diode installation is successful. Follow these steps carefully to avoid any issues.
Turn Power Back On
Locate your home’s circuit breaker panel. Find the switch that controls your doorbell’s power. Flip the switch back to the “on” position. This action restores electricity to your doorbell system. Wait a few seconds for the power to stabilize. Avoid touching any wires during this step.
Check Doorbell Functionality
Press the doorbell button to check if it rings. Look at the Ring app on your phone. Confirm you receive the live video feed and alerts. Test the chime inside your home to ensure it sounds. If the doorbell does not work, recheck your diode connection. A working doorbell means your installation is complete.
Troubleshooting Common Issues
Troubleshooting common issues during the Ring Video Doorbell 2 diode installation can save time and effort. Many problems stem from small mistakes or overlooked details. Identifying these issues early helps ensure your doorbell works smoothly. The following sections cover common errors and solutions to keep your device running well.
Diode Installation Errors
Incorrect diode placement causes many installation problems. The diode must connect to the correct terminals on the doorbell. Check the wiring carefully before securing the diode in place. If the diode is reversed, the doorbell may not ring or charge properly. Use a multimeter to confirm correct diode orientation. Secure the diode firmly to avoid loose connections. Loose wiring can cause intermittent issues or no response from the doorbell.
Power And Connectivity Problems
Power issues are common during installation. Verify your doorbell’s transformer provides the right voltage. Low or unstable power prevents the doorbell from working correctly. Check wiring for damage or corrosion. Ensure all connections are tight and clean. Connectivity problems often relate to Wi-Fi signals. Place the doorbell within range of your router. Avoid thick walls or metal objects that block signals. Restart your router and doorbell if connection fails. Regularly update your doorbell’s firmware for best performance.
Maintaining Your Ring Doorbell 2
Maintaining your Ring Doorbell 2 ensures it works well and lasts longer. Regular care keeps the video clear and the device responsive. Simple steps help avoid common problems and save time in the future.
Regular Cleaning
Clean the doorbell surface often. Use a soft cloth to wipe dirt and dust. Avoid harsh chemicals that can damage the lens or casing. Check for spider webs or debris around the sensor. Keep the button area free from grime to maintain good response.
Software Updates
Keep your Ring Doorbell 2 software up to date. Updates fix bugs and add new features. Open the Ring app to check for updates. Install them as soon as they appear. This helps your device stay secure and work smoothly.
Credit: www.esseg.eu
Frequently Asked Questions
What Tools Are Needed To Install Ring Video Doorbell 2 Diode?
You need a screwdriver, drill, diode, wire stripper, and voltage tester. These tools ensure a safe and proper installation of the diode. Having the right tools simplifies the process and prevents damage to your doorbell or wiring.
Why Install A Diode In Ring Video Doorbell 2?
A diode prevents power surges and protects your doorbell’s internal components. It stops electrical feedback that could cause malfunctions. Installing a diode ensures the doorbell functions smoothly and extends its lifespan.
How To Connect The Diode To Ring Video Doorbell 2 Wires?
Connect the diode in series with the doorbell’s positive wire. Ensure the diode’s cathode side faces the doorbell terminal. This setup allows current to flow correctly while preventing reverse voltage damage.
Can I Install The Diode Without Professional Help?
Yes, you can install the diode yourself if you follow instructions carefully. Basic electrical knowledge and safety precautions are necessary. If unsure, consulting a professional is recommended to avoid hazards.
Conclusion
Installing the Ring Video Doorbell 2 diode is simple and quick. Follow each step with care to avoid mistakes. A correct setup keeps your doorbell working well. Enjoy clear video and reliable alerts every time. This small part helps your doorbell last longer.
Take your time and double-check connections before finishing. Now, you can protect your home easily and safely.