Are you looking to brighten up your space with LED lights but don’t know how to connect two strings together? You’re not alone.
Connecting LED light strings may seem tricky at first, but once you know the simple steps, it becomes quick and easy. Imagine creating longer, seamless strands of light that perfectly fit your room, party, or holiday decoration without any hassle.
In this guide, you’ll discover exactly how to connect your LED light strings safely and effectively, so you can enjoy a stunning, glowing atmosphere in no time. Keep reading, and you’ll have your lights shining bright in minutes!

Credit: www.reddit.com
Types Of Led Light Strings
LED light strings come in different types. Choosing the right type helps you connect them easily. Some are simple to link, while others need special care. Understanding these types saves time and avoids damage.
Knowing the differences helps you pick the best option for your space. This guide explains the main types and how to connect two strings safely.
Battery Operated Vs Plug-in
Battery operated LED strings use small batteries for power. They are portable and work without outlets. These are good for places without plugs.
Plug-in LED strings need to connect to an electric socket. They usually offer brighter light and longer run times. Plug-in lights often allow more strings to connect.
Battery lights are smaller and less powerful. Plug-in lights can handle bigger decorations. Choose based on where and how long you want the lights on.
Connectors And Compatibility
Not all LED light strings connect the same way. Some have built-in connectors for easy linking. Others require special adapters or connectors.
Check the ends of your LED strings before joining them. Matching connectors avoid loose connections or shorts. Compatibility depends on brand and model too.
Using the wrong connector can cause damage or poor lighting. Always match the voltage and connector type for safety. This helps your lights work well together.
Tools And Materials Needed
Connecting two strings of LED lights requires a few simple tools and materials. Having the right items makes the process smooth and safe. Prepare all tools before starting to save time and avoid mistakes.
Basic Tools
You need a pair of wire cutters to trim the wires cleanly. A wire stripper helps remove the insulation without damaging the wires. Use electrical tape to cover and protect wire connections. A small screwdriver might be needed for some connectors. A multimeter is useful to check the voltage and continuity of the wires. These tools keep your work neat and secure.
Safety Equipment
Wear safety goggles to protect your eyes from wire bits and sparks. Use insulated gloves to avoid electric shocks. Work in a dry area to reduce risk. Make sure the power is off before handling any wires. Safety is important to prevent injuries and accidents.
Preparing The Led Strings
Preparing your LED strings before connecting them is important. It helps avoid problems and ensures a smooth setup. Take time to check each string carefully. This step saves effort and keeps the lights working well.
Checking For Damage
Look closely at each LED string. Check for broken bulbs or frayed wires. Damaged parts can cause shorts or stop the lights from working. Replace any faulty bulbs or wires before connecting the strings. Make sure the power cords are intact and safe to use.
Matching Connectors
Identify the connectors at the ends of your LED strings. They must fit together properly. Some strings have male and female connectors that click in place. Others may need special adapters. Using connectors that match prevents loose connections and flickering lights. Confirm the voltage and type are the same on both strings.

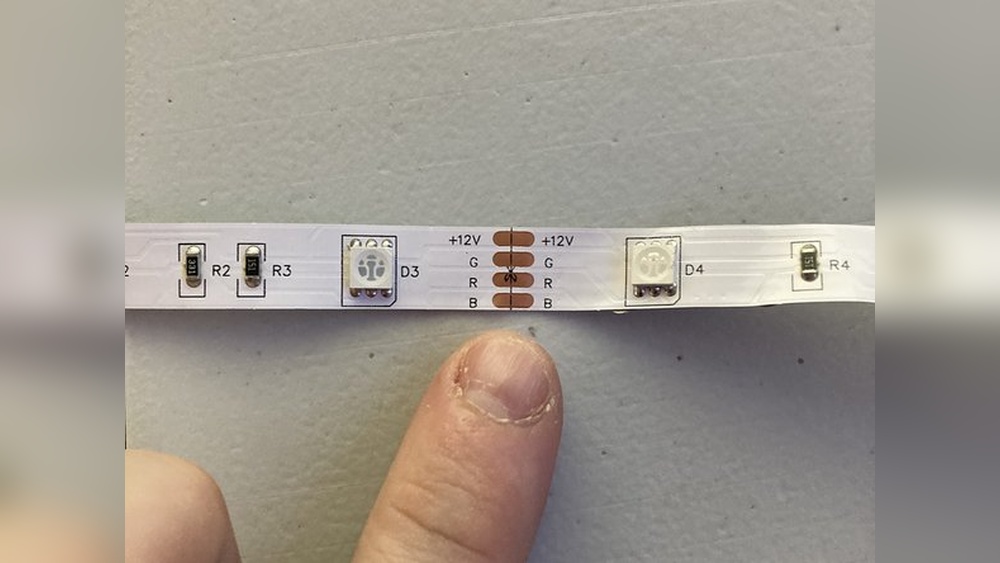
Credit: www.reddit.com
Connecting The Led Strings
Connecting two strings of LED lights is a simple process that enhances your lighting setup. It allows you to cover larger areas without extra power sources. Proper connection ensures the lights work safely and look great.
Use methods that maintain the electrical flow and protect the wires. Choose the best option for your LED strings to avoid damage or shorts.
Using Built-in Connectors
Many LED strings come with built-in connectors at the ends. These connectors make joining two strings quick and easy. Align the connectors carefully and push them together until they click. This connection is secure and often waterproof.
Check the product manual to confirm compatibility between strings. Using built-in connectors helps keep wires tidy and safe. It also avoids the need for special tools or extra materials.
Splicing Wires Safely
Splicing wires is a good option if your LED strings lack built-in connectors. Start by cutting the power supply and unplugging all lights. Strip about half an inch of insulation from each wire end.
Twist the matching wires together—positive to positive, negative to negative. Use electrical tape or heat shrink tubing to cover the splice. This prevents short circuits and protects the connection from moisture.
Double-check the wires are connected firmly before plugging the lights back in. Safe splicing keeps your LED lights working well without risk of fire or damage.
Testing The Connection
Testing the connection between two strings of LED lights is a crucial step. It ensures both strings work well together. This process helps catch any issues early. It saves time and avoids frustration later.
Start testing right after you connect the LED strings. Check the power source and the light strings carefully. Look for any signs of a bad connection or faulty lights.
Powering On
Plug the LED light strings into the power outlet. Turn on the switch or power button. Watch the lights closely as they start to glow. All LEDs should light up evenly and brightly. If some lights stay off or flicker, note which string has issues.
Troubleshooting Common Issues
If the lights do not turn on, first check the power source. Confirm the plug is fully inserted and the outlet works. Look for loose connections between the two strings. Reconnect the plugs firmly and test again.
Flickering lights may mean a loose wire or poor connection. Try tightening the connectors or switching the strings’ order. Replace any broken bulbs or damaged wires. Sometimes, a reset of the power supply can fix problems.
Testing helps ensure your LED strings work safely and look great. It avoids damage and keeps your setup bright and stable.
Safety Tips And Best Practices
Connecting two strings of LED lights can brighten any space. Safety should always be your top concern. This section covers simple tips and best practices. Follow these to avoid problems and keep your lights working well.
Avoiding Overloads
Do not connect too many LED strings together. Each string has a limit on how many can be linked. Check the packaging for this number. Overloading can cause overheating and fire risks. Use a power strip with a built-in circuit breaker. This helps protect your home’s electrical system. Always plug lights into outlets that match the voltage and wattage requirements.
Proper Handling And Storage
Handle LED light strings with care. Avoid pulling or twisting the wires. This prevents damage to the bulbs and connections. Store lights in a dry, cool place when not in use. Coil them loosely to avoid tangles and breaks. Keep lights away from pets and children. Regularly check for frayed wires or broken bulbs before use. Replace damaged parts immediately to stay safe.

Credit: www.youtube.com
Frequently Asked Questions
How Do I Safely Connect Two Led Light Strings?
To connect two LED light strings safely, use compatible connectors or solder the wires. Ensure the power supply supports the combined wattage. Avoid overloading circuits and always follow manufacturer guidelines for voltage and amperage limits to prevent hazards.
Can I Connect Different Brands Of Led Light Strings?
Connecting different brands is possible if voltage and connector types match. Check compatibility to avoid electrical issues. Using mismatched strings can cause flickering or damage. Always test the connection before permanent installation.
What Tools Do I Need To Connect Led Light Strings?
You need wire strippers, electrical tape, connectors or soldering tools, and a multimeter. These tools help create secure, reliable connections. Proper tools ensure safety and improve the lifespan of your LED light setup.
How Many Led Strings Can I Connect Together?
The number depends on the power rating and maximum load specified by the manufacturer. Usually, 3 to 5 strings can be connected in series safely. Exceeding this can cause voltage drop and damage the lights.
Conclusion
Connecting two strings of LED lights is simple and safe with the right steps. Always check the power source and connectors before starting. Use proper tools to join the wires securely. Test the lights after connecting to ensure they work well.
This way, you can enjoy bright and extended LED lighting for your space. Remember, careful work leads to better results and longer-lasting lights. Keep these tips handy for your next LED project. Brighten your home or event with ease and confidence.