Are you ready to upgrade your home security with a Ring Video Doorbell Pro? Installing it hardwired ensures your doorbell stays powered without worrying about batteries.
But if you’re unsure how to get started or worried about the wiring, don’t worry—you’re in the right place. This guide will walk you through every step, making the process simple and stress-free. By the end, you’ll have a smart, reliable doorbell that keeps you connected to your home anytime, anywhere.
Keep reading to learn exactly how to install your Ring Video Doorbell Pro hardwired, even if you’ve never done electrical work before.
Credit: www.ortholight.ch
Tools And Materials Needed
Installing a Ring Video Doorbell Pro hardwired requires specific tools and materials. These items ensure a smooth and safe setup process. Preparing everything before you start saves time and avoids frustration. Here is a list of what you need to have ready.
Essential Tools
- Electric drill with drill bits
- Screwdriver (Phillips and flathead)
- Wire stripper and cutter
- Voltage tester
- Level tool
- Pencil for marking
- Measuring tape
Required Materials
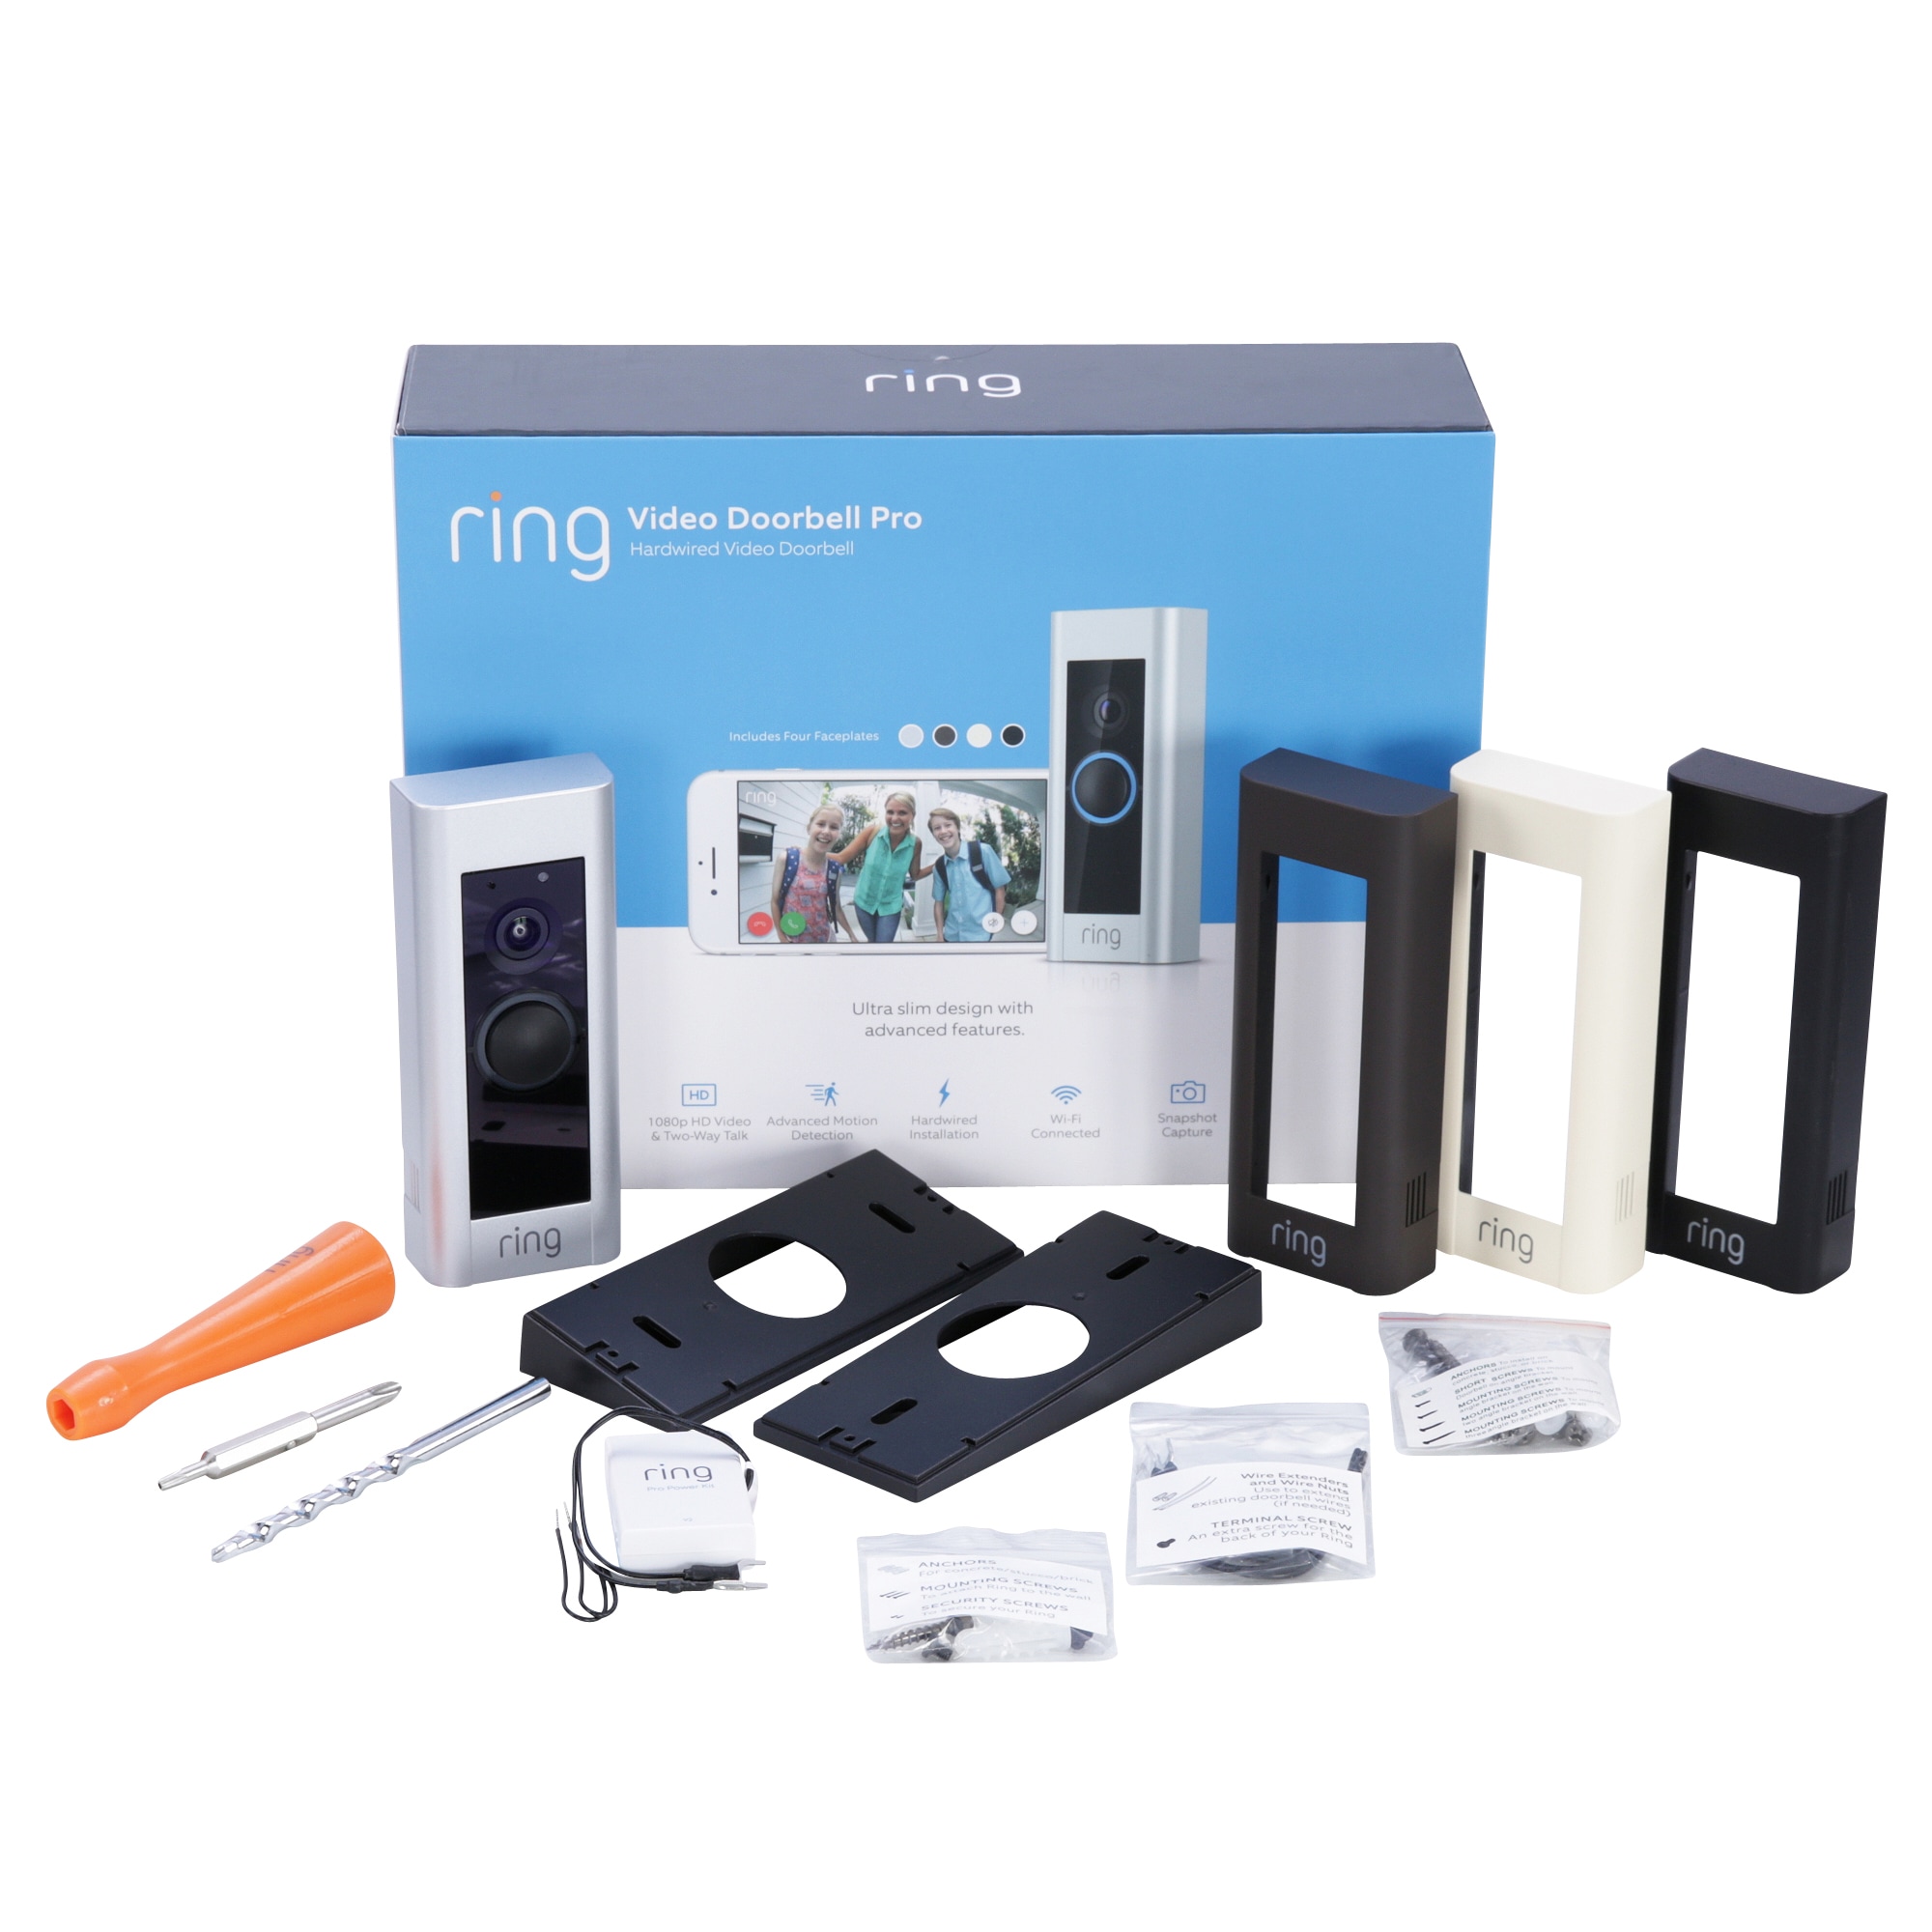
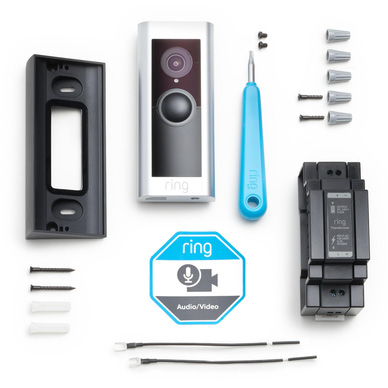
- Ring Video Doorbell Pro unit
- Mounting bracket and screws (usually included)
- Hardwired doorbell transformer (16-24V AC)
- Wire connectors or electrical tape
- Extension wires (if needed)
- Wall anchors (for drywall installation)
Preparing Your Doorbell Setup
Preparing your doorbell setup is the first step to install a Ring Video Doorbell Pro hardwired. This process ensures safety and makes the installation easier. Follow these steps carefully to avoid any issues.
Turn Off Power
Safety is the priority. Turn off the power to your existing doorbell at the circuit breaker. This step prevents electric shock during installation. Confirm the power is off by pressing the doorbell button. The chime should not ring. If it does, switch off the correct breaker.
Remove Existing Doorbell
Remove the old doorbell carefully. Start by unscrewing the doorbell button from the wall. Pull the button away gently to expose the wires. Use a screwdriver to disconnect the wires from the doorbell. Keep the wires safe and untangled for the new installation. Remove the chime cover inside your home as well. This helps with connecting the Ring Video Doorbell Pro later.
Wiring The Ring Video Doorbell Pro
Wiring the Ring Video Doorbell Pro is an important step in the installation process. It ensures your doorbell works smoothly with your home’s power system. This part requires careful attention to avoid mistakes.
Follow simple steps to connect your doorbell safely and correctly. The right wiring helps your device stay powered and functional all the time.
Identify Wires
Start by turning off the power at the breaker to avoid shocks. Look at your existing doorbell wires. Most homes have two wires connected to the doorbell chime.
Use a voltage tester to check if the wires carry power. Usually, wires are either black, white, or red. Note which wire goes where. This step is crucial for proper connection.
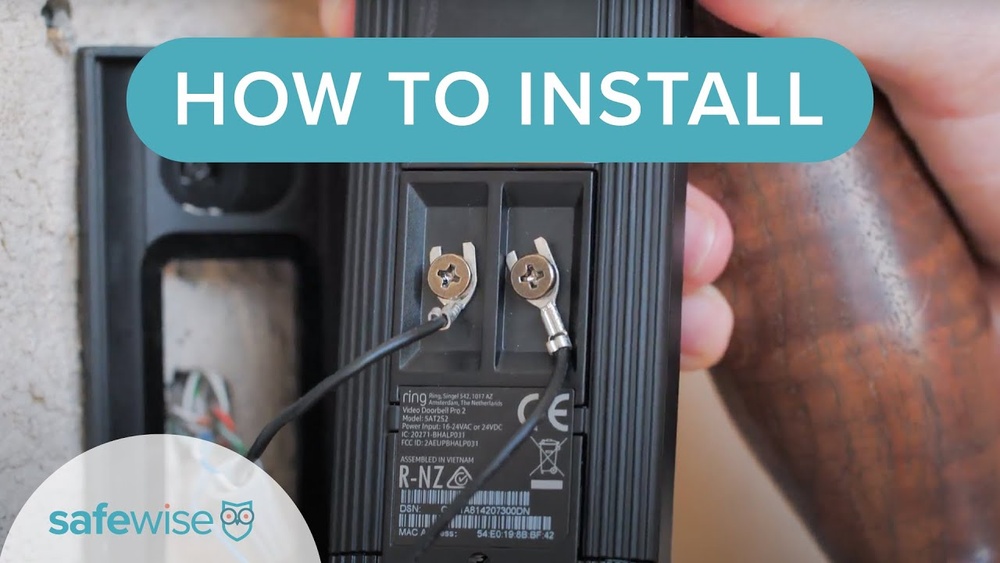
Connect Wires To Doorbell
Attach the wires to the back of the Ring Video Doorbell Pro. The device has two terminals marked for the wires. Connect one wire to each terminal.
Make sure the screws hold the wires tightly. Loose connections can cause the doorbell to fail. Once connected, secure the doorbell on the wall or mounting bracket.
Turn the power back on and test the device to confirm the wiring is correct. Proper wiring ensures your Ring Video Doorbell Pro works without interruption.
Mounting The Doorbell
Mounting the Ring Video Doorbell Pro hardwired is an important step. It ensures your device stays secure and works well. Proper mounting helps the camera capture clear views of your doorstep. Follow simple steps for a smooth installation.
Choose Mounting Location
Select a spot near your front door. The camera should see visitors clearly. Avoid places with direct sunlight or heavy rain. Make sure the location is close to your existing doorbell wires.
Attach Mounting Bracket
Use the bracket that comes with your doorbell. Hold it against the wall at the chosen spot. Mark the holes with a pencil. Drill small holes and insert anchors if needed. Screw the bracket tightly to the wall.
Secure Doorbell
Connect the doorbell wires to the back of the device. Align the doorbell with the bracket. Press the doorbell firmly until it clicks in place. Use the provided security screws to lock it. Check if the doorbell is stable and secure.
Restoring Power And Testing
After installing your Ring Video Doorbell Pro hardwired, restoring power is a key step. This step brings your doorbell back to life. Testing ensures everything works correctly. Follow these steps carefully to avoid issues.
Turn Power Back On
Go to your home’s circuit breaker panel. Find the switch you turned off for installation. Flip the switch back to the ON position. This restores electricity to your doorbell system. Wait a few seconds for the power to stabilize. Your Ring doorbell should light up or make a sound. This means it is receiving power properly.
Check Doorbell Functionality
Press the doorbell button gently. Listen for the chime inside your home. Check the Ring app on your phone. The app should show the doorbell is online. Test the video feed to see if the camera works. Speak through the app to check the microphone. Make sure the motion alerts are active. If any part does not work, review your wiring and settings. Proper power and connection are essential for full function.
Credit: www.blizanovy.cz
Setting Up The Ring App
Setting up the Ring app is an important step for your Ring Video Doorbell Pro. The app connects your doorbell to your phone. It lets you see visitors and get alerts. Follow these simple steps to get started quickly.
Download And Install App
Search for the Ring app in your phone’s app store. It works on both Android and iOS devices. Tap the download button to install it. Wait a few moments for the app to install fully. Open the app once it is ready.
Connect Doorbell To Wi-fi
Open the Ring app and sign in or create an account. Choose “Set Up Device” from the menu. Select “Doorbells” and then pick your model. Follow the prompts to connect the doorbell to your Wi-Fi. Make sure your Wi-Fi signal is strong near the doorbell.
Customize Settings
After connecting, explore the app’s settings. Adjust motion sensitivity to avoid false alerts. Set up your notification preferences for calls and alerts. Add shared users so family members can access the doorbell. Personalize the app to fit your needs.
Troubleshooting Common Issues
Troubleshooting common issues helps keep your Ring Video Doorbell Pro working smoothly. Problems can stop your doorbell from working right. Knowing how to fix them saves time and frustration. Here are some common problems and easy solutions.
Power Problems
Power issues cause the doorbell to stop working or lag. Check if the doorbell is hardwired correctly to your home’s electrical system. Use a voltage tester to confirm power flow. If the voltage is too low, the doorbell will not function. Replace old or damaged wires. Make sure the circuit breaker is not tripped. Reset the breaker if needed. A faulty transformer can also cause power problems. Replace it with a compatible one for your Ring doorbell.
Connectivity Issues
Connectivity problems stop your doorbell from sending alerts. Check your Wi-Fi signal strength near the doorbell. Walls and distance can weaken the signal. Move your router closer or use a Wi-Fi extender. Restart your router to refresh the connection. Ensure your phone and doorbell use the same Wi-Fi network. Update the Ring app and doorbell firmware. Disable any VPN or firewall that may block the connection. Test the connection by viewing the live video feed.
Installation Errors
Installation errors cause poor performance or no response. Follow the Ring installation guide carefully. Mount the doorbell at the recommended height and location. Tighten all screws to keep it stable. Use the correct mounting bracket for your doorbell model. Avoid placing the doorbell near metal objects that block signals. Double-check wiring connections for secure contact. Test the doorbell before finalizing the installation. Correct errors early to avoid future issues.

Credit: ocupatucalle.com
Safety Tips And Best Practices
Installing a Ring Video Doorbell Pro hardwired requires attention to safety. Following best practices helps avoid accidents and damage. This section covers key safety tips to keep you protected.
Electrical Safety
Turn off power at the breaker before starting the installation. Use a voltage tester to confirm no electricity flows through the wires. Avoid touching wires with bare hands. Wear insulated gloves for extra protection. Keep water away from the work area to prevent shocks. Handle wires carefully and avoid cutting them too short. Ensure all wire connections are secure and insulated. Restore power only after completing the installation and checking connections.
Proper Tool Use
Use tools designed for electrical work. A screwdriver with an insulated handle is safer. Avoid using damaged or worn tools. Keep tools organized to prevent accidents. Use a drill with the right bit size to avoid damaging walls or wires. Follow the manufacturer’s instructions for all tools. Handle sharp tools with care to avoid cuts. Store tools safely after use to prevent injuries.
Frequently Asked Questions
How Do I Hardwire A Ring Video Doorbell Pro?
To hardwire your Ring Video Doorbell Pro, connect it to your existing doorbell wires. Turn off power first. Attach wires to the back of the device, then mount it securely. Restore power and follow the app setup instructions to complete installation.
What Tools Are Needed For Installation?
You need a drill, screwdriver, voltage tester, wire stripper, and mounting screws. A level helps ensure straight placement. Having these tools ready makes installation faster and safer, preventing damage and ensuring a secure fit for your Ring Video Doorbell Pro.
Can I Use Existing Doorbell Wiring For Ring Pro?
Yes, the Ring Video Doorbell Pro is compatible with most existing doorbell wiring. Ensure your system provides 16-24 VAC at 50/60Hz. This compatibility allows for easy integration without extra wiring, saving time and installation costs.
How Do I Test If The Wiring Is Correct?
Use a voltage tester to check for power before connecting wires. After installation, test the doorbell by pressing the button and checking the app for notifications. Proper wiring ensures the device functions correctly and safely.
Conclusion
Installing a Ring Video Doorbell Pro hardwired is simple and safe. Follow each step carefully for best results. Double-check your wiring before starting the installation. Test the doorbell after connecting it to power. Enjoy clearer video and faster alerts at your door.
Protect your home with easy-to-use technology. Stay secure and aware, day and night. This small effort brings big peace of mind.