Installing a hard wired smoke detector in your home is one of the smartest steps you can take to protect your family and property. You want to make sure your smoke detector works reliably, without the hassle of changing batteries all the time.
But how do you get started? Don’t worry—this guide will walk you through every simple step, so you can set it up quickly and safely. By the end, you’ll have peace of mind knowing your home is better prepared for emergencies.
Keep reading to learn exactly how to install a hard wired smoke detector with confidence.
:max_bytes(150000):strip_icc()/install-hardwired-smoke-detectors-1152329_FINAL-5233cb01c4f34ee1bae5860132624788.png)
Credit: www.thespruce.com
Tools And Materials Needed
Installing a hard wired smoke detector requires specific tools and materials. Having the right items makes the job easier and safer. This section lists everything needed to complete the installation smoothly.
Basic Tools
Start with essential tools. A screwdriver set is key for mounting the detector and securing wires. A wire stripper helps remove insulation from electrical wires.
A drill with bits is necessary to make holes for screws or anchors. Use a voltage tester to check if wires are live before handling them.
Electrical Materials
Use electrical wire that matches your home’s wiring system, usually 14 or 12 gauge. Wire nuts connect wires safely and securely. Electrical tape adds extra protection to wire joints.
A junction box is needed if the detector wiring requires a new connection point. Make sure all materials meet local electrical codes.
Smoke Detector Kit
Choose a hard wired smoke detector with a backup battery for power outages. The kit usually includes mounting brackets and screws. Check the package for all parts before starting.

Credit: www.youtube.com
Safety Precautions
Safety is the top priority when installing a hard wired smoke detector. Taking proper precautions protects you and your home. Small mistakes can cause electric shocks or damage.
Follow these safety tips closely to avoid hazards. Work carefully and stay alert during installation.
Turn Off The Power
Always switch off the power at the main circuit breaker. This stops electricity from flowing to the wires you will handle. Test the wires with a voltage tester to make sure the power is off.
Use Proper Tools And Equipment
Use insulated tools made for electrical work. Wear safety gloves to protect your hands from sharp edges and electric shock. Avoid using damaged or worn-out tools.
Read The Manufacturer’s Instructions
Check the smoke detector’s manual before starting. Follow the specific steps and safety warnings given. Each model may have different wiring and mounting requirements.
Avoid Wet Or Damp Areas
Do not install the detector in wet places or during rain. Water and electricity are a dangerous mix. Make sure your working area is dry and safe.
Work In Good Lighting
Choose a bright work area to see wires and connections clearly. Poor lighting increases the risk of mistakes and accidents. Use a portable lamp if needed.
Choosing The Right Location
Choosing the right location for a hard wired smoke detector is very important. It helps the detector work well and keep your home safe. The detector needs to sense smoke quickly to alert you early. The placement affects how fast it detects smoke and how well it covers your space.
Ideal Placement Areas
Install smoke detectors on every level of your home. Place one inside each bedroom and outside sleeping areas. Hallways near bedrooms work well. Mount detectors on ceilings or high on walls. Smoke rises, so higher spots catch smoke first. Keep detectors away from windows, doors, and vents. These spots can cause false alarms or slow detection.
Avoiding Common Mistakes
Do not place detectors in kitchens or bathrooms. Steam and cooking fumes cause false alarms. Avoid placing detectors near heating or cooling vents. Airflow can push smoke away from the detector. Do not install detectors too close to ceiling fans. Fans can disperse smoke and delay alarms. Keep detectors at least 10 feet from cooking appliances. Check manufacturer rules for exact distances.
Turning Off Power
Turning off power is the first and most important step when installing a hard wired smoke detector. It keeps you safe from electric shocks and prevents damage to your home’s electrical system. Always make sure the power is completely off before you start working with wires.
Take your time to follow each step carefully. Safety is the top priority in this process.
Locate The Circuit Breaker
Find the main electrical panel in your home. It is usually in the basement, garage, or utility room. Open the panel door to see the circuit breakers.
Identify The Correct Breaker
Look for the breaker that controls the area where you will install the smoke detector. It may be labeled. If not, switch off the main breaker to cut power to the entire house.
Turn Off The Power
Flip the breaker switch to the OFF position. This stops the electrical current. Double-check by turning on a light or using a voltage tester to confirm no power flows.
Use A Voltage Tester
Test the wires where you will work. A voltage tester shows if any electricity is still present. Never skip this step. It ensures your safety before touching wires.
Removing Old Detector
Removing an old hard-wired smoke detector is the first step in installing a new one. This task ensures your new detector works properly and safely. Taking the right steps makes the process simple and safe.
Turn Off The Power
Start by switching off the power at the circuit breaker. This stops electricity from flowing to the detector. Double-check by pressing the test button on the old detector. No sound means the power is off.
Remove The Smoke Detector Cover
Gently twist or pull the cover to open it. Some covers may have small screws. Use a screwdriver to remove them carefully. Keep these screws safe for later use.
Disconnect The Wires
Notice how the wires connect to the detector. Use a small screwdriver to loosen the wire connectors. Carefully pull the wires free. Avoid pulling on the wires too hard.
Detach The Detector Base
The base is usually held by screws. Use a screwdriver to remove these screws. Take the base off the ceiling or wall. Keep the screws if you want to use the same holes.
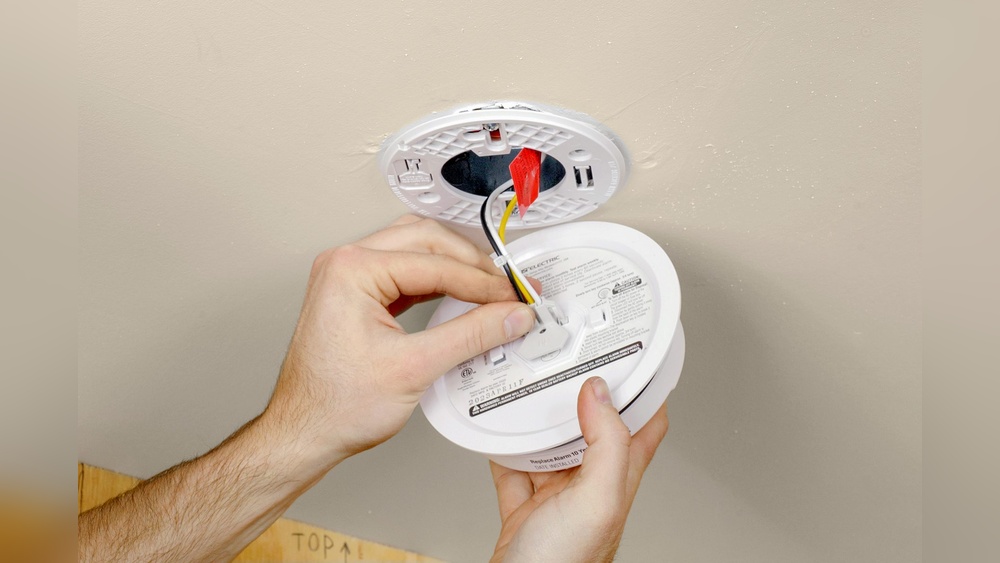
Wiring The New Detector
Wiring the new hard wired smoke detector is a key step in installation. It ensures the device works properly and keeps your home safe. Careful wiring avoids electrical problems and false alarms.
Identifying Wires
Start by turning off the power at the circuit breaker. This keeps you safe from electric shocks.
Look inside the electrical box. You will see several wires. Usually, black wires are hot wires. White wires are neutral. A green or bare wire is ground.
Some detectors have a red wire. This wire links multiple smoke detectors. Check your detector’s manual for specific wire colors.
Connecting Wires Safely
Match each wire from the detector to the same color wire in the box. Use wire nuts to connect them tightly.
Twist the wires together before putting on the wire nut. Pull gently to check if the connection is secure.
Wrap electrical tape around the wire nuts for extra safety. Make sure no bare wire is exposed.
Carefully tuck the wires back into the box. Attach the detector to the mounting bracket. Turn the power back on and test the detector.
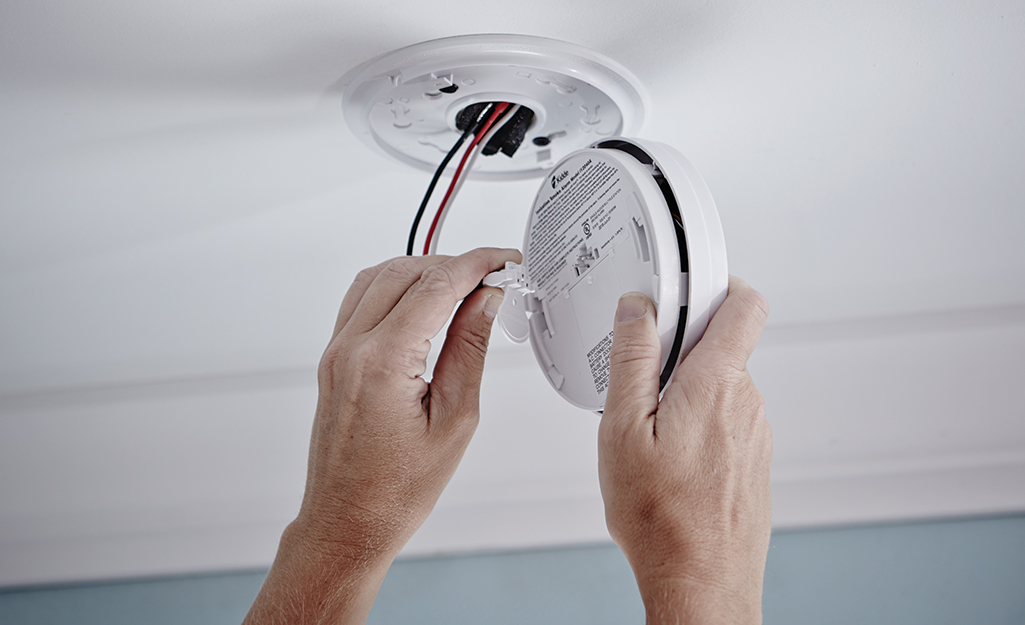
Mounting The Detector
Mounting the smoke detector is a key step in the installation process. It ensures the device works properly and stays secure. The right placement helps detect smoke quickly and keeps your home safe. Follow these steps to mount your hard wired smoke detector correctly.
Choose The Best Location
Select a spot on the ceiling or high on the wall. Smoke rises, so place the detector where smoke can reach it fast. Avoid corners and areas near windows or vents. These spots can cause false alarms or delay detection.
Mark The Mounting Holes
Hold the mounting bracket against the chosen spot. Use a pencil to mark where the screws will go. Make sure the bracket is level. This step helps you drill holes in the right place.
Drill Holes And Insert Anchors
Use a drill to make holes where you marked. If you mount on drywall, insert wall anchors. Anchors keep the screws tight and prevent the detector from falling.
Attach The Mounting Bracket
Use screws to fix the bracket firmly to the ceiling or wall. Check if it is secure by gently tugging it. A loose bracket can cause the detector to fall or not work well.
Connect And Mount The Detector
Connect the wiring according to the instructions. Align the smoke detector with the bracket. Twist or snap the detector into place. Confirm it locks securely to the bracket.
Restoring Power And Testing
After installing your hard wired smoke detector, restoring power is the next step. This process ensures your device receives electricity and begins working properly. Testing follows to confirm the detector functions as expected. Both steps are vital for safety and peace of mind.
Power On Procedures
First, switch the circuit breaker back on. This restores electricity to the smoke detector. Check the device’s indicator light. A steady or blinking light usually means power is on. Listen for any startup sounds from the detector. These signs confirm the unit is receiving power.
Functionality Testing
Press the test button on the smoke detector. Hold it until you hear a loud alarm sound. This sound shows the alarm works correctly. Test each detector in your home, one by one. Replace batteries if the alarm sounds weak or fails. Regular testing keeps your home safe and your detector reliable.
Maintenance Tips
Maintaining your hard wired smoke detector is key for safety. Regular care keeps it working well. It helps protect your home and family from fire risks. Follow these simple maintenance tips to ensure your smoke detector stays reliable.
Regular Testing
Test your smoke detector once a month. Press the test button until the alarm sounds. This confirms the device works properly. If no sound occurs, check the power connection or call a professional. Regular tests catch problems early.
Battery Replacement
Even hard wired detectors have backup batteries. Replace these batteries every year or when the low battery signal beeps. Use the correct battery type listed in your detector’s manual. Fresh batteries ensure the alarm works during power outages.
Credit: www.homedepot.com
Frequently Asked Questions
How Do I Install A Hard Wired Smoke Detector Safely?
Turn off power at the circuit breaker before installation. Follow the manufacturer’s wiring instructions carefully. Use a voltage tester to ensure no electricity flows. Mount the detector securely on the ceiling or wall. Restore power and test the detector after installation.
Can I Install A Hard Wired Smoke Detector Myself?
Yes, if you have basic electrical knowledge and tools. Always turn off power before working with wiring. Follow local electrical codes and manufacturer instructions. If unsure, consult a licensed electrician to ensure safety and compliance.
How Do I Connect Multiple Smoke Detectors Together?
Use the interconnect wire provided with your smoke detectors. Connect all detectors in parallel following the wiring diagram. This allows all alarms to sound simultaneously. Ensure the power is off during wiring. Test the system after installation for proper function.
What Tools Are Needed For Smoke Detector Installation?
You need a screwdriver, wire stripper, voltage tester, drill, and mounting hardware. A ladder may be necessary for ceiling installation. Always use insulated tools when working with electrical wiring for safety.
Conclusion
Installing a hard wired smoke detector is a smart safety step. It helps protect your home and family from fire risks. Follow the steps carefully to ensure it works well. Test the detector regularly to keep it reliable. Remember, safety starts with good preparation and proper installation.
Stay safe and feel secure every day.