Thinking about adding a Ring Video Doorbell 2 to your stucco home? You’re in the right place.
Installing this smart device on stucco can feel tricky, but it doesn’t have to be. With the right steps, you can have your doorbell up and running smoothly, boosting your home’s security and convenience. Keep reading to discover simple, clear instructions that will guide you through the process, so you can enjoy peace of mind and stay connected to your doorstep anytime, anywhere.
Tools And Materials Needed
Preparing the right tools and materials is key to install the Ring Video Doorbell 2 on stucco. Stucco walls need specific anchors and screws to hold the doorbell safely. Having the correct tools makes the installation easier and safer. Gather all items before starting the work.
Ring Video Doorbell 2 Components
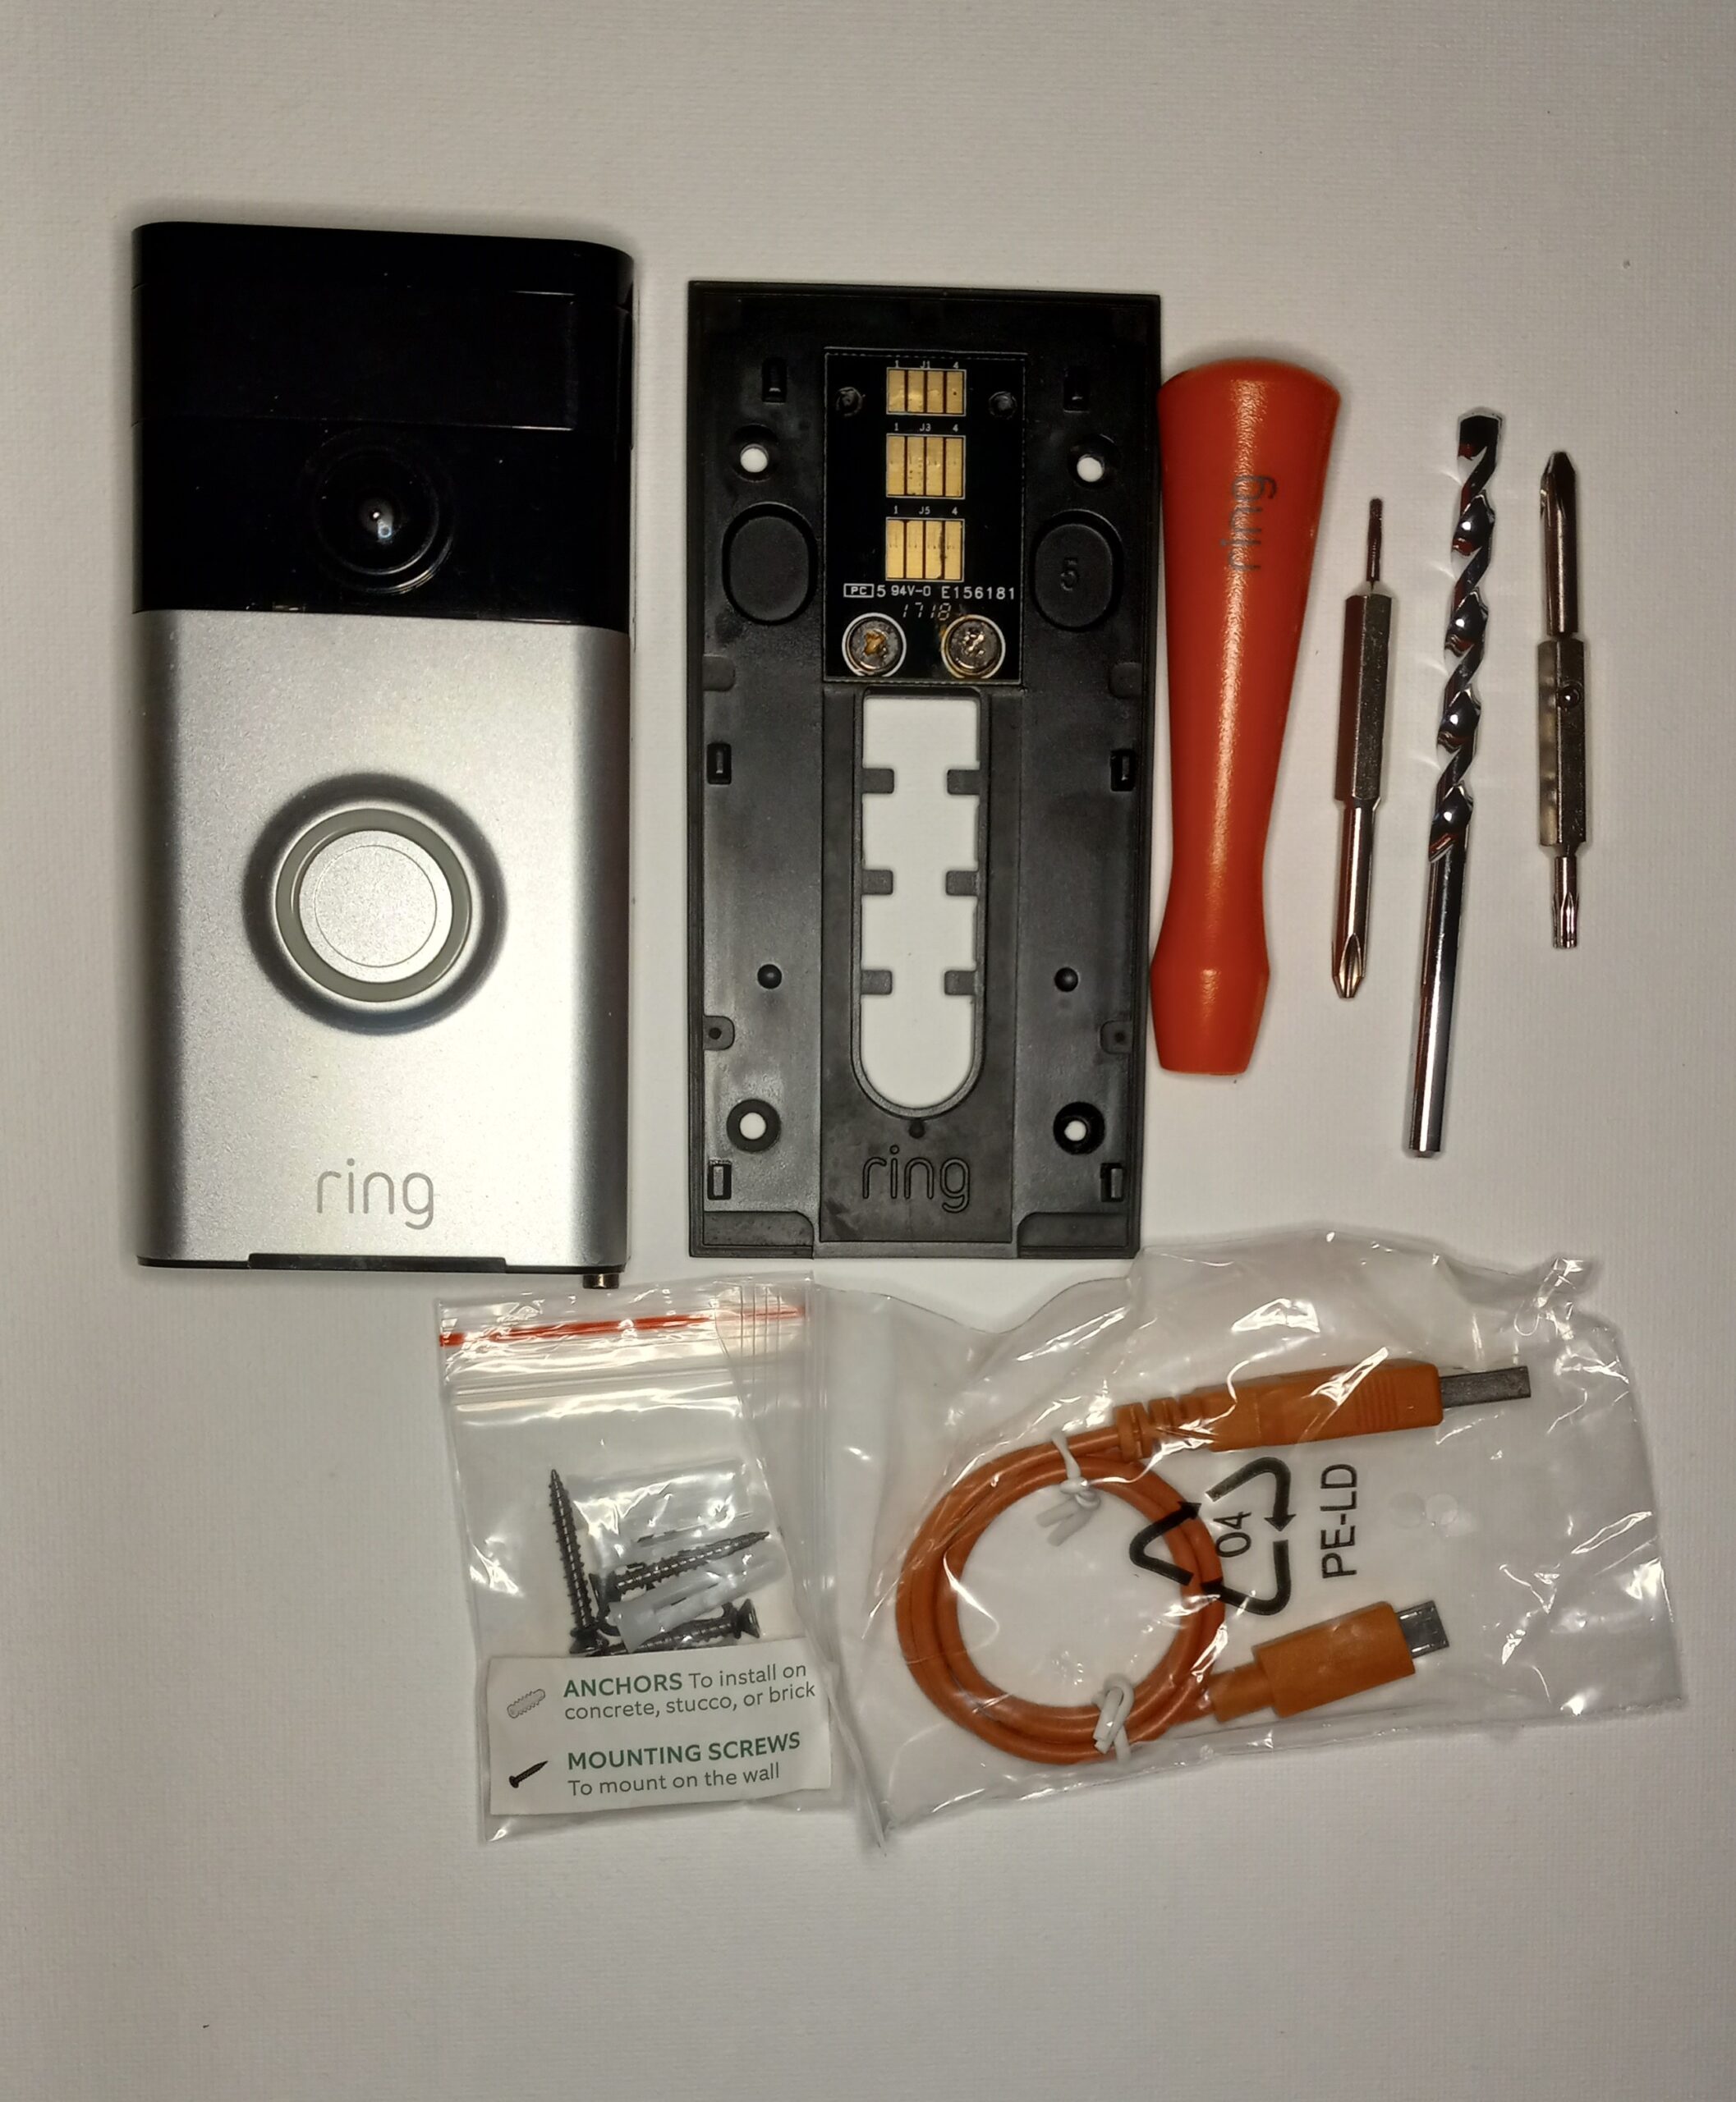
The package includes the video doorbell, a mounting bracket, screws, and anchors. A charging cable and a quick start guide are also inside. Check all parts before installation. This ensures nothing is missing or damaged.
Installation Tools
You need a drill with a masonry bit to drill into stucco. A screwdriver will help to tighten screws. A level tool ensures the doorbell is straight. A pencil is useful to mark drill spots. A tape measure helps position the doorbell correctly.
Stucco Anchors And Screws
Stucco is rough and brittle. Use special anchors made for masonry or stucco walls. These anchors prevent the screws from pulling out. Choose screws that fit the anchors and the mounting bracket. Using the right anchors and screws keeps the doorbell secure for years.
Preparing The Installation Site
Preparing the installation site is a key step for a successful Ring Video Doorbell 2 setup on stucco walls. This phase ensures the device fits well and works perfectly. Careful preparation helps avoid damage to the wall and makes the installation smooth.
Choosing The Best Location
Pick a spot near your main entrance. The doorbell should capture visitors clearly. Avoid placing it in direct sunlight or where it gets wet often. The camera needs a clear view without obstructions like plants or decorations. Make sure the location is within Wi-Fi range for a strong signal.
Marking Drill Points On Stucco
Use the Ring bracket to mark exact drill holes on the stucco surface. Hold the bracket steady and mark the points with a pencil. Double-check measurements to ensure the doorbell will sit straight. Marking carefully prevents mistakes and keeps the device secure.
Protecting Surrounding Areas
Stucco can chip or crack during drilling. Cover the area around drill points with painter’s tape. This helps stop chips and dust from spreading. Place a cloth or plastic sheet on the ground to catch debris. Wear safety glasses to protect your eyes from dust and small particles.
Drilling Into Stucco Safely
Drilling into stucco requires care and the right tools. Stucco is a hard, brittle surface. A wrong drill or technique can cause cracks or damage. Taking time to drill safely helps keep your wall strong. It also ensures your Ring Video Doorbell 2 stays secure. Follow these steps to drill properly into stucco.
Selecting The Right Drill Bit
Use a masonry drill bit for stucco. These bits have a strong tip made for hard surfaces. Choose a bit size that matches your anchor or screw. Avoid wood or metal bits. They can break or wear out quickly on stucco. A sharp, new bit drills cleaner holes with less pressure.
Drilling Techniques For Stucco
Start with a small pilot hole. Drill slowly and steadily. Do not force the drill. Let the bit do the work. Use a drill with a hammer setting if available. It helps break the stucco gently. Keep the drill straight to avoid angled holes. Clear dust from the hole often by blowing it out. This prevents clogging and overheating of the bit.
Installing Anchors Correctly
Choose anchors made for stucco or masonry. Insert anchors gently without forcing them. Tap them lightly with a hammer if needed. Make sure anchors sit flush against the stucco surface. Tighten screws slowly to avoid cracking the stucco. Proper anchors hold the doorbell firmly in place. This prevents it from loosening over time.

Credit: www.youtube.com
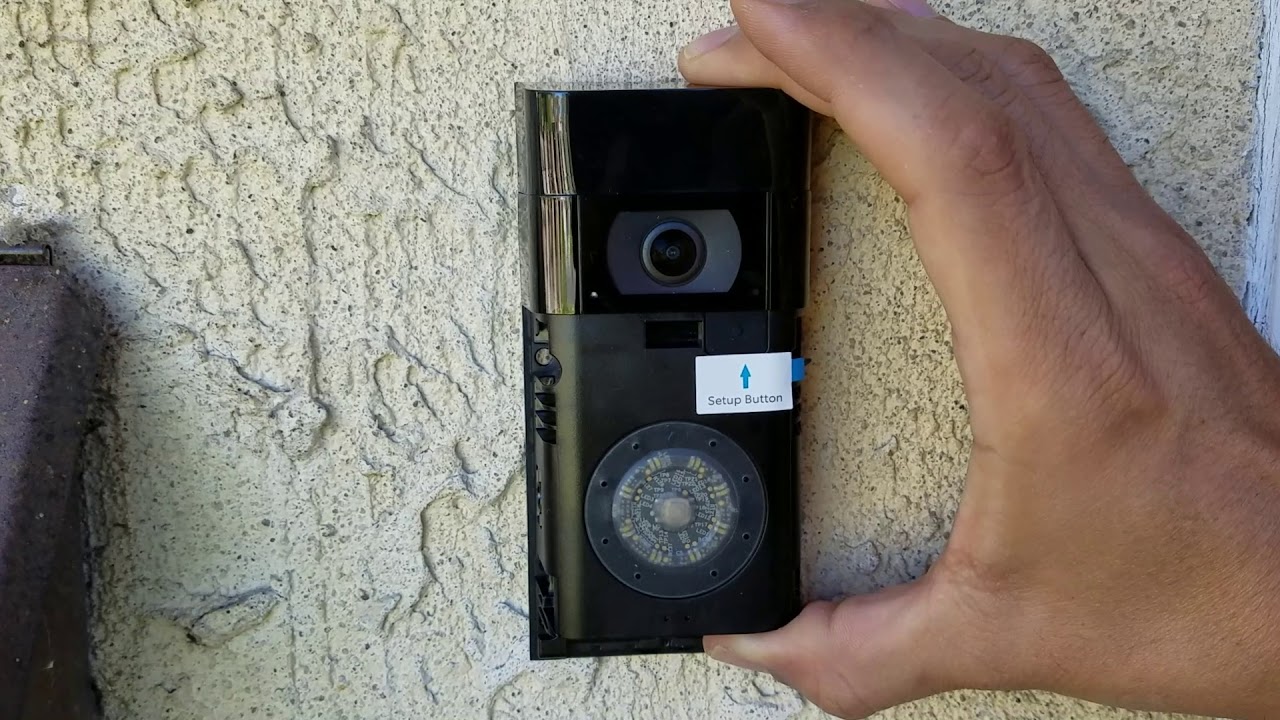
Mounting The Doorbell
Mounting the Ring Video Doorbell 2 on stucco requires care and the right tools. Stucco is a hard surface that can crack if not drilled properly. Follow these steps to mount your doorbell securely and safely. Proper mounting ensures your doorbell works well and stays in place for years.
Attaching The Mounting Bracket
Start by marking the spots for the screws on the stucco wall. Use a pencil and a level to keep the bracket straight. Drill holes with a masonry bit to avoid cracking the stucco. Insert wall anchors into the holes to hold the screws tightly. Then, screw the mounting bracket firmly into the anchors. The bracket must feel solid and not move.
Securing The Doorbell Unit
Align the Ring Video Doorbell 2 with the mounting bracket. Push the doorbell onto the bracket until you hear a click. This sound means the unit locked in place. Use the included security screws to lock the doorbell to the bracket. Tighten screws with a screwdriver to prevent theft. Check the doorbell to make sure it is secure and does not wobble.
Adjusting The Doorbell Angle
The Ring Video Doorbell 2 allows angle adjustment for better view. Use the wedge or corner mount if you need to change the angle. Slightly tilt the doorbell up or down to cover your doorstep. Test the camera view on your phone to confirm the angle. Adjust until you get a clear and wide view of the entry area.
Connecting Power And Setup
Connecting power and setting up your Ring Video Doorbell 2 is a key step. It ensures your doorbell works smoothly with your home system. This part guides you through powering options and pairing the device with your phone app. Testing the doorbell confirms everything is ready for use. Follow these steps to make your installation simple and effective.
Hardwiring Or Battery Options
The Ring Video Doorbell 2 can work with batteries or hardwired power. Battery use is simple; just charge the battery before installation. Hardwiring connects the doorbell to existing doorbell wires for constant power. Choose the method that fits your home setup best. Both options keep your doorbell active and ready.
Syncing With The Ring App
Download the Ring app on your smartphone. Create an account or log in if you already have one. Follow the app’s instructions to add a new device. Connect your doorbell to your home Wi-Fi through the app. This step links your phone and doorbell for remote control.
Testing Doorbell Functionality
Press the button on your Ring Video Doorbell 2. Check for sounds and lights indicating it works. Use the app to see live video and test notifications. Make sure the video is clear and notifications arrive quickly. Confirm all parts function before finishing installation.
Troubleshooting Common Issues
Troubleshooting common issues is important when installing the Ring Video Doorbell 2 on stucco. Some problems can stop your doorbell from working well. Knowing how to fix these issues saves time and keeps your device secure. This section covers key problems and easy solutions for a smooth setup.
Dealing With Stucco Cracks
Stucco cracks can weaken the mounting area. Check the wall before drilling. Small cracks may need filling with a patching compound. Let the patch dry completely. Large cracks may require professional repair. Avoid mounting on unstable surfaces to keep the doorbell safe.
Wi-fi Connectivity Tips
Strong Wi-Fi is vital for your doorbell to work well. Place your router closer to the doorbell. Remove obstacles between the router and device. Use a Wi-Fi extender if the signal is weak. Check that your network uses 2.4 GHz for better range. Restart your router if connection drops.
Fixing Mounting Stability Problems
Loose mounting can cause the doorbell to fall. Use the right screws and anchors for stucco. Drill pilot holes carefully to avoid cracking. Tighten screws firmly but do not over-tighten. Consider using weather-resistant anchors for a stronger hold. Test the stability before finishing installation.
Maintenance Tips For Longevity
Maintaining your Ring Video Doorbell 2 helps it work well for a long time. Regular care keeps the camera clear and the battery strong. It also protects the device from weather damage. Follow these simple tips to keep your doorbell in top shape.
Cleaning The Doorbell Lens
Clean the lens gently with a soft cloth. Avoid harsh chemicals that can damage the lens. Dirt and dust can blur the camera view. Wipe the lens every few weeks to keep videos clear.
Checking Battery Health
Check the battery level in the Ring app often. Recharge or replace the battery when it runs low. A healthy battery ensures your doorbell stays active. Avoid letting the battery fully drain to extend its life.
Weatherproofing Considerations
Make sure the doorbell is installed properly on the stucco surface. Check seals around the device to stop water from entering. Use weatherproof covers if your area has heavy rain or snow. Protecting the doorbell from moisture prevents damage and keeps it working well.
Credit: www.youtube.com
Credit: kdfoundation.org
Frequently Asked Questions
How Do I Mount Ring Video Doorbell 2 On Stucco?
To mount on stucco, use a masonry drill bit and anchors. Drill holes carefully, insert anchors, and secure the doorbell with screws. This ensures a stable and secure installation on the rough stucco surface.
What Tools Are Needed To Install Ring Doorbell 2 On Stucco?
You need a drill with a masonry bit, screwdriver, anchors, screws, and a level. These tools help you drill into stucco safely and mount the doorbell securely.
Can I Use Adhesive Mounts For Ring Doorbell 2 On Stucco?
Adhesive mounts are not recommended for stucco. Stucco’s rough texture weakens adhesive strength. Using anchors and screws ensures a durable, weather-resistant installation.
How Do I Protect Wiring When Installing On Stucco?
Use waterproof wire connectors and conduit to protect wiring. Seal gaps around wires with silicone caulk. This prevents moisture damage and maintains a clean, safe installation.
Conclusion
Installing the Ring Video Doorbell 2 on stucco is simple with the right steps. Use the proper tools and take your time. Drill carefully to avoid cracks and ensure a strong hold. Seal the edges to protect from weather damage.
Test the doorbell to confirm it works well. Enjoy added security and convenience at your doorstep. This guide helps you install with confidence and ease.