Imagine waking up every morning to a mirror that not only shows your reflection but also displays the weather, news, and your daily schedule—all in one place. What if you could build this smart mirror yourself using a simple Raspberry Pi?
You don’t need to be a tech expert or spend a fortune. In this guide, you’ll discover step-by-step how to turn an ordinary mirror into a smart, interactive hub that makes your daily routine smoother and more exciting. Ready to transform your space and impress your friends?
Let’s dive in and make your smart mirror a reality.
Choosing The Right Components
Choosing the right components is key to building a smart mirror. Each part affects how well your mirror works. You need to balance cost, quality, and compatibility. This guide helps you pick the best parts for your project.
Selecting The Raspberry Pi Model
The Raspberry Pi is the brain of your smart mirror. The Raspberry Pi 4 is a popular choice. It offers good speed and enough memory for most tasks. Choose a model with at least 2GB RAM for smooth performance. Lower models can work but might slow down your mirror.
Picking The Display Screen
The screen shows your smart mirror’s information. A size between 15 to 24 inches works well. Use an LCD or LED monitor with HDMI input. Make sure the screen has good brightness and resolution. A touch screen is optional but adds extra control.
Choosing The Two-way Mirror
The two-way mirror lets you see the display behind the glass. Acrylic or glass mirrors can work. Acrylic is lighter and easier to cut but scratches more easily. Glass mirrors offer better clarity and durability. Pick a size that matches your screen exactly.
Additional Hardware Essentials
You need extra parts for a complete setup. A microSD card stores your Raspberry Pi’s software. A power supply with enough wattage keeps the Pi running safely. Add a frame to hold everything together. Sensors like a motion detector can make the mirror more interactive.

Credit: smartbuilds.io
Setting Up The Raspberry Pi
Setting up the Raspberry Pi is the first step to creating your smart mirror. It involves installing the operating system, connecting to the internet, and enabling remote access. These tasks prepare your device for running smart mirror software smoothly.
Installing The Operating System
Download the Raspberry Pi OS image from the official website. Use a tool like Raspberry Pi Imager or balenaEtcher to write the OS to a microSD card. Insert the microSD card into the Raspberry Pi and power it on. Follow the on-screen instructions to complete the setup.
Connecting To Wi-fi
Open the Wi-Fi settings on your Raspberry Pi desktop. Select your home network from the list of available networks. Enter the Wi-Fi password carefully and connect. Confirm the connection by checking the network icon in the taskbar.
Enabling Ssh And Vnc
SSH allows you to control the Raspberry Pi remotely through the terminal. VNC lets you access the desktop from another computer. Open the Raspberry Pi configuration tool in the settings menu. Enable both SSH and VNC under the interfaces tab. This setup helps you manage the smart mirror without a dedicated monitor.
Installing Smart Mirror Software
Installing the smart mirror software is the key step in turning your Raspberry Pi into a smart mirror. This software controls what shows on the mirror screen. It lets you display the time, weather, news, calendar, and more. Choosing the right software makes the setup easier and your mirror more useful.
Many platforms offer different features and support. Some are simple, while others allow more customization. Understanding these options helps you pick the best one for your needs.
Overview Of Popular Platforms
MagicMirror² is the most popular choice for smart mirrors. It is open-source and free to use. It has a large community and many modules. Another option is Dakboard, which is user-friendly but less customizable. Some users prefer HomeMirror for its smart home integration. Each platform offers unique features, so select one that fits your project goals.
Installing Magicmirror²
To install MagicMirror², start with updating your Raspberry Pi system. Use the terminal to run update commands. Next, download MagicMirror² from its official repository. Installation scripts make the process simple. Follow the on-screen instructions carefully. Once installed, MagicMirror² will run automatically on startup. This makes your mirror ready to display information without extra steps.
Configuring Modules And Plugins
Modules add different functions to your smart mirror. The default setup includes a clock, calendar, and weather. You can add more modules like news feeds or traffic updates. Plugins extend the features even further. Configuration is done by editing the config.js file. Change settings to suit your preferences. Test each module after adding it to ensure it works. Customizing modules personalizes your smart mirror experience.

Credit: www.raspberrypi.com
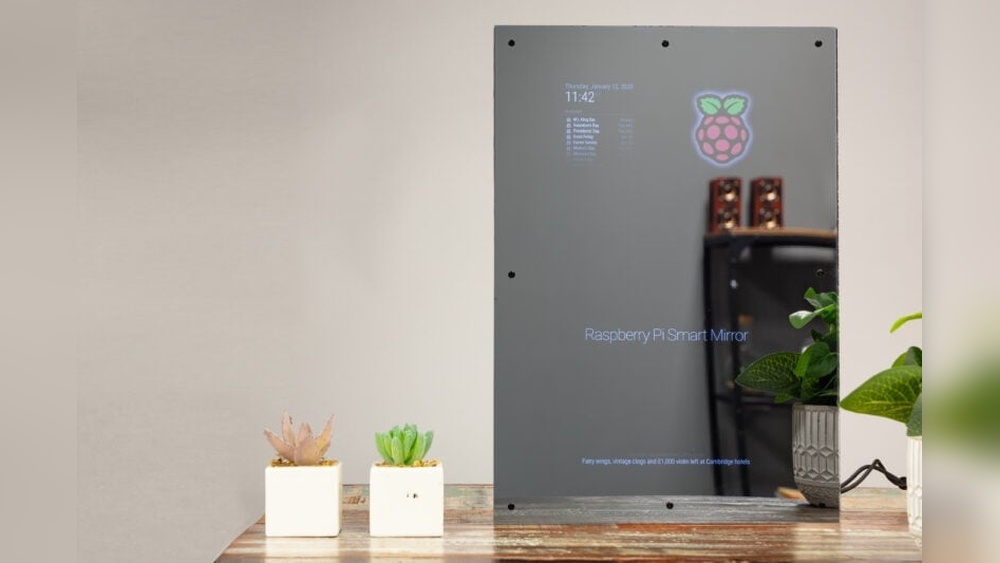
Building The Mirror Frame
Building the mirror frame is a key step in making a smart mirror with Raspberry Pi. The frame holds the display and mirror securely. It also gives the smart mirror a clean, polished look. A well-built frame ensures the device lasts long and works well.
Designing The Frame
Start by measuring your display size carefully. Decide the frame size based on these measurements. Leave a little extra space for wiring and ventilation. Choose a style that fits your room’s decor. Simple, modern frames often work best. Sketch your design on paper or use software. Keep the design easy to build and sturdy.
Assembling Materials
Gather all materials before you start building. Wood and acrylic sheets are popular choices. Wood gives a warm, classic look. Acrylic is lightweight and modern. Get screws, glue, and brackets for assembly. Sandpaper helps smooth wood edges. Paint or finish can improve the frame’s look. Make sure all materials fit your design and size.
Mounting The Display And Mirror
Place the display inside the frame carefully. Secure it with brackets or tape. Next, fit the two-way mirror in front of the display. It should cover the entire screen without gaps. Use strong glue or clips to hold the mirror. Check that the mirror is flush with the frame edges. Ensure no light leaks around the mirror for the best effect.
Customizing The Interface
Customizing the interface of your smart mirror makes it truly yours. It changes the mirror from a simple display to a helpful assistant. You can add useful information and change how it looks. Small changes can make a big difference in daily use.
Adding Weather And News Modules
Show current weather to plan your day better. Use free APIs to get local weather data. Add news headlines to stay updated without extra devices. Choose modules that refresh automatically for fresh content. These modules keep your mirror informative and practical.
Integrating Voice Control
Voice control lets you interact hands-free. Use tools like Google Assistant or Amazon Alexa. Set simple commands to check weather or control music. Voice adds convenience, especially when your hands are busy. It makes the mirror feel more like a personal helper.
Personalizing Layout And Themes
Change the layout to fit your needs and style. Move modules around to highlight what matters most. Select colors and fonts that match your room’s decor. A clean, simple design improves readability and appeal. Personal touches make your smart mirror welcoming and unique.
Troubleshooting Common Issues
Building a smart mirror with Raspberry Pi can be fun and rewarding. Still, some common problems may arise during setup or daily use. Knowing how to troubleshoot these issues saves time and frustration. This section covers display problems, software glitches, and connectivity troubles. Each area has clear tips to help your smart mirror run smoothly.
Display Problems
The screen may stay black or show no image. Check the power supply first. Make sure the monitor is plugged in and turned on. Verify the HDMI cable connects firmly to the Raspberry Pi and the monitor. Try a different HDMI cable to rule out cable issues. Adjust the screen resolution in the Raspberry Pi settings. Incorrect resolution can cause no display or flickering. If the screen shows strange colors or lines, clean the monitor and cable connections. Sometimes, a reboot fixes minor display glitches.
Software Glitches
Software may freeze or crash. Restart the Raspberry Pi to refresh the system. Check for updates in the smart mirror software and Raspberry Pi OS. Updated software often fixes bugs. Review the configuration files for errors. Even small mistakes can cause the interface not to load. Disable unused modules to reduce load and conflicts. Look at log files for clues about crashes or errors. Reinstall the software if problems persist after other steps.
Connectivity Troubles
Network issues affect weather, news, and calendar updates. Confirm the Raspberry Pi connects to Wi-Fi or Ethernet. Restart your router and Raspberry Pi to reset connections. Check the Wi-Fi password for accuracy. Use a network cable if wireless is unstable. Ping a website from the terminal to test internet access. Disable firewalls or security software that block connections. Ensure the smart mirror app has permission to use the network.
Enhancing Features
Enhancing your smart mirror with extra features makes it more useful and fun. These features bring your mirror to life. They add convenience and personalize your daily routine. Simple upgrades can make a big difference in how you use your smart mirror.
Adding Motion Sensors
Motion sensors detect when you stand in front of the mirror. This lets the mirror turn on automatically. It saves energy by turning off when no one is nearby. Motion sensors also make the mirror feel more modern and smart. You can find easy-to-use sensors compatible with Raspberry Pi. Connect the sensor to the Pi and program it to control the display.
Incorporating Facial Recognition
Facial recognition lets the mirror recognize different people. It can show personalized information like weather, calendar, or news. This adds a personal touch to your smart mirror. Use a camera module with your Raspberry Pi. Software like OpenCV helps build facial recognition into your system. It may need some basic coding but offers a great user experience.
Integrating Smart Home Controls
Control your smart home devices through the mirror. Adjust lights, thermostat, or music without using your phone. Connect the Raspberry Pi to your smart home system. Use voice commands or touch controls on the mirror display. This feature makes your mirror a central hub for home automation. It adds real value to your daily life.
Maintenance And Upgrades
Keeping your smart mirror in good shape helps it work well for a long time. Regular care and updates keep the system fast and error-free. Upgrades let you add new features and make the mirror more useful. Small actions can make a big difference in performance.
Regular Software Updates
Software updates fix bugs and improve security. Check for updates often. Use the Raspberry Pi’s update commands to keep the system fresh. Updating the operating system and mirror software ensures smooth operation. Back up important data before updates, just in case.
Hardware Cleaning Tips
Dust and dirt can block sensors and screens. Clean the mirror’s surface with a soft cloth. Avoid using harsh chemicals that may damage the glass. Gently blow dust from vents and ports to prevent overheating. Turn off and unplug the device before cleaning.
Expanding Functionality
Add new sensors or modules to increase features. Install voice assistants or weather displays for extra convenience. Use USB or GPIO pins to connect accessories. Explore open-source apps designed for smart mirrors. Regularly explore new tools to keep your mirror smart and fresh.

Credit: www.youtube.com
Frequently Asked Questions
What Components Are Needed For A Raspberry Pi Smart Mirror?
You need a Raspberry Pi, a two-way mirror, a monitor, a frame, and power supply. Optional items include sensors and a microphone for added features.
How Do I Install The Smart Mirror Software On Raspberry Pi?
Download and install the MagicMirror² platform via terminal. Follow the setup guide to configure modules and customize your display.
Can I Add Voice Control To My Smart Mirror?
Yes, integrate voice assistants like Google Assistant or Amazon Alexa. Use compatible microphones and software modules for voice command functionality.
How Do I Connect The Smart Mirror To Wi-fi?
Use the Raspberry Pi’s network settings to scan and connect to your Wi-Fi. Enter your password to enable internet access.
Conclusion
Building a smart mirror with Raspberry Pi is fun and rewarding. You only need basic parts and simple steps. This project helps you learn about technology hands-on. Your mirror can show time, weather, and news easily. You can customize it to fit your needs.
Try adding new features as you go. Enjoy creating something useful and unique for your home. Start small, and keep experimenting. This smart mirror can brighten your daily routine.