Are you ready to upgrade your home security without calling a locksmith? Installing a smart lock on your metal door might seem tricky, but it’s easier than you think.
Imagine unlocking your door with just a tap on your phone or a simple code—no more fumbling for keys. In this guide, you’ll discover step-by-step instructions to fit a smart lock perfectly on your metal door. Stick with me, and by the end, you’ll have a secure, high-tech entryway that makes your life safer and more convenient.
Let’s get started!
Choosing The Right Smart Lock
Choosing the right smart lock is key for a metal door. It affects security, ease of use, and installation. Not all smart locks work well with metal doors. Some may need special tools or adjustments. Understanding the lock’s features helps pick one that fits your needs. Think about power sources, connectivity, and safety features. This makes the smart lock both reliable and user-friendly.
Compatibility With Metal Doors
Metal doors are thicker and harder than wood. Some smart locks do not fit well on metal surfaces. Check the lock’s size and shape before buying. Look for locks designed for metal doors. The lock should attach firmly without damaging the door. Also, verify if the lock works with your door’s thickness. A good fit prevents problems during installation and use.
Power Sources And Connectivity
Smart locks need power to work. Most use batteries, but some plug into electricity. Battery life varies by model and use. Choose a lock with easy battery replacement. Some locks connect via Bluetooth or Wi-Fi. Bluetooth works only nearby, while Wi-Fi works from anywhere. Think about your home’s internet setup. A stable connection makes the lock more reliable.
Security Features To Consider
Security is the main reason to install a smart lock. Look for locks with strong encryption to protect data. Some locks have alarm systems for break-ins. Check if the lock has an auto-lock feature. This locks the door after a set time. User codes or fingerprint access add extra security. Choose features that match your safety needs.

Credit: www.amazon.com
Gathering Tools And Materials
Installing a smart lock on a metal door starts with gathering the right tools and materials. This step is crucial for a smooth installation. Having everything ready saves time and avoids frustration. Each tool plays a specific role in the process. Knowing what you need helps you work safely and efficiently.
Essential Tools For Installation
Start with a power drill. It helps make holes in the metal door. Use drill bits made for metal to avoid damage. A screwdriver is necessary for tightening screws. Choose one with a comfortable grip for better control. A tape measure ensures accurate placement of the lock. Marking tools, like a pencil or marker, help outline drilling spots. A level makes sure the lock sits straight on the door. Safety glasses protect your eyes from metal shards. Gloves protect your hands during drilling and handling sharp edges.
Additional Supplies Needed
Smart lock installation kits often include screws and mounting plates. Check if your kit has these parts before buying extras. Double-sided tape can hold the lock temporarily in place. Metal file smooths rough edges after drilling holes. Use cleaning cloths to remove metal dust and debris. Batteries power the smart lock, so have fresh ones ready. A small flashlight helps see inside tight spaces. Keep a manual or installation guide nearby for reference.
Preparing The Metal Door
Preparing a metal door for a smart lock is an important first step. It sets the stage for a smooth installation. Careful preparation saves time and prevents damage to the door. This process involves precise measuring and ensuring safety while drilling into metal. Let’s explore these key tasks.
Measuring And Marking Drill Points
Accurate measurements are crucial for a good fit. Use a tape measure to find the center of the door’s edge. Mark this spot lightly with a pencil. Next, measure the height for the lock’s main body. Mark this point clearly on the door surface.
Double-check all marks before drilling. A level tool can help keep marks straight. Take your time. Errors in marking can cause misalignment or damage.
Safety Precautions For Metal Drilling
Drilling into metal requires care to avoid injury. Always wear safety goggles to protect your eyes. Use work gloves to shield your hands from sharp edges. Secure the door or panel so it does not move during drilling.
Choose the right drill bit designed for metal. Start drilling at a low speed to prevent slipping. Keep the drill steady and apply gentle pressure. Clear metal shavings frequently to keep the work area safe and clean.

Credit: www.reddit.com
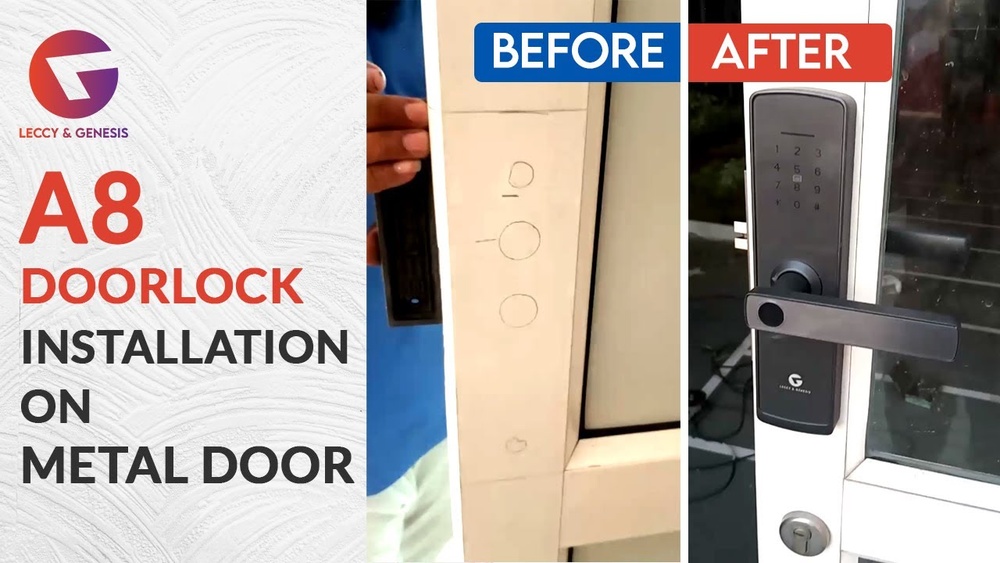
Drilling And Modifying The Door
Drilling and modifying a metal door for a smart lock requires careful work. This step is crucial to fit the lock parts perfectly. Metal doors are tough, so precise drilling is needed. Proper tools and techniques make the job easier and safer. Take time to plan the holes and marks before drilling. Protect the door surface to avoid scratches or damage.
Using The Right Drill Bits
Use drill bits made for metal. High-speed steel (HSS) bits work well. Cobalt bits last longer and cut through metal smoothly. Start with a small pilot bit to mark the hole. This prevents the drill from slipping. Gradually increase the bit size to match the lock hole size. Keep the drill steady and use slow speed. Wear safety glasses and gloves for protection.
Creating Holes For Lock Components
Mark the lock position carefully on the door. Measure twice to avoid mistakes. Drill holes for the lock cylinder and bolt. Use a hole saw or step drill for larger holes. Deburr edges after drilling to remove sharp metal pieces. Test fit the lock parts to check the holes. Adjust holes if necessary for a tight fit. This ensures smooth lock installation and operation.
Installing The Smart Lock Components
Installing the smart lock components on a metal door takes careful steps. Each part must fit well and work smoothly. This section guides you through mounting the exterior assembly, securing the interior assembly, and connecting wiring and batteries. Follow these steps to ensure your smart lock functions properly.
Mounting The Exterior Assembly
Start by placing the exterior assembly on the door’s outside. Align it with the pre-drilled holes. Push the spindle through the latch hole. Make sure the keypad or touchpad faces outward. Tighten the screws to hold the assembly firmly in place. Avoid over-tightening to prevent damage to the metal door.
Securing The Interior Assembly
Next, attach the interior assembly on the door’s inside. Match it with the spindle and screw holes. Insert the screws through the interior plate. Tighten them so the assembly sits flush against the door. Ensure the lock’s battery compartment is easy to access. Check that the interior lever or thumb turn moves smoothly.
Connecting Wiring And Batteries
Connect the wiring harness between the interior and exterior assemblies. Plug each connector carefully to avoid bending pins. Place the required batteries in the interior assembly’s compartment. Use fresh batteries for best performance. Close the battery cover securely. Test the lock by locking and unlocking using the keypad or app.
Configuring The Smart Lock
Configuring the smart lock is the key step after installation. It makes the lock work with your phone and other devices. Proper setup ensures security and easy access. Follow these simple steps to get your smart lock ready.
Setting Up The Mobile App
Download the lock’s app from your phone’s store. Open the app and create an account. Follow the instructions to connect the app to your lock. Make sure your phone’s Bluetooth and Wi-Fi are on. The app lets you control and monitor the lock remotely.
Pairing The Lock With Devices
Turn on the lock’s pairing mode. Use the app to find the lock on your phone. Select the lock and confirm the connection. Pairing links the lock to your phone and other devices. This step allows you to use the app to lock and unlock easily.
Programming Access Codes
Open the app and go to access settings. Create new access codes for family or friends. Set time limits or one-time use for each code. Save the codes in the app to manage who can enter. Programming codes adds security and convenience for all users.
Testing And Troubleshooting
Testing and troubleshooting are key steps after installing a smart lock on a metal door. These steps help confirm that the lock works well and keeps your home safe. Testing ensures the lock responds to commands. Troubleshooting fixes any problems you find during testing.
Ensuring Proper Lock Function
Begin by locking and unlocking the door manually. Check if the bolt moves smoothly without sticking. Use the keypad or app to operate the lock. Make sure the lock responds quickly to commands. Test the lock several times to confirm it works every time. Check the battery level to avoid power issues.
Common Installation Issues
The lock may not fit well on the metal door. The screws might be loose or too tight. The strike plate could be misaligned with the bolt. The lock might not connect properly with the app or keypad. Low battery or poor Wi-Fi signal can cause problems. Noise or resistance when turning the lock also indicates issues.
Tips For Reliable Operation
Tighten screws without overdoing it to avoid damage. Adjust the strike plate to align with the bolt perfectly. Replace batteries regularly to keep the lock powered. Keep the app updated for smooth connectivity. Test the lock each month to catch problems early. Clean the lock and door area to prevent dirt buildup.

Credit: www.youtube.com
Maintaining Your Smart Lock
Maintaining your smart lock ensures it works smoothly and lasts longer. A well-kept lock keeps your metal door secure without issues. Simple care steps prevent problems and save money on repairs. Regular attention helps avoid lock failures and keeps your home safe.
Battery Replacement Tips
Check the battery level often to avoid sudden power loss. Use the recommended battery type for your smart lock model. Replace batteries before they run out completely to keep the lock responsive. Keep spare batteries nearby for quick changes. Always remove old batteries to prevent corrosion inside the lock.
Regular Cleaning And Care
Clean the lock surface gently with a soft cloth. Avoid harsh chemicals that can damage the lock’s finish. Remove dust and dirt from the keypad and keyhole area. Lubricate moving parts with a small amount of graphite or silicone spray. Do not use oil-based lubricants as they attract dirt. Check for any loose screws and tighten them regularly.
Frequently Asked Questions
How Do I Choose A Smart Lock For A Metal Door?
Choose a lock designed for metal doors with proper dimensions. Check compatibility, durability, and security features before purchasing. Consider smart functions like keypad, fingerprint, or app control for convenience.
Can I Install A Smart Lock Without Drilling Metal?
Some smart locks offer no-drill installation using adhesive mounts. However, drilling ensures stronger security and durability on metal doors. Always follow manufacturer instructions for best results.
What Tools Are Needed To Install A Smart Lock?
You typically need a drill, screwdriver, measuring tape, and pencil. Additional tools may include a metal drill bit and level. Prepare all tools before starting the installation.
How Long Does It Take To Install A Smart Lock?
Installation usually takes 30 to 60 minutes depending on skill level. Proper preparation and following instructions speed up the process. Testing the lock afterward ensures correct setup.
Conclusion
Installing a smart lock on a metal door is easier than it seems. Follow each step carefully for best results. Use the right tools and measure twice before drilling. Test the lock to make sure it works smoothly. This upgrade adds convenience and safety to your home.
Keep instructions handy for future reference. Enjoy the new ease of keyless entry every day.