
Looking to add a towel rack but not sure where to start? You’re in the right place.
Installing a towel rack might seem tricky, but with the right steps, you can do it yourself quickly and easily. Imagine having your towels neatly organized and within reach every time you step out of the shower. In this guide, you’ll discover simple, clear instructions to put up your towel rack just the way you want it.
Keep reading—you’re just minutes away from a tidier, more functional bathroom.

Credit: www.towelsupercenter.com
Choose The Right Towel Rack
Choosing the right towel rack is key to organizing your bathroom well. It helps keep towels dry and your space tidy. Picking the best rack means knowing your needs and style. This guide covers types, materials, sizes, and styles. You will find the perfect fit for your bathroom.
Types Of Towel Racks
Towel racks come in many forms. Wall-mounted racks save floor space and hold multiple towels. Freestanding racks are easy to move and place anywhere. Over-the-door racks hang on the door for small spaces. Heated racks warm towels and dry them faster. Choose the type that fits your bathroom size and use.
Material And Finish Options
Materials affect durability and look. Stainless steel is strong and rust-resistant. Wood adds warmth but needs sealing. Plastic is lightweight and budget-friendly. Chrome and brushed nickel finishes suit modern bathrooms. Matte black or bronze give a rustic feel. Pick a material and finish that match your bathroom decor.
Size And Style Considerations
Measure your space before buying. A rack too big can crowd the room. Small racks fit tight spots and hold one or two towels. Large racks offer more storage but need more space. Style matters too. Simple racks fit modern looks. Ornate racks add a classic touch. Choose size and style to match your bathroom’s size and theme.
Gather Necessary Tools
Gathering the right tools is the first step in putting up a towel rack. Having everything ready makes the job faster and easier. It helps avoid interruptions and mistakes. You will need some basic tools for most installations. Some surfaces may require special tools. Being prepared ensures a smooth and successful project.
Basic Tools Needed
Start with a drill to make holes in the wall. A screwdriver is needed to fasten screws. Use a tape measure to mark exact spots. A pencil helps mark drill points clearly. A level ensures the rack is straight. Anchors and screws come with most towel racks. These tools handle most installation tasks.
Optional Tools For Different Surfaces
Drywall may need wall anchors to hold screws firmly. For tile walls, use a carbide-tipped drill bit. Masonry walls require a hammer drill and masonry bits. A stud finder helps locate studs behind drywall. A utility knife can score tile to prevent cracks. These tools depend on your wall type. Choosing the right tools protects your walls and keeps the rack secure.
Select The Installation Spot
Selecting the right spot to install your towel rack is important. It affects how easy it is to use and how long it lasts. The place should be practical and safe. Think about where you reach for towels most often. Also, the wall must support the rack well. Careful choice prevents damage and keeps towels dry.
Ideal Height And Placement
Place the towel rack at a good height. Around 48 inches from the floor works well for most people. This height lets adults and children reach towels easily. Put the rack near the shower or sink for quick access. Avoid spots that block doors or drawers. The rack should not stick out too much in small spaces.
Avoiding Obstacles And Moisture
Keep the towel rack away from obstacles like light switches and shelves. This stops towels from getting caught or torn. Avoid walls that get very wet or damp. Moisture can cause damage to the rack and the wall. Choose a dry, well-ventilated spot. Good airflow helps towels dry faster and keeps the area clean.

Credit: www.youtube.com
Mark And Measure Accurately
Marking and measuring accurately is key to a strong towel rack installation. A well-measured space prevents crooked racks and damage to walls. Take your time and use the right tools for precise placement.
Using A Level And Tape Measure
Start by measuring the height and width where you want the rack. Use a tape measure for exact numbers. Next, hold a level against the wall to check if your marks are straight. Adjust until the bubble is centered. This step ensures the rack hangs perfectly horizontal.
Marking Drill Points
After measuring, mark the drill points clearly with a pencil. These marks show where to insert screws or anchors. Double-check distances between points to match the towel rack’s mounting holes. Clear marks avoid mistakes and keep your rack stable.
Prepare The Wall Surface
Preparing the wall surface is an essential step before installing a towel rack. A clean and smooth surface ensures strong support and prevents damage. This preparation helps the towel rack stay secure and last longer.
Drilling Holes
Mark the spots where you want to place the towel rack. Use a pencil for accurate marks. Choose a drill bit that matches the size of the screws. Drill holes straight into the wall at the marked points. Drill slowly to avoid cracking the wall. Clear out dust from the holes to make room for anchors.
Using Wall Anchors
Wall anchors add extra support for the towel rack. Insert anchors into the drilled holes. Tap gently with a hammer until the anchors sit flush with the wall. Anchors prevent the screws from pulling out. Choose anchors based on your wall type, like drywall or plaster. This step is important for heavy towel racks or tiled walls.
Attach The Towel Rack
Attaching the towel rack is a key step to ensure it holds well and looks neat. This stage involves fixing the mounting brackets securely and then attaching the rack to these brackets. Taking time here helps avoid a loose or crooked towel rack.
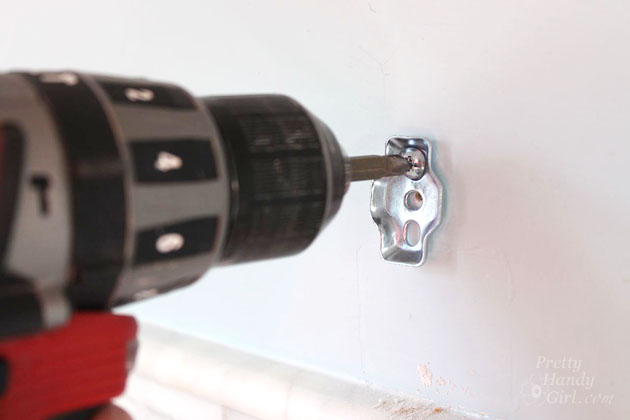
Securing Mounting Brackets
Start by placing the mounting brackets on the wall where you marked. Use a level to check if they are straight. Mark the screw holes with a pencil through the bracket holes. Drill holes on these marks for wall anchors if needed. Insert anchors to give strong support. Screw the brackets tightly into the wall anchors or directly into studs. Make sure the brackets do not move when you pull on them lightly.
Fixing The Rack In Place
Hold the towel rack and align it with the mounted brackets. Slide or snap the rack onto the brackets as the design requires. Check that the rack fits snugly and does not wobble. Tighten any small screws that lock the rack to the brackets. Give the rack a gentle pull to confirm it is secure. Your towel rack is now ready to hold towels safely and neatly.
Test Stability And Adjust
After installing the towel rack, checking its stability is important. This step ensures the rack holds towels safely without falling. A stable rack lasts longer and keeps your bathroom neat.
Checking Firmness
Grab the towel rack gently and move it side to side. It should feel solid with no wobbling. Press down lightly to test if it stays firm on the wall. A loose rack can cause damage or injury. Use a level to confirm the rack is straight.
Making Necessary Adjustments
If the rack feels loose, tighten the screws carefully. Use a screwdriver to secure the mounting brackets. For racks attached to drywall, add wall anchors for extra support. Adjust the position slightly if the rack is not level. Repeat the firmness test after every adjustment to ensure stability.
Credit: prettyhandygirl.com
Tips For Maintenance
Keeping your towel rack in good shape helps it last longer and look better. Regular care stops damage and keeps the rack clean. Simple steps make a big difference in maintenance. Follow these easy tips to keep your towel rack neat and strong.
Cleaning The Rack
Clean your towel rack often to avoid dirt build-up. Use a soft cloth and mild soap with water. Wipe gently to remove dust and stains. Dry the rack well after cleaning to stop water marks. Avoid harsh cleaners that can damage the finish.
Preventing Rust And Damage
Keep the towel rack dry to prevent rust. Wipe off water after each use. Use a rust-resistant spray if your rack is metal. Check screws and brackets for tightness regularly. Fix loose parts fast to avoid damage or accidents.
Frequently Asked Questions
How Do I Install A Towel Rack On Drywall?
Use a stud finder to locate studs for secure mounting. If no studs, use drywall anchors. Mark holes, drill pilot holes, insert anchors, then screw the rack in place.
What Tools Are Needed To Put Up A Towel Rack?
You need a drill, screwdriver, level, measuring tape, pencil, and anchors. These tools ensure accurate placement and secure installation of your towel rack.
How High Should I Mount A Towel Rack?
Mount the towel rack about 48 inches from the floor. This height is convenient for most users and allows towels to hang freely without touching the floor.
Can I Install A Towel Rack Without Drilling?
Yes, use adhesive hooks or suction cup racks for lightweight towels. These are easy to install but less durable than drilled racks.
Conclusion
Putting up a towel rack can be simple and quick. Follow the steps carefully to avoid mistakes. Use the right tools for a strong hold. Measure twice to place the rack in the best spot. Take your time to drill and fix it firmly.
A well-installed towel rack keeps towels dry and organized. Enjoy your neat and tidy bathroom space. Small projects like this add comfort at home. Try it yourself and feel proud of the result.

