Are you looking to add a warm, charming touch to your home décor? Decorating a burlap wreath is a simple and creative way to do just that.
Whether you want something rustic for your front door or a cozy centerpiece for your living room, burlap wreaths offer endless possibilities. In this guide, you’ll discover easy steps and clever ideas to transform a plain burlap wreath into a stunning decoration that reflects your style.
Keep reading, and you’ll be ready to impress everyone who sees your beautiful creation.
Choosing The Right Burlap
Choosing the right burlap is key to a beautiful wreath. Burlap comes in many types, colors, and textures. Picking the right one helps your wreath stand out. It also fits the style you want. Take time to know your options. This makes decorating easier and more fun.
Types Of Burlap Fabrics
Burlap fabrics vary by weave and fiber content. Natural burlap is rough and rustic. It has a classic look and feel. Polyester burlap is smoother and more durable. It resists fraying and holds color well. Some burlaps mix natural and synthetic fibers. These blends balance texture and strength. Choose based on the look and durability you need.
Color And Texture Options
Burlap is not just brown. It comes in many colors like white, green, and red. Some have printed patterns or glitter for extra style. Texture also differs. Coarse burlap shows a rough, earthy vibe. Soft burlap feels smooth and gentle to touch. Pick a color and texture that match your wreath’s theme. Bright colors add cheer, while neutral tones create calmness.
Basic Tools And Materials
Decorating a burlap wreath starts with gathering the right tools and materials. These basics help you create a wreath that looks great and lasts long. Keep your workspace tidy and have everything ready before you begin. This makes the process smooth and fun.
Essential Craft Supplies
- Burlap ribbon or burlap fabric strips
- Wire wreath frame
- Hot glue gun with glue sticks
- Floral wire or twist ties
- Scissors or craft shears
- Wire cutters
- Ruler or measuring tape
These supplies form the base of your wreath. Burlap provides a rustic look. The wire frame gives shape and support. Hot glue and floral wire attach decorations firmly.
Optional Decorative Elements
- Artificial flowers or greenery
- Ribbon in different colors
- Wooden letters or signs
- Small pine cones or berries
- Seasonal ornaments
- Buttons or beads
Choose decorations that match your style or season. These elements make your wreath unique and festive. Use them sparingly to avoid clutter.
Simple Wrapping Techniques
Simple wrapping techniques make decorating a burlap wreath easy and fun. These methods help you create a neat and attractive base for your decorations. Wrapping burlap around the wreath frame gives texture and charm. It also helps secure other decorative elements firmly in place.
Try different styles to change the look of your wreath. Each technique uses basic supplies and little time. Choose one that fits your style and enjoy crafting.
Classic Burlap Wrap
The classic burlap wrap is the easiest way to cover a wreath frame. Cut a long strip of burlap about 3 to 4 inches wide. Start wrapping from the back of the wreath form.
Wrap the burlap tightly around the frame, overlapping each round slightly. Keep the edges even to create a smooth look. Once you cover the whole frame, secure the end with hot glue or floral wire.
This simple style creates a clean base perfect for adding flowers or ribbons.
Layered And Twisted Styles
Layered and twisted styles add more texture and depth to your wreath. Cut several shorter strips of burlap instead of one long piece. Twist each strip gently before attaching it to the wreath.
Pinch the burlap and tuck it into the frame or use floral wire to hold it. Layer twisted strips over each other to build volume and interest. This technique gives a rustic and full look that stands out.
Play with the amount of twisting and layering to find your favorite style.
Spring And Summer Designs
Spring and summer bring fresh colors and lively vibes. Decorating a burlap wreath for these seasons brightens any door or wall. Use simple ideas to create a cheerful and inviting look. Choose elements that reflect nature and warm weather. Here are three easy ways to style your burlap wreath for spring and summer.
Floral Accents
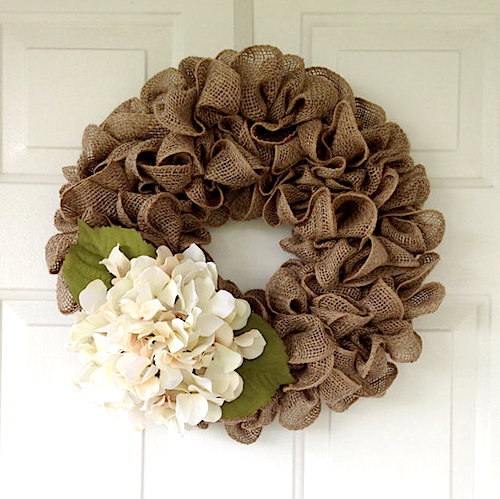
Flowers bring life to a burlap wreath. Use silk or dried flowers for a lasting look. Bright blooms like daisies, sunflowers, and tulips fit spring and summer perfectly. Arrange them in small bunches or a full circle. Attach flowers with hot glue or floral wire. Mix different sizes and colors for a natural feel.
Bright Color Palettes
Choose colors that pop against the burlap’s neutral tone. Bright yellows, pinks, blues, and greens work well. Use ribbons, bows, or painted wooden shapes in these colors. Colorful accents catch the eye and add cheerfulness. Keep the palette simple with two or three main colors. This avoids a cluttered look and keeps the wreath fresh.
Natural Elements
Use items from nature to add texture. Pinecones, twigs, small branches, and berries create a rustic charm. These elements blend well with burlap’s rough texture. Secure them tightly with wire or glue. Combine natural items with flowers or colorful ribbons. This mix creates a balanced and organic design perfect for spring and summer.
Fall And Autumn Themes
Fall and autumn themes bring warmth and charm to burlap wreaths. These seasons inspire nature-inspired decorations. Colors and symbols evoke cozy feelings and festive spirits. Decorating your wreath with fall elements creates a welcoming touch for your home.
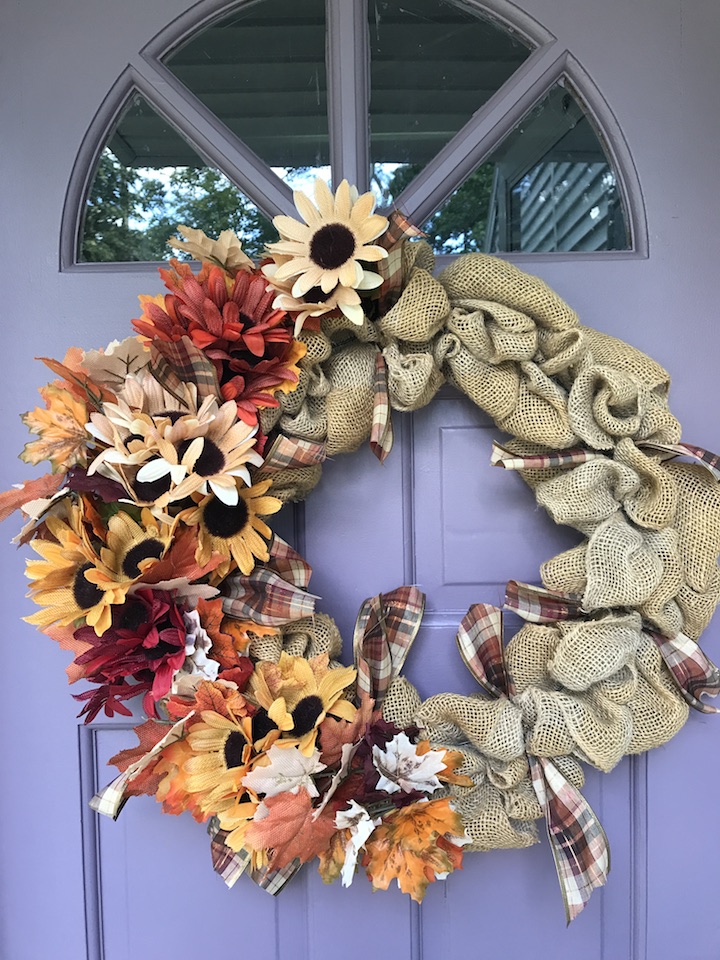
Warm Tones And Leaves
Warm tones like orange, red, and gold suit fall wreaths perfectly. These colors reflect autumn leaves and sunset skies. Adding faux leaves enhances the natural look. Use different leaf shapes and sizes for depth. Pinecones and twigs add texture and interest. Arrange these elements around the wreath’s base evenly or in clusters.
Pumpkin And Harvest Motifs
Pumpkins symbolize harvest and fall celebrations. Small faux pumpkins or gourds work well on burlap wreaths. Pair pumpkins with berries and wheat stalks for a harvest feel. Use ribbon in plaid or burlap to tie the design together. These motifs create a festive, rustic vibe that suits any door.
Credit: howtomakeaburlapwreath.com
Winter And Holiday Styles
Winter brings a special charm to burlap wreaths. The natural texture of burlap pairs well with cozy and festive decorations. Holiday styles turn simple wreaths into warm, inviting pieces. Decorating with winter themes adds charm to your home entrance. Try classic colors, rustic details, and bright lights. These ideas create a joyful holiday mood.
Festive Red And Green
Red and green are traditional holiday colors. Add red berries or velvet ribbons to your wreath. Green pine sprigs or holly leaves bring freshness. Place a big red bow at the bottom or top. These colors make your wreath pop and feel merry. Keep decorations simple to keep burlap visible. Balance colors evenly for a neat look.
Snowy And Rustic Touches
White elements create a snowy effect on burlap. Use faux snow spray or white paint lightly. Pinecones and twigs add a rustic, natural feel. Cotton balls can mimic snow and add softness. Burlap wreaths with these touches look warm and cozy. Use small decorations to keep the design subtle. Rustic styles fit well with farmhouse or country homes.
Adding Lights And Ornaments
Small LED string lights brighten burlap wreaths beautifully. Wrap lights gently around the wreath frame. Choose warm white lights for a soft glow. Add small ornaments like bells or mini baubles. Keep lights and ornaments lightweight to avoid damage. These additions bring sparkle and a festive spirit. Lights also make your wreath visible at night.
Creative Embellishments
Creative embellishments bring burlap wreaths to life. They add personality and charm. Small details make a big difference. Choose items that match your style and season. These touches turn a simple wreath into a unique decoration.
Ribbons And Bows
Ribbons and bows add color and texture. Use soft fabrics like satin or grosgrain. Bright colors work well for spring and summer. Earth tones suit fall and winter themes. Tie a large bow at the top or bottom. Let ribbon tails hang for extra flair. Mix patterns like stripes and polka dots. Secure ribbons with hot glue or floral wire. Change ribbons easily for a fresh look.
Personalized Tags And Signs
Personalized tags make wreaths special. Use wood, metal, or cardstock for tags. Write names, greetings, or short messages. Hand lettering adds a personal touch. Attach tags with twine, wire, or ribbon. Tags can reflect holidays or seasons. Small signs create a welcoming feel. Change tags to match occasions or moods.
Hanging And Display Tips
Hanging and displaying your burlap wreath properly helps it look its best. It also keeps the wreath safe from damage. Choosing the right place and securing the wreath well makes a big difference. Follow these tips to showcase your wreath beautifully.
Choosing The Right Spot
Pick a spot where the wreath stands out. A plain door or wall works great. Avoid busy backgrounds that hide the wreath’s texture and color. Choose a place protected from strong wind and rain. A covered porch or indoor wall is perfect. Make sure the spot is eye-level for easy viewing.
Securing Your Wreath
Use a sturdy hook or wreath hanger to hold the wreath. Choose one that fits the wreath’s size and weight. If hanging on a door, use an over-the-door hanger to avoid damage. For walls, use nails or adhesive hooks made for wreaths. Wrap a ribbon or twine around the wreath loop for extra support. Check the wreath often to make sure it stays secure.
Maintaining Your Burlap Wreath
Maintaining your burlap wreath helps keep its charm and shape. Proper care extends its life and keeps it fresh for many seasons. Simple steps protect the natural fibers and decorations from damage.
Cleaning Techniques
Dust your burlap wreath often using a soft brush. Gently shake the wreath outside to remove loose dirt. Spot clean stains with a damp cloth and mild soap. Avoid soaking the wreath to prevent damage. Let it air dry completely before hanging again.
Storage Advice
Store your burlap wreath in a cool, dry place. Use a large box or a wreath storage bag to keep dust away. Avoid crushing or folding the wreath to keep its shape. Place tissue paper around the wreath for extra protection. Keep it away from direct sunlight to prevent fading.
Credit: www.simplycraftylife.com
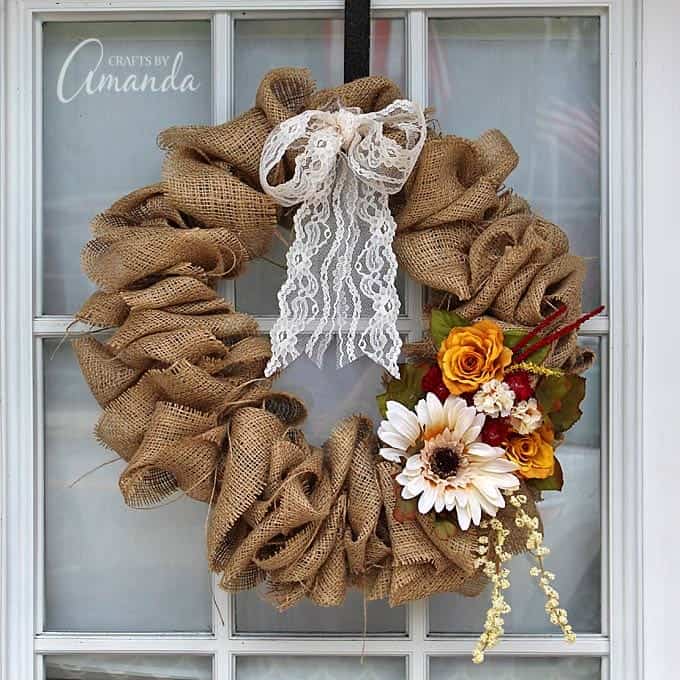
Credit: craftsbyamanda.com
Frequently Asked Questions
How Do I Start Decorating A Burlap Wreath?
Begin by choosing a wreath base and cutting burlap strips. Attach burlap using hot glue or wire. Add decorations like ribbons or flowers for a personalized touch.
What Materials Work Best For Burlap Wreath Decorations?
Use natural elements like faux flowers, pine cones, ribbons, or seasonal ornaments. These materials complement burlap’s rustic texture and create an attractive, cohesive design.
How Can I Make My Burlap Wreath Last Longer?
Keep the wreath indoors or in a covered area. Avoid exposure to rain or direct sunlight. Store it properly during off-seasons to maintain its shape and color.
Can I Customize Burlap Wreaths For Different Seasons?
Yes, switch out decorations like flowers and ribbons to match seasons. Use bright colors for spring and warm tones for autumn to keep it festive year-round.
Conclusion
Decorating a burlap wreath adds charm to any space. You can use ribbons, flowers, or natural elements. Keep the design simple for a cozy, rustic look. Personal touches make your wreath unique and special. Try different colors and textures to fit your style.
Have fun creating something beautiful and welcoming. Your burlap wreath will brighten doors and rooms alike. Enjoy the process and show off your creativity!