Your safety starts with a reliable smoke detector, and knowing how to replace your First Alert smoke detector is key to keeping your home protected. If your alarm is beeping, outdated, or just not working right, you might feel unsure about what to do next.
Don’t worry—this guide will walk you through every simple step to replace your smoke detector quickly and safely. By the end, you’ll have peace of mind knowing your home is secure. Keep reading to learn exactly how to do it yourself without any hassle.
Tools And Materials Needed
Replacing a First Alert smoke detector is easier with the right tools and materials. Preparing these items before starting saves time and prevents mistakes. Each tool has a specific role in the process.
Gather everything you need to make the replacement smooth and safe. This section lists essential tools and materials to have on hand.
Basic Tools Required
A screwdriver is necessary to remove the old detector. Most models use a flathead or Phillips screwdriver. A step ladder helps reach ceiling-mounted detectors safely.
Replacement Smoke Detector
Choose a First Alert smoke detector that matches your old one. Verify the type (photoelectric or ionization) fits your needs. New detectors often come with mounting brackets included.
Batteries
Smoke detectors need fresh batteries for proper operation. Most First Alert models use 9-volt or AA batteries. Check the manual for the correct battery type.
Safety Gear
Wear safety goggles to protect your eyes from dust and debris. Use a dust mask if the area is dirty. Gloves can prevent minor injuries and improve grip.
Additional Materials
Keep electrical tape handy to secure wire connections if needed. A voltage tester helps ensure power is off before handling wires. Have a small container ready for screws and parts to avoid losing them.
Safety Precautions
Replacing a First Alert smoke detector requires careful attention to safety. Smoke detectors protect your home, so handle them with care. Follow safety rules to avoid accidents and ensure the device works well.
Always prepare before starting the replacement. This lowers risks and keeps you safe during the process.
Turn Off The Power
Cut power to the smoke detector at the circuit breaker. This stops electric shocks while you work. Confirm the power is off by testing the detector.
Use A Stable Ladder
Choose a strong, steady ladder to reach the detector. Avoid standing on furniture or unstable surfaces. Check the ladder’s position before climbing.
Handle Batteries Carefully
Remove old batteries with care. Dispose of them properly to prevent leaks. Insert new batteries following the correct direction.
Wear Protective Gear
Use gloves to protect your hands from dust and debris. Safety glasses shield your eyes during the replacement. Keep these items handy before you start.
Work In A Well-lit Area
Good lighting helps you see all parts clearly. It reduces mistakes and speeds up the process. Use a flashlight if necessary.
Removing The Old Smoke Detector
Removing the old smoke detector is the first step in installing a new First Alert smoke detector. This process requires care and attention to ensure safety and avoid damage. Follow these simple steps to remove the old unit properly.
Turn Off Power
Start by turning off the power to the smoke detector. Locate the circuit breaker panel and switch off the breaker connected to the detector. This step prevents electric shocks during removal. Use a voltage tester to double-check that the power is off.
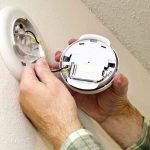
Detach The Detector
Next, remove the smoke detector from its mounting bracket. Most detectors twist or slide off easily. Hold the detector firmly and turn it counterclockwise. Be gentle to avoid breaking the unit or the mounting plate.
Disconnect Wiring
Once detached, carefully disconnect the wiring. Press the release tab or gently pull the connector apart. Avoid pulling wires directly to prevent damage. Keep the wires safe for connecting the new detector.

Credit: www.ifixit.com
Installing The New Smoke Detector
Installing a new First Alert smoke detector is a simple process. It keeps your home safe from fire hazards. The steps below will guide you through the installation. Follow each one carefully to ensure the detector works well.
Connect The Wiring
Start by matching the wires from the ceiling to the smoke detector. Connect the black wire to the black wire and the white wire to the white wire. Use wire nuts to secure the connections. Make sure no bare wire is visible. This keeps the connection safe and stable.
Mount The Detector
Align the smoke detector’s base with the mounting bracket. Twist or snap it into place until it clicks. The detector should fit snugly and not move. Check that the detector faces downward or outward, as per instructions.
Restore Power
Turn the power back on at the circuit breaker. Press the test button on the detector to check it works. You should hear a loud beep. This confirms the detector is ready to protect your home.
Testing The New Detector
Testing the new First Alert smoke detector is an important step. It confirms the device works properly and keeps your home safe. You must perform a few simple checks before finishing the installation.
Performing A Sound Test
Press and hold the test button on the smoke detector. The alarm should sound loudly within a few seconds. If you hear no sound or it is weak, check the battery or connections. A loud alarm means the smoke sensor and speaker are working well.
Checking Battery Backup
Remove the detector from its mount to check the battery backup. Look for the battery compartment and ensure the battery is fresh and installed correctly. If the detector uses sealed batteries, verify the expiration date. The battery backup keeps the alarm active during power outages.

Credit: www.youtube.com
Maintenance Tips
Proper maintenance keeps your First Alert smoke detector working well. It helps protect your home from fire risks. Small steps can ensure the device stays reliable. Follow these tips to maintain your smoke detector easily.
Regular Testing
Test your smoke detector every month. Press the test button until the alarm sounds. This checks if the device works correctly. If it does not beep, replace the battery or the unit. Do not ignore a failed test. A working alarm saves lives.
Battery Replacement Schedule
Change the batteries at least once a year. Use fresh batteries recommended by the manufacturer. Some detectors use long-life batteries that last up to 10 years. Still, check the device regularly to be sure. Low batteries cause weak or no alarm sound.

Credit: www.ifixit.com
Frequently Asked Questions
How Do I Replace A First Alert Smoke Detector?
Turn off power, remove old detector, disconnect wires, attach new detector, and restore power. Test the new unit to ensure functionality.
What Tools Are Needed To Replace A First Alert Detector?
You need a screwdriver, ladder, and possibly wire strippers. Always have fresh batteries ready for installation.
How Often Should I Replace My Smoke Detector?
Replace your smoke detector every 10 years for optimal safety. Batteries should be replaced annually or when low.
Can I Replace The Battery Without Removing The Detector?
Yes, most First Alert detectors have a battery compartment for easy replacement without full removal.
Conclusion
Replacing your First Alert smoke detector keeps your home safe and sound. Follow each step carefully to avoid mistakes. Test the new detector to make sure it works well. Change batteries regularly for continuous protection. Stay alert to any signs of damage or wear.
Safety starts with working smoke detectors in every room. Taking action today helps prevent dangers tomorrow. Simple tasks can save lives. Keep your family secure with a reliable smoke alarm.