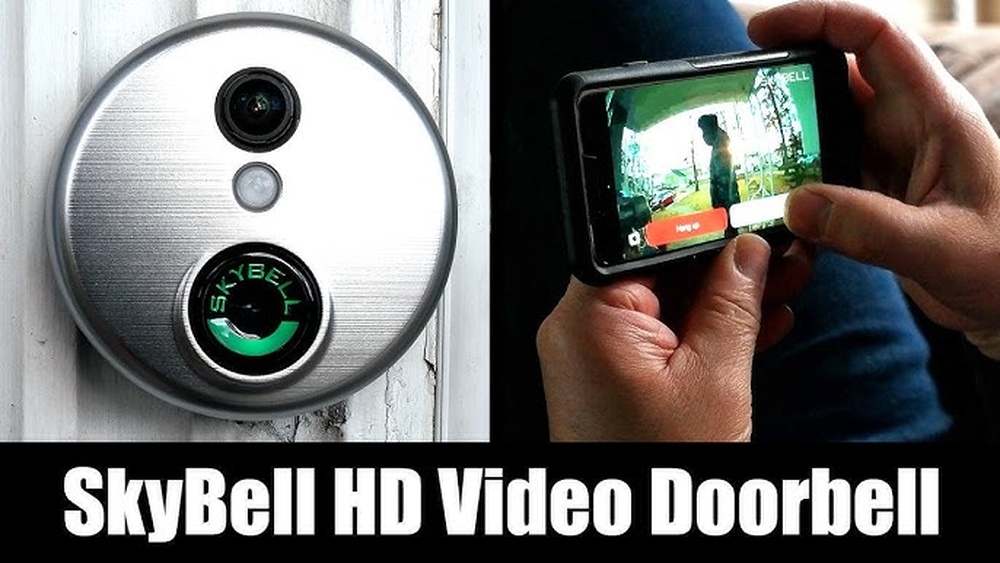
Are you ready to boost your home’s security with clear, real-time video right at your doorstep? Installing the Skybell HD WiFi Video Doorbell might seem tricky, but you can do it yourself without any hassle.
Imagine knowing exactly who’s at your door before you even open it, all from your phone. In this guide, you’ll find simple, step-by-step instructions that make the installation process fast and easy. Keep reading to discover how you can transform your home’s safety with just a few tools and a little time.

Credit: www.youtube.com
Unbox And Check Components
Starting with the Skybell HD WiFi Video Doorbell means first opening the box carefully. This step helps you see all parts before installation. Checking each component ensures you have everything needed to set up the device smoothly.
Take your time to remove all items from the box. Lay them on a clean surface. This makes it easier to identify each piece and prevents losing small parts.
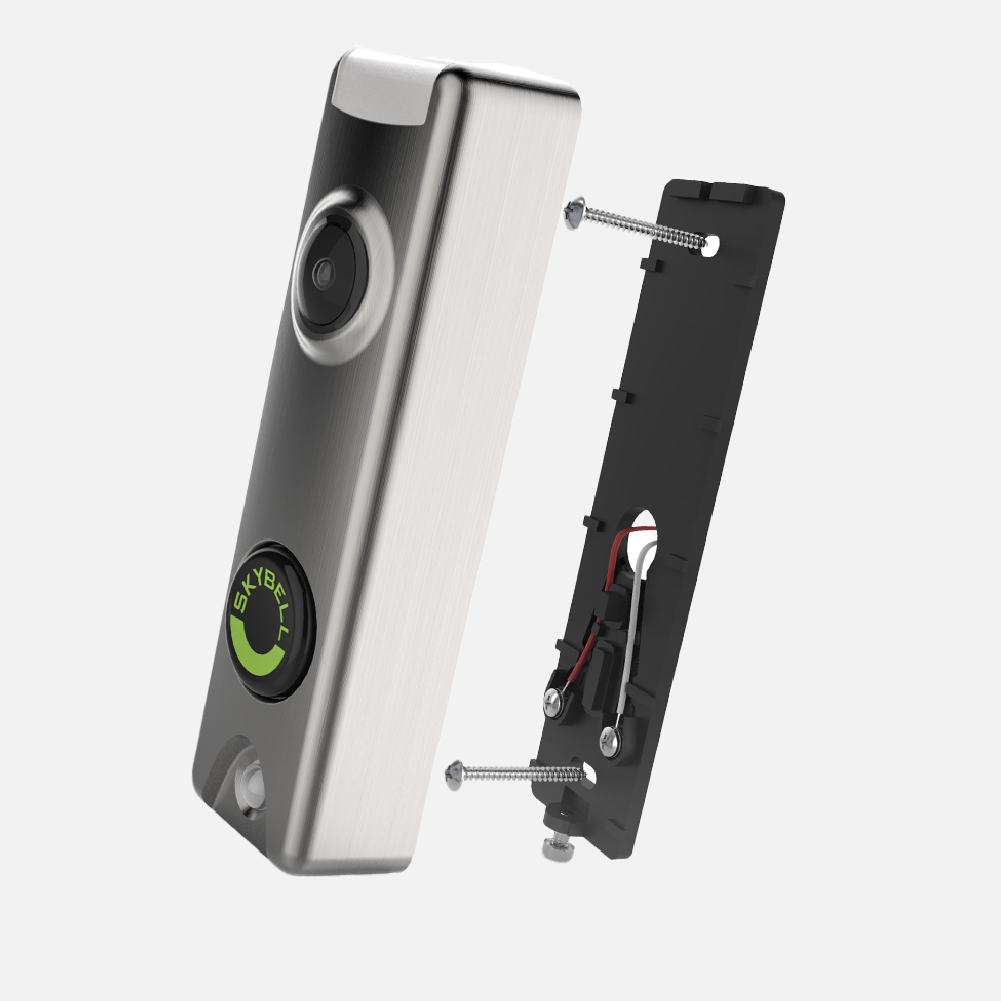
Skybell Hd Video Doorbell Unit
The main device is the Skybell HD video doorbell. It has a camera lens and button. Inspect it for any damage or scratches before installation. This unit records video and allows you to see visitors.
Mounting Plate And Screws
The mounting plate holds the doorbell on the wall. Screws and anchors come with it. These help fix the plate securely. Check the screws match the plate holes and no parts are missing.
Power Adapter And Wiring
Your doorbell needs power to work. The box includes a power adapter or wiring tools. Look for wires or connectors. Make sure the power parts are intact and ready for use.
Instruction Manual And Tools
Find the instruction manual in the box. It guides you through installation steps. Sometimes, basic tools like a screwdriver are included. Confirm you have these before starting the setup.
Additional Accessories
Extra items may come with the doorbell. These include wall anchors, stickers, or trim plates. Check these accessories to see if they fit your installation needs.

Credit: www.shoshitamam.com
Gather Required Tools
Gathering the right tools is the first step to install your Skybell HD WiFi Video Doorbell. Having everything ready makes the process smooth and fast. No interruptions or last-minute trips to the store.
Make sure to check all the tools before you start. This helps avoid delays and frustration. Here are the tools you will need for a successful installation.
Power Drill
A power drill is essential for making holes in the wall. Choose one with a drill bit size that matches the mounting screws. It saves time and effort during installation.
Screwdriver
Use a Phillips or flathead screwdriver to tighten screws. This tool helps secure the doorbell firmly. A good grip on the screws prevents damage and loosening.
Wire Strippers
Wire strippers remove the insulation from doorbell wires. This step is important for a clean electrical connection. Proper stripping ensures the doorbell works correctly.
Voltage Tester
A voltage tester checks if the wires are live. Safety first. It avoids electric shocks during installation. Always test wires before touching them.
Level Tool
A level tool keeps the doorbell straight on the wall. A crooked doorbell looks unprofessional and might affect the camera view. Small adjustments make a big difference.
Measuring Tape
Measuring tape helps mark the exact spot for mounting. Accurate measurements prevent mistakes and extra holes. It ensures the doorbell is at the right height.
Turn Off Power
Before installing the Skybell HD WiFi Video Doorbell, turning off the power is very important. It keeps you safe from electric shocks. It also protects your doorbell and home wiring from damage.
Always check that the power is completely off before starting the installation. This step prevents accidents and ensures a smooth setup process.
Locate The Circuit Breaker
Find the main electrical panel in your home. It usually looks like a metal box. The circuit breaker controls power to different parts of your house. Look for labels to identify the one for your doorbell or front door area.
Switch Off The Correct Breaker
Turn the breaker switch to the off position. This cuts power to the doorbell wiring. Double-check by pressing your existing doorbell button. It should not make any sound if the power is off.
Use A Voltage Tester
Use a voltage tester to confirm no electricity flows to the wires. Touch the tester to each wire. The tester should not light up or beep. This ensures your safety before handling wires.
Wear Safety Gear
Wear insulated gloves to protect yourself. Avoid working near water or damp areas. Safety first makes your installation worry-free and easy.
Remove Existing Doorbell
Removing the existing doorbell is the first step in installing the Skybell HD WiFi Video Doorbell. This process prepares your home for the new device. It is important to work safely and carefully during this step.
Begin by turning off the power to your doorbell at the circuit breaker. This prevents electrical shocks and protects the wiring.
Turn Off Power At The Circuit Breaker
Locate your home’s circuit breaker panel. Find the switch for the doorbell or the front door area. Flip the switch to turn off the power. Double-check by pressing the doorbell button to ensure it no longer rings.
Remove The Doorbell Cover
Use a screwdriver to remove screws holding the doorbell cover. Keep the screws safe for later use. Gently pull the cover away from the wall to expose the wiring and mounting plate.
Disconnect The Doorbell Wires
Note the position of the wires before disconnecting. Unscrew the terminal screws holding the wires in place. Carefully pull the wires away from the old doorbell unit.
Remove The Mounting Plate
Unscrew the mounting plate from the wall. Keep these screws for installing the Skybell. Clean the area to remove dirt or debris.
Mount Skybell Hd Doorbell
Mounting the Skybell HD doorbell is a key step for a clear video and smooth operation. It needs to be steady and connected properly to work well. Follow these simple steps to fit the doorbell on your wall and link the wires.
Attach Mounting Plate
Start by placing the mounting plate on the wall near your door. Use a pencil to mark the screw holes. Drill small holes in the marked spots. Insert wall anchors if needed for extra hold. Screw the mounting plate firmly to the wall. Make sure it does not move or tilt.
Connect Doorbell Wires
Turn off the power at your circuit breaker. Take the wires coming from your wall. Connect each wire to the terminals on the back of the Skybell. Usually, it does not matter which wire goes where. Tighten the screws to keep the wires in place. Double-check that the wires are secure and not touching each other.
Credit: www.esseg.eu
Restore Power
Restoring power is the final step in setting up your Skybell HD WiFi Video Doorbell. This step ensures the device receives electricity and starts working properly. Without power, the doorbell cannot operate or connect to your WiFi.
Carefully restoring power helps avoid damage and ensures safety. It also triggers the doorbell to begin its startup process and connect to your home network.
Turn On The Circuit Breaker
Locate the circuit breaker for your doorbell’s power source. Flip the breaker switch back to the ON position. This action restores electricity to the doorbell wiring. Wait a few seconds to see if the doorbell lights up.
Check The Doorbell Indicator Light
Look for the LED indicator on your Skybell device. A solid or blinking light means the doorbell has power. No light could mean the power is not restored or there is a wiring issue. Confirm the breaker is on and connections are secure.
Test The Doorbell Button
Press the doorbell button to test its response. The device should chime or show activity on your app. If it does not, double-check the power source and wiring. Proper power restoration is key for full functionality.
Download Skybell App
Downloading the Skybell app is the first step to using your Skybell HD Wifi Video Doorbell. This app lets you see visitors, talk to them, and control your doorbell from anywhere. It is easy to get and simple to use.
The app works on both Android and iOS devices. Make sure your phone or tablet is connected to the internet before starting the download. The app is free to download and install.
Find The Skybell App In The App Store Or Google Play
Open the app store on your device. For iPhones, use the Apple App Store. For Android phones, use Google Play Store. Type “Skybell” in the search bar. Look for the official Skybell app with the video doorbell icon.
Download And Install The Skybell App
Tap the “Download” or “Install” button. Wait for the app to download fully. The app will install automatically. Once done, open the app by tapping its icon on your screen.
Create Your Skybell Account
Open the app and select “Create Account.” Enter your email and make a password. Follow the on-screen instructions to finish setup. This account helps you manage your doorbell settings and notifications.
Grant Necessary Permissions
The app will ask for permission to use your camera, microphone, and location. Allow these for the best experience. Permissions let you see and talk to visitors clearly and get alerts on time.
Connect Doorbell To Wifi
Connecting your Skybell HD WiFi video doorbell to your home WiFi network is a key step. This connection lets you see visitors and talk to them from your phone. The process is simple and quick.
Follow these easy steps to connect your doorbell to WiFi and start using it.
Power On Your Skybell Doorbell
Make sure your Skybell doorbell is powered. Use the batteries or the existing doorbell wiring. The device must be on before connecting to WiFi.
Download And Open The Skybell App
Get the Skybell app from Google Play or the Apple App Store. Open the app and create an account or log in.
Start The Wifi Setup In The App
Follow the app instructions to add a new device. The app will ask you to connect to your doorbell’s temporary WiFi signal.
Connect Your Phone To Skybell’s Wifi
Go to your phone’s WiFi settings. Find and connect to the Skybell network. This network is temporary and used for setup only.
Select Your Home Wifi Network
Return to the Skybell app. Choose your home WiFi network from the list. Enter your WiFi password carefully.
Complete The Connection
The app will connect the doorbell to your WiFi. Wait a moment for the confirmation message. Your doorbell is now online and ready.
Test Video And Audio
Testing the video and audio of your Skybell HD WiFi Video Doorbell is a crucial step. It ensures clear communication and proper functioning. This step helps confirm that the camera and microphone work well. It also checks if the speaker delivers sound clearly.
Follow these easy steps to test your device. Make sure your doorbell is connected to WiFi. Use the Skybell app on your smartphone to start the test. This process helps avoid any issues before regular use.
Test Video Quality
Open the Skybell app and go to the live view. Look for a sharp and clear image. Check the lighting and focus of the video. The camera should show a wide view of your doorstep. Adjust the angle if the image is blurry or dark.
Test Audio Clarity
Press the talk button in the app. Speak clearly and listen to your voice through the doorbell. Ask someone near the doorbell to speak back. The sound should be loud and clear on both ends. Fix any static or low volume issues immediately.
Low video quality may come from a weak WiFi signal. Move your router closer or use a WiFi extender. Audio problems can occur due to dirt on the microphone or speaker. Clean the device gently with a soft cloth. Restart the app or doorbell if problems persist.
Adjust Settings And Notifications
Adjusting the settings and notifications on your Skybell HD WiFi Video Doorbell helps you control alerts and device behavior. Proper setup ensures you get important notifications without distractions. It also customizes your experience to fit your daily routine.
Use the Skybell app to manage these settings easily. The app offers clear options for sound, motion detection, and alert preferences. Tailor each setting to receive only the alerts you want.
Adjust Motion Detection Settings
Open the Skybell app and find the motion settings. You can set motion zones to focus on specific areas. This avoids false alarms from passing cars or pets. Adjust the sensitivity to control how often you get alerts.
Customize Notification Preferences
Choose which alerts to receive on your phone. Decide between push notifications, email alerts, or both. Turn off notifications during quiet hours to reduce disturbances. This way, you stay informed only when necessary.
Set Video Quality And Storage Options
Change video resolution to balance quality and data use. Higher quality videos use more storage and bandwidth. Select cloud storage plans or save videos locally. Manage storage to avoid running out of space.
Troubleshoot Common Issues
Troubleshooting common issues helps keep your SkyBell HD Video Doorbell working well. Small problems often stop the doorbell from working right. Fixing these quickly saves time and frustration.
Check each step carefully. Many issues come from simple mistakes or weak connections. Understanding common problems makes the process easier and faster.
Check Your Wifi Connection
A strong WiFi signal is key for SkyBell HD. Weak WiFi causes slow video or no connection. Move your router closer or use a WiFi extender. Restart your router to refresh the network.
Verify Power Supply
SkyBell needs enough power to run. Check your doorbell’s wiring and transformer. Low voltage causes the doorbell to stop or reboot. Use a multimeter to measure voltage if possible.
Reset The Doorbell
Resetting can fix many bugs. Press and hold the button for 10 seconds. Wait for the light to flash. Reconnect the device in the app after the reset.
Update Firmware And App
Old software causes glitches and missed features. Check for updates in the SkyBell app. Update the doorbell firmware and the mobile app regularly. This improves stability and security.
Inspect Physical Installation
Loose wires or poor mounting can cause problems. Tighten all screws and wires. Make sure the doorbell is firmly attached to the wall. Avoid damp or direct sunlight spots.
Frequently Asked Questions
How Do I Connect Skybell Hd To Wifi?
To connect Skybell HD, download the Skybell app and create an account. Follow in-app instructions to link your WiFi network. Ensure your WiFi signal is strong near the doorbell for reliable connectivity.
What Tools Are Needed To Install Skybell Hd Doorbell?
You need a screwdriver, drill, level, and mounting screws. The Skybell kit usually includes screws and anchors. These tools help securely mount the doorbell and connect wiring safely.
Can I Install Skybell Hd Without Professional Help?
Yes, Skybell HD installation is DIY-friendly. Follow the step-by-step guide in the app or manual. Basic electrical knowledge helps, but professional help is optional for safety or complex wiring.
How To Troubleshoot Skybell Hd Wifi Connection Issues?
Restart your router and doorbell. Check WiFi password and signal strength. Move the router closer if needed. Update the Skybell app and firmware regularly for best performance.
Conclusion
Installing the Skybell HD WiFi Video Doorbell is simple and quick. Follow each step carefully for the best results. Your home gains extra security and convenience. Enjoy seeing visitors clearly on your phone anytime. This device helps you stay connected and safe.
Keep your instructions nearby for future reference. Now, you are ready to use your new doorbell confidently. Safety and ease are just a few clicks away.