Are you staring at your old ceramic towel rack wondering how to get it down without damaging your wall? Removing a ceramic towel rack can feel tricky, especially if you want to avoid messy repairs or leftover marks.
But don’t worry—you’re closer than you think to a clean, smooth wall ready for a fresh look. In this guide, you’ll discover simple, step-by-step tips to remove your ceramic towel rack safely and easily. Keep reading, and you’ll have your bathroom ready for an upgrade in no time.
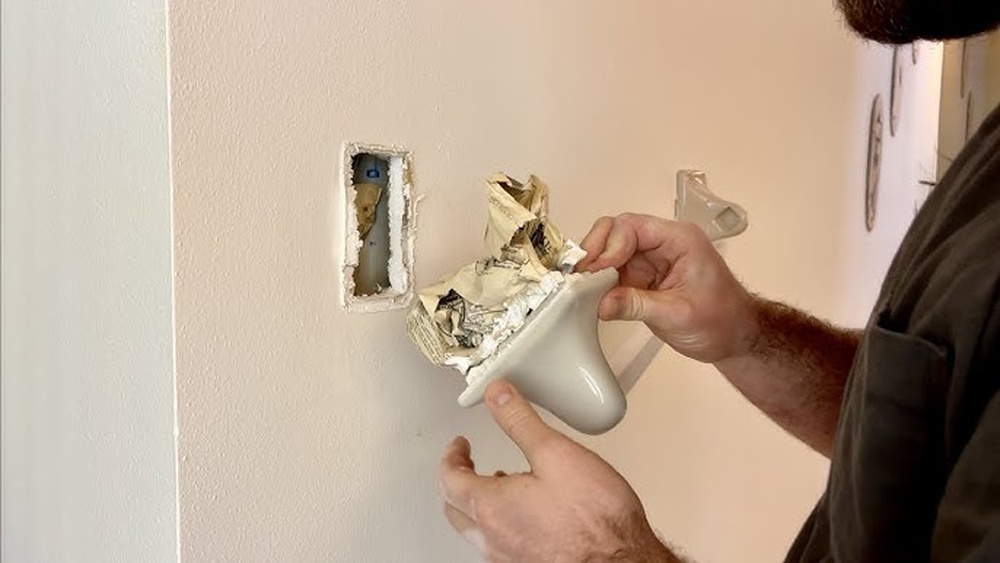
Credit: www.reddit.com
Tools Needed
Removing a ceramic towel rack needs the right tools. Using proper tools makes the job easier and safer. This section lists the tools needed for removing the towel rack without damage.
Flathead Screwdriver
A flathead screwdriver helps to pry off covers and screws. It fits into small gaps to loosen parts carefully.
Phillips Screwdriver
A Phillips screwdriver removes cross-head screws holding the rack. It provides a good grip to avoid stripping screws.
Utility Knife
Use a utility knife to cut through caulk or paint around the rack. This prevents damage to the wall during removal.
Pliers
Pliers grip and twist stubborn screws or bolts. They also help pull out nails or anchors firmly.
Putty Knife
A putty knife slides under the rack base to loosen adhesive or paint. It protects the wall surface while working.
Safety Gloves
Wear safety gloves to protect hands from sharp edges and debris. Gloves improve grip and reduce risk of injury.
Towel Or Cloth
Place a towel under the rack to catch falling debris or screws. It also cushions the rack during removal.
Safety Precautions
Removing a ceramic towel rack needs care and attention. Safety precautions protect you from injury and damage. Taking simple steps helps make the process smooth and safe.
Wear Protective Gloves And Eyewear
Gloves protect your hands from sharp edges and broken ceramic. Eyewear shields your eyes from dust and small chips. Always wear them before starting to remove the rack.
Turn Off Nearby Water Sources
Close water valves near the towel rack. This prevents leaks or water damage during removal. Dry work areas reduce the chance of slipping and accidents.
Use Proper Tools For Removal
Choose tools that fit the screws and brackets. Using the wrong tools can cause slips and breaks. Keep tools in good condition for better control.
Work Slowly And Carefully
Take your time to avoid cracking the ceramic. Rushing leads to mistakes and injuries. Remove screws and brackets gently to keep the wall intact.
Clear The Work Area
Remove objects and clutter around the towel rack. A clean space allows for safe movement. It also prevents tripping or knocking over items.
Prepare The Area
Preparing the area before removing a ceramic towel rack is important. It helps protect your walls and makes the task easier. Take a few simple steps to get ready.
Clear the space around the towel rack. Remove any towels, clothes, or items nearby. This gives you room to work safely and prevents damage to your belongings.
Clear The Surrounding Space
Start by taking down all towels and hangers from the rack. Move any furniture or objects close to the wall away. This clears your work zone and avoids accidents.
Protect The Wall Surface
Cover the wall below the rack with a soft cloth or plastic sheet. This stops scratches or paint damage. Use painter’s tape to secure the covering in place.
Gather Necessary Tools
Collect tools like a screwdriver, putty knife, and cleaning cloth. Having everything ready saves time and keeps the process smooth. Check that tools are in good condition.
Wear Safety Gear
Put on safety glasses and gloves before starting. Ceramic pieces can break and cause injury. Safety gear protects your eyes and hands during removal.
Turn Off Water Supply
Before removing a ceramic towel rack, turn off the water supply. This step prevents water leaks and damage. It makes the removal process safe and clean.
Water supply lines often connect near towel racks in bathrooms. Stopping water flow avoids unexpected spills. It also protects walls and floors from water harm.
Locate The Main Water Valve
Find the main water valve for your home. This valve controls water to the entire house. Usually, it is near the water meter or where pipes enter the house.
Turn Off The Valve
Turn the valve clockwise to close it. This stops water flow completely. Use a wrench if the valve is hard to turn.
Drain Remaining Water
Open the faucet near the towel rack. Let water flow out to clear pipes. This reduces pressure and prevents leaks during removal.
Check For Water Flow
Make sure water is fully stopped. Turn on the faucet to test. No water should come out if the valve is off.
Remove Screws Or Anchors
Removing the screws or anchors is the next step to take down your ceramic towel rack. This part needs care to avoid damage to the wall or the rack itself. Taking your time here helps keep everything intact for future use or repairs.
Locate Fasteners
First, find all screws or anchors holding the towel rack. Check behind the rack edges and underneath any covers. Some screws may be hidden under decorative caps. Use a flashlight to see clearly in dark spots.
Unscrew Carefully
Use a screwdriver that fits the screws perfectly. Turn the screws slowly to avoid stripping them. Keep a hand on the rack to stop it from falling suddenly. Place screws in a small container to avoid losing them.
Detach The Towel Rack
Detaching a ceramic towel rack requires care and attention. You want to avoid damage to the wall and the rack itself. Taking the right steps ensures a smooth removal process. Follow these tips to safely detach your towel rack.
Handle With Care
Ceramic towel racks are fragile. They can crack or break easily. Use gentle pressure when touching the rack. Avoid pulling or twisting it roughly. Support the rack with both hands. Keep tools steady and slow during removal. Patience helps prevent accidents and damage.
Check For Adhesives
Some towel racks stick with glue or adhesive strips. Look closely around the base for any sticky residue. Use a putty knife or scraper to loosen the adhesive gently. Warm the area with a hairdryer to soften glue. This makes the rack easier to lift off. Clean leftover adhesive from the wall after removal.
Clean Wall Surface
Cleaning the wall surface is key after removing a ceramic towel rack. A clean wall helps prepare for painting or mounting new fixtures. It also keeps your bathroom looking neat and fresh. Follow simple steps to remove residue and fix minor damage.
Remove Residue
Start by scraping off leftover glue or adhesive with a plastic scraper. Avoid metal tools to protect the wall. Use warm soapy water and a sponge to wash the area. For stubborn spots, try rubbing alcohol on a cloth. Wipe gently until all residue disappears. Let the wall dry fully before moving on.
Repair Minor Damage
Check for small holes or cracks left by screws. Fill these with spackling paste using a putty knife. Smooth the surface and remove extra paste. Allow it to dry completely. Lightly sand the area with fine sandpaper to make it even. Clean off dust with a dry cloth. Your wall is now ready for the next step.

Credit: diy.stackexchange.com
Tips To Avoid Wall Damage
Removing a ceramic towel rack can harm your wall without care. The right steps help keep walls clean and smooth. Use gentle methods to stop paint and drywall from chipping.
Small efforts now save big repairs later. Protect your wall by working slowly and carefully. This guide shares easy tips for safe removal.
Use The Right Tools
Choose tools designed for gentle wall work. A putty knife and screwdriver often work well. Avoid metal tools that dig into the wall surface. Soft plastic tools reduce scratches and dents.
Loosen Screws Slowly
Turn screws slowly to avoid ripping paint or drywall. Stop if the screw feels stuck. Spray a little lubricant to ease removal. Patience helps keep the wall intact.
Protect The Wall Edges
Place painter’s tape around the towel rack base. Tape shields paint from tool slips and scratches. It also marks the area to work within carefully.
Fill Holes Immediately
Patch holes right after removing the rack. Use lightweight spackle or wall filler. Smooth the surface with a putty knife. Let it dry before sanding for a clean finish.
Clean The Area Gently
Wipe the wall with a soft cloth after removal. Avoid harsh scrubbing that can peel paint. Mild soap and water work well for dirt and dust.
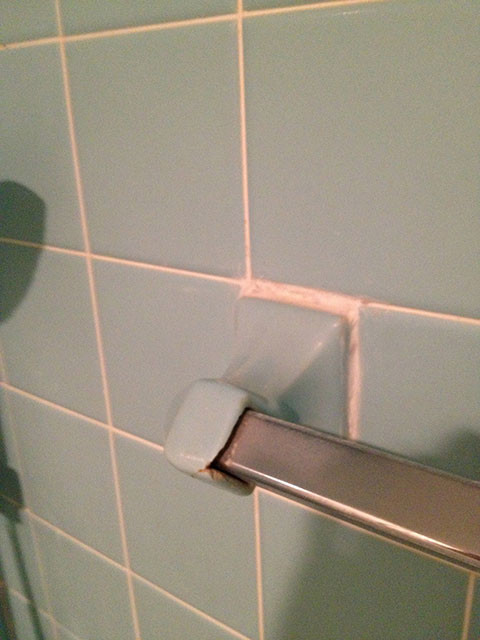
Credit: www.houzz.com
Frequently Asked Questions
How Do I Safely Remove A Ceramic Towel Rack?
To safely remove a ceramic towel rack, first locate the mounting screws. Use a screwdriver to unscrew them gently. If adhesive is involved, apply a hairdryer to soften it. Carefully detach the rack to avoid damaging the wall or ceramic.
What Tools Are Needed To Remove Ceramic Towel Racks?
You need a screwdriver, hairdryer, putty knife, and possibly adhesive remover. These tools help loosen screws and soften glue, making removal easier. Always use appropriate safety gear and work carefully to avoid wall or ceramic damage.
Can I Remove A Ceramic Towel Rack Without Damaging Walls?
Yes, by loosening screws slowly and using heat to soften adhesive. Use a putty knife to gently pry the rack away. Work carefully to avoid pulling paint or drywall off the wall surface.
How To Clean Wall After Removing Ceramic Towel Rack?
Remove any leftover adhesive with a putty knife or adhesive remover. Clean the wall with mild soap and water. Allow it to dry fully before repainting or installing a new rack. This keeps the wall smooth and ready for new fixtures.
Conclusion
Removing a ceramic towel rack does not have to be hard. Take your time and work carefully. Use the right tools to avoid damage. Keep screws and parts safe for later use. Clean the wall after removal for a neat look.
Now, you can easily install a new rack or leave the space empty. Simple steps lead to good results. You can do it yourself with patience and care.