Imagine looking into your mirror each morning and seeing more than just your reflection. What if your mirror could show you the weather, your daily schedule, or even news updates—all while you get ready?
Building a full smart mirror might sound complicated, but with the right steps, you can create one yourself. This guide will walk you through everything you need to know, making the process simple and fun. Ready to turn your ordinary mirror into a smart, personalized assistant?
Let’s dive in and make it happen!

Credit: www.youtube.com
Choosing The Right Mirror
Choosing the right mirror is the first step in building a smart mirror. It affects how the mirror looks and works. The mirror must let light pass to show the display behind it. It must also look clear and stylish. Knowing the types of mirrors and the right materials helps make a better smart mirror.
Types Of Smart Mirrors
Smart mirrors come in different types. Some have one-way glass that shows a screen behind it. Others use two-way mirrors that reflect like normal mirrors but also show images. Some smart mirrors have touch screens, while others use voice control. Pick a type that fits your needs and space.
Selecting Mirror Glass
Mirror glass is very important for clarity and brightness. Two-way glass is common for smart mirrors. It lets light through but still reflects your image. Choose glass that is thin and has low reflectivity. This ensures the screen behind the glass is easy to see. Avoid glass that is too dark or thick.
Frame Options
The frame holds the mirror and the screen together. It can be wood, metal, or plastic. Wood frames give a classic look. Metal frames are strong and modern. Plastic frames are light and cheap. Pick a frame that matches your room style. Make sure it fits the mirror size well.
Gathering Materials And Tools
Gathering the right materials and tools is the first step in building a full smart mirror. It sets the foundation for a smooth project. Knowing what you need helps avoid delays and keeps things organized. This section breaks down the essential hardware, software, and tools required.
Essential Hardware Components
Start with a two-way mirror. It lets you see the display behind it. Next, choose a display screen, like an LCD or LED monitor. A small computer or microcontroller powers the smart features. Raspberry Pi is a popular choice. Add a frame to hold everything together. Don’t forget power cables and connectors. Sensors like a microphone or camera can be added for voice or face recognition.
Required Software And Apps
Install an operating system on your computer. Raspbian works well for Raspberry Pi. Choose smart mirror software to display information. MagicMirror² is a widely used option. Add modules for weather, news, or calendar updates. Some coding knowledge helps customize features. Apps for voice control or facial recognition enhance the mirror’s functions.
Tools Checklist
Gather basic tools such as a screwdriver and wire cutters. A drill helps with making holes in the frame. Use a hot glue gun or double-sided tape to fix parts. A soldering iron is useful for secure electrical connections. Have a measuring tape for precise cutting and fitting. A computer or laptop is needed for software setup. Keep safety gear like gloves and goggles handy.
Setting Up The Display
Setting up the display is a crucial step in building a smart mirror. The screen shows all information clearly. It should fit well and work perfectly behind the mirror glass. Proper setup ensures easy reading and a sleek look.
Selecting A Monitor Or Tablet
Choose a screen size that fits your mirror frame. Monitors work well for large mirrors. Tablets suit smaller or portable mirrors. Check the screen resolution for clear images. Avoid screens with low brightness. A bright display improves visibility behind the glass.
Preparing The Screen
Remove any unnecessary parts like stands or buttons. This creates a flat surface. Clean the screen gently with a soft cloth. Avoid harsh chemicals that can damage it. Attach the screen securely to the mirror frame. Use strong tape or brackets to hold it in place.
Adjusting Brightness And Contrast
Set brightness high enough for easy reading. Avoid too much brightness to save power. Adjust contrast for sharp text and images. Test the display in different light conditions. Make changes until the screen looks clear and comfortable.
Installing The Two-way Mirror
Installing the two-way mirror is a key step in building a smart mirror. This mirror allows the display to show through while reflecting your image. Proper installation ensures a clear view and sharp reflection. It also protects the screen behind the glass.
Mounting Techniques
Start by choosing a sturdy frame to hold the mirror. Use strong clips or adhesive strips for mounting. Avoid heavy glue that can damage the mirror. Align the mirror carefully with the display screen behind it. Check for any gaps or misalignment before fixing it in place. A well-mounted mirror stays flat and stable over time.
Ensuring Visibility And Reflection
Clean the mirror surface before installation. Dust or fingerprints reduce clarity. Position the mirror in a well-lit area. Light behind the mirror must be dimmer than the front room light. This balance lets you see the screen and your reflection clearly. Test the mirror by turning the display on and off.
Securing The Mirror
Secure the mirror with gentle pressure after mounting. Use foam tape or rubber pads to avoid scratches. Double-check that the mirror does not shift inside the frame. Tighten any screws or fasteners carefully. The mirror should stay firmly in place during use. Proper security prevents accidents and keeps the smart mirror working well.
Configuring The Smart Features
Configuring the smart features is a key step in building your full smart mirror. This stage brings your mirror to life. It adds useful functions that you can interact with daily.
Start by setting up the operating system. This software controls all the smart functions. Next, integrate voice assistants. They make your mirror respond to your commands. Finally, add weather and news widgets. These show real-time updates on your mirror’s screen.
Installing Operating System
Choose an operating system that supports smart mirror apps. Raspberry Pi OS is a popular choice. Download the OS image file and flash it onto your microSD card. Insert the card into your Raspberry Pi or device. Power it on and follow the setup instructions on the screen. Connect your device to Wi-Fi to enable internet features. Keep the OS updated for better performance and security.
Integrating Voice Assistants
Voice assistants make your smart mirror hands-free. Google Assistant and Amazon Alexa are common options. Install the necessary software on your device. Create an account and link it to your voice assistant. Configure microphone and speaker settings for clear audio. Test the assistant by speaking simple commands. Adjust settings to improve recognition and response speed.
Adding Weather And News Widgets
Weather and news widgets keep you informed daily. Find widgets compatible with your operating system. Install them using the smart mirror software or terminal commands. Configure widget settings to show your location and preferred news sources. Arrange the widgets on the mirror display for easy reading. Update widgets regularly to receive fresh information.

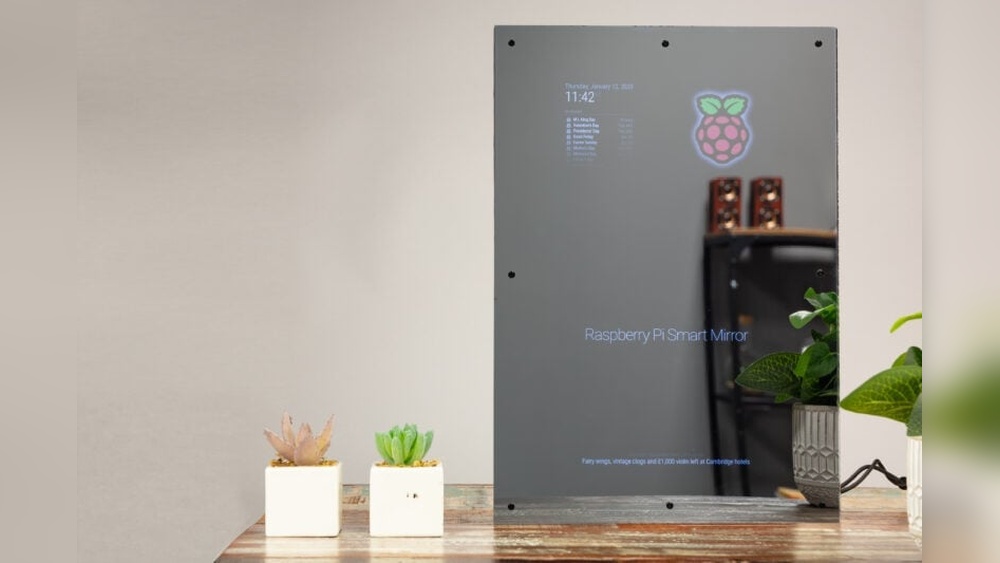
Credit: www.edn.com
Building The Frame And Housing
Building the frame and housing is a key step in creating a smart mirror. The frame holds all parts together and gives the mirror a clean look. Good design and careful assembly help the mirror last long and work well.
Designing The Frame
Start with a simple design that fits your space. Choose materials like wood, metal, or plastic. Wood is easy to work with and looks natural. Measure the mirror and screen size carefully. Leave space for cables and ventilation. Keep the frame slim to avoid bulkiness. A good design protects the screen from dust and damage.
Assembling The Housing
Cut the frame pieces according to your design. Use screws or glue to join parts firmly. Make sure the frame holds the screen tightly without pressure. Add a back panel to protect electronics. Drill holes for power cords and buttons. Test the fit before final assembly to avoid problems. Secure the smart mirror parts inside the housing carefully.
Cable Management Tips
Keep cables tidy to avoid tangles and damage. Use clips or adhesive hooks inside the housing. Bundle cables with zip ties or Velcro straps. Leave some slack for easy access and changes. Route cables away from heat sources. Label cables for quick identification. Good cable management helps the smart mirror look neat and work better.
Powering The Smart Mirror
Powering the smart mirror is a key step in the build process. It ensures your mirror works smoothly and lasts long. Choosing the right power source and managing cables carefully makes a big difference. Safety must always come first to avoid any accidents or damage.
Choosing Power Sources
Most smart mirrors use a standard power adapter. It converts wall electricity to a safe level for the mirror parts. Some builders use USB power supplies for smaller mirrors. Consider the power needs of your display and computer. Always pick a power source with enough voltage and current. This prevents overheating or sudden shutdowns.
Managing Power Cables
Keep power cables neat and hidden behind the mirror frame. Use cable clips or ties to secure loose wires. Avoid sharp bends or tight loops in cables. This protects them from wear and tear. Label cables if you have many. It helps during maintenance or upgrades.
Safety Considerations
Use power supplies with proper certifications like UL or CE. Check all connections are firm and insulated. Avoid placing power adapters near water or heat sources. Turn off power before making any changes to wiring. Use a surge protector to guard against voltage spikes. These steps reduce fire risk and protect your smart mirror.
Customizing User Interface
Customizing the user interface of your smart mirror makes it unique and easier to use. A good interface helps you find information fast. It also makes the mirror look nice and fit your style. You can change themes, add widgets, and improve the experience for daily use.
Selecting Themes And Layouts
The first step is choosing a theme that suits your taste. Themes control colors, fonts, and background images. Pick one that matches your room’s style. Layouts decide where each part of the display goes. Arrange the time, weather, and news in a way that feels natural to you. Simple layouts help avoid clutter and confusion.
Adding Personal Widgets
Widgets are small tools that show useful info or perform tasks. You can add widgets for calendar, weather, news, or traffic. Some smart mirrors support custom widgets, like to-do lists or reminders. Choose widgets that fit your daily routine. Keep only the most helpful ones to keep the screen clean.
Optimizing For User Experience
Make sure the text is easy to read from a distance. Use large fonts and clear icons. Brightness should adjust automatically to room light. Test the interface in different lighting conditions. Place the most important info in the center or top. Avoid too many moving parts that can distract you.
Troubleshooting Common Issues
Troubleshooting common issues is a key part of building a smart mirror. Problems can appear in different parts of the system. Knowing how to fix these helps keep your smart mirror working well. This section covers display problems, software glitches, and hardware malfunctions.
Display Problems
The display may not turn on or show a blank screen. Check all cable connections first. Loose or damaged cables often cause display issues. Make sure the monitor is powered properly. Adjust brightness and contrast settings to improve visibility.
Screen flickering or strange colors can signal a problem with the display driver. Update the driver or reinstall it to fix the issue. If problems continue, test the monitor with another device to isolate the cause.
Software Glitches
Smart mirror software can freeze or crash. Restart the software or reboot the system to clear temporary bugs. Check for available updates and install them to improve stability.
Some features may not work as expected. Review configuration files for errors or missing settings. Resetting the software to default settings often solves these glitches. Use logs to find detailed error messages.
Hardware Malfunctions
Hardware parts can fail over time. The touchscreen might stop responding or sensors may malfunction. Test each hardware component separately to find faulty parts.
Power supply problems cause unexpected shutdowns. Ensure your power source is stable and meets voltage needs. Replace damaged wires and connectors to avoid short circuits.
Cooling fans and other moving parts need regular cleaning. Dust buildup can cause overheating and hardware failure. Maintain your smart mirror by cleaning and inspecting parts often.
Credit: medium.com
Enhancing With Advanced Features
Enhancing your smart mirror with advanced features makes it more useful and fun. These upgrades help the mirror do more than just show your reflection and basic info. You can control your home, recognize faces, and even use voice commands for a smooth experience.
Integrating Smart Home Controls
Connect your smart mirror to lights, thermostats, and security systems. Control devices right from the mirror’s screen. Adjust settings without using your phone or separate apps. This makes your daily routine simpler and faster.
Adding Facial Recognition
Facial recognition lets the mirror identify who stands in front of it. Show personalized information like calendar events or weather updates. It keeps your data private by showing info only to you. This feature adds convenience and security.
Voice Command Enhancements
Use voice commands to operate the mirror hands-free. Ask for news, weather, or control smart devices with simple words. This makes the mirror easy to use while getting ready or cooking. Voice control creates a smooth and natural interaction.
Frequently Asked Questions
What Components Are Needed To Build A Smart Mirror?
You need a two-way mirror, monitor, Raspberry Pi, sensors, and frame materials. Additional tools include software and power supply for full functionality.
How Do I Program A Smart Mirror’s Software?
Use open-source platforms like MagicMirror². Customize modules using JavaScript and configure settings via JSON files for personalized displays.
Can A Smart Mirror Display Weather And News Updates?
Yes, smart mirrors can show real-time weather, news, calendar events, and notifications using integrated apps and APIs.
Is Building A Smart Mirror Cost-effective Compared To Buying One?
Building a smart mirror is often cheaper and customizable. Costs vary based on parts quality and desired features.
Conclusion
Building a full smart mirror is simpler than it seems. Follow the steps carefully and take your time. Choose the right materials and tools to avoid problems. Test each part before final assembly to ensure it works well. Your smart mirror will add style and tech to any room.
Enjoy the process and learn new skills along the way. This project brings creativity and function together in one. Start your smart mirror journey today and see the results!