Have you ever faced the challenge of removing a smoke detector from your ceiling but didn’t know where to start? Whether it’s time to replace an old unit or you need to disconnect it for maintenance, taking it down safely is crucial.
You might worry about damaging your ceiling or triggering the alarm accidentally. Don’t worry—this guide will walk you through each simple step so you can confidently remove your smoke detector without stress. Keep reading to learn exactly what you need to do and avoid common mistakes that many people make.
Credit: support.firstalert.com
Tools Needed
Removing a smoke detector from the ceiling needs the right tools. Using correct tools makes the task safe and easy. Prepare all tools before starting. This saves time and avoids frustration.
Basic Tools
A screwdriver is the main tool for this job. Most smoke detectors use screws to hold them. Choose a screwdriver that fits the screws well. A ladder or step stool helps to reach the ceiling safely. A small flashlight can help see screws clearly. A pair of pliers might be needed to disconnect wires carefully.
Safety Equipment
Safety is important when working on ceilings. Wear safety goggles to protect your eyes from dust. Use gloves to avoid electrical shocks or sharp edges. Turn off the power at the circuit breaker before starting. This prevents accidents with live wires. Have a dust mask handy if the ceiling is dusty or dirty.
Prepare The Area
Preparing the area before removing a smoke detector is important for safety and ease. It helps avoid accidents and protects your property. Taking simple steps makes the removal process smooth and stress-free.
Turn Off Power
Start by turning off the power to the smoke detector. This stops any electric shock risk. Use the circuit breaker or fuse box to cut power to the room. Double-check the power is off by testing the detector or using a voltage tester.
Clear The Surrounding Space
Remove furniture and objects near the smoke detector. This creates a clear work area. Cover floors and items with a cloth or plastic sheet to catch dust or debris. Good lighting helps you see better and work safely.
Locate The Smoke Detector
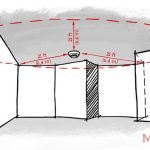
Locating the smoke detector is the first step to remove it safely. You need to know exactly where it is on the ceiling. Most smoke detectors are placed in central spots or near bedrooms.
Finding the device helps you prepare the right tools. It also lets you avoid damaging the ceiling or the wiring. Take your time to look carefully before starting.
Identify The Type
Smoke detectors come in different types. Some have a round shape, while others are square. There are battery-powered models and those hardwired into your home.
Knowing the type helps you understand how it attaches to the ceiling. It also tells you if you need to turn off power before removal. Check for any labels or markings on the device.
Check For Mounting Style
Smoke detectors attach to ceilings in various ways. Some twist off by turning counterclockwise. Others use screws to hold them in place.
Look closely at the base to see how it is fixed. This step prevents damage to both the detector and the ceiling. Knowing the mounting style makes removal easier and safer.
Credit: www.youtube.com
Remove The Detector
Removing the smoke detector from the ceiling is the next step after turning off power. This part needs care to avoid damage or injury. Follow the simple methods to detach the device safely.
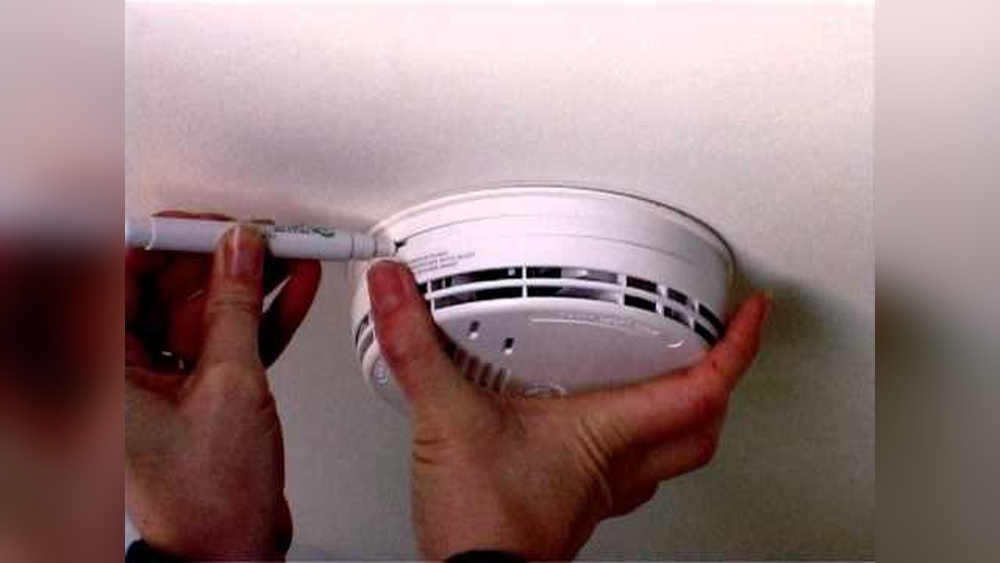
Twist Or Unclip
Most smoke detectors either twist or unclip from their base. Hold the detector firmly and try turning it counterclockwise. If it does not twist, look for clips or tabs around the edge. Press or squeeze these clips gently to release the detector. Pull the unit down slowly once it is loose.
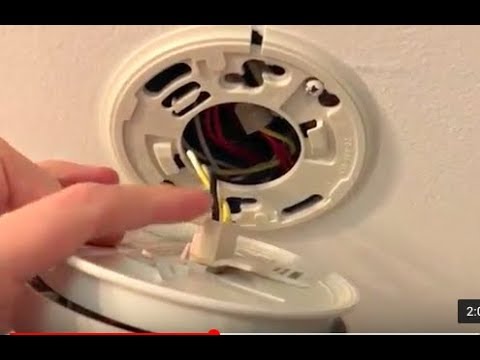
Disconnect Wiring
After removing the detector from the base, wires will still connect it to the ceiling. Carefully pull the detector away to access the wiring. Most detectors have a plug or connector that can be unplugged. Press the release tab and pull the connector apart. Avoid pulling wires directly to prevent damage.
Handle Batteries
Handling the batteries in your smoke detector is a crucial step before removal. Batteries power the device and keep it active. Removing the batteries prevents false alarms and ensures safety during removal. Proper care during this step avoids damage and keeps your home safe.
Remove And Dispose
First, open the battery compartment carefully. Take out the batteries one by one. Avoid using force to prevent damage. Place the old batteries in a safe container. Do not throw them in regular trash. Use a battery recycling center or follow local disposal rules.
Replace If Needed
Check the batteries for any signs of corrosion or leakage. If they look worn or weak, replace them with new ones. Use the battery type recommended by the manufacturer. Insert the new batteries correctly, matching the plus and minus signs. This ensures the smoke detector works properly after reinstallation.
Inspect The Ceiling
Before removing a smoke detector from the ceiling, inspect the area carefully. This step helps avoid damage and keeps the ceiling safe. It also prepares you for any cleaning or repair needed after removal.
Check For Damage
Look closely at the ceiling around the smoke detector. Check for cracks, holes, or stains. These signs may show water leaks or structural problems. Noticing damage early helps you plan repairs. It also prevents bigger issues later.
Clean The Area
Dust and dirt often collect near smoke detectors. Use a soft cloth or brush to clean the ceiling gently. Removing debris helps you see the surface better. It also stops dust from falling during removal. Clean surfaces make repairs easier if needed.
Reinstall Or Replace
After removing a smoke detector from the ceiling, the next step is to decide whether to reinstall the same device or replace it. Reinstalling works if the detector is still in good condition and functions well. Replacement is best if the detector is old or faulty. Both options keep your home safe from fire hazards.
Install New Detector
Start by connecting the wires from the ceiling to the new smoke detector. Follow the instructions that come with the device carefully. Attach the mounting bracket to the ceiling first. Then, secure the new detector onto the bracket. Make sure it fits firmly and does not wobble. Avoid touching the sensor area to prevent damage.
Test Functionality
Once installed, test the smoke detector immediately. Press the test button on the device until you hear the alarm. The sound confirms the detector works well. If there is no sound, check the battery or wiring. Replace batteries if needed or consult an electrician. Regular testing keeps your smoke detectors reliable and your home safe.
Credit: support.firstalert.com
Safety Tips
Removing a smoke detector from the ceiling requires care and attention. Safety is the top priority to avoid accidents. Follow these tips to protect yourself and your home.
Avoid Electrical Hazards
Turn off the power to the smoke detector at the circuit breaker. Never rely on just removing the battery. Use a voltage tester to check if the wires are live. Handle wires gently to avoid electric shocks. Keep your hands dry during the process. Use insulated tools for better protection.
Proper Disposal Of Old Units
Smoke detectors often contain radioactive material and batteries. Do not throw them in regular trash. Check local rules for hazardous waste disposal. Many communities have special collection points. Remove the battery before disposal to prevent leaks. Follow guidelines to keep the environment safe.
Frequently Asked Questions
How Do I Safely Remove A Smoke Detector From Ceiling?
First, turn off the power at the breaker. Then, twist or slide the detector off its mounting bracket. Disconnect the wiring carefully to avoid damage.
What Tools Are Needed To Remove A Smoke Detector?
You typically need a ladder, screwdriver, and possibly a voltage tester for safety. These tools help you reach and detach the detector safely.
Can I Remove A Smoke Detector Without Cutting Wires?
Yes, most detectors unplug or twist off from the base without cutting wires. Always handle the wiring gently to maintain functionality.
How To Avoid Damaging The Ceiling During Smoke Detector Removal?
Use a gentle twisting motion to detach the detector. Avoid pulling hard on wires or brackets to prevent ceiling damage.
Conclusion
Removing a smoke detector from the ceiling is simple and safe. Always turn off the power before starting. Use a ladder to reach the detector carefully. Twist or unclip the device gently to avoid damage. Remember to disconnect the wires with care.
Keep the smoke detector in a safe place if you plan to reuse it. Regular checks help keep your home safe. Now you know how to remove a smoke detector properly. Stay safe and take your time during the process.