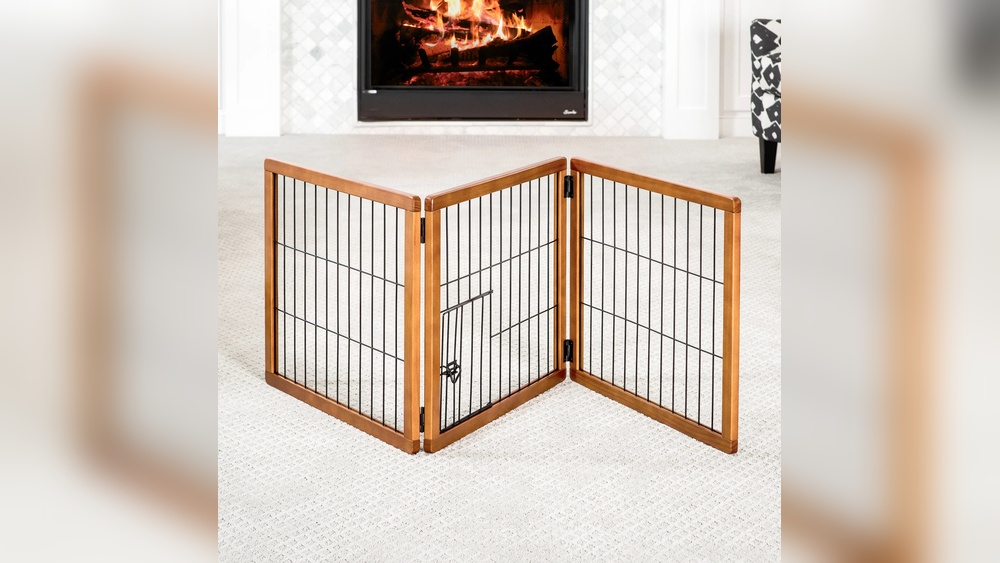
Are you tired of your pet wandering into rooms where they shouldn’t be? A foldable pet gate could be the perfect solution to keep your furry friend safe and your home organized.
Imagine having a gate that’s easy to move, store, and set up whenever you need it. In this guide, you’ll learn simple steps to make your own foldable pet gate quickly and affordably. By the end, you’ll have a handy tool that gives you control and peace of mind—without breaking the bank.
Let’s get started!

Credit: maiamidwifery.com
Benefits Of A Foldable Pet Gate
A foldable pet gate offers many benefits for pet owners. It helps keep pets safe and controls their movement inside the house. This type of gate is easy to use and store. It suits different spaces and needs.
Choosing a foldable gate means convenience and flexibility. It fits in tight spaces and folds away when not needed. This makes it perfect for homes with limited room. It also adapts to various doorways or openings.
Easy Storage and PortabilityFoldable pet gates fold flat for easy storage. You can carry them to different rooms or take them outside. This feature makes travel or visits with pets simple. It saves space when the gate is not in use.
Adjustable Size and ShapeThe gate can adjust to fit many openings. It bends or folds to match doors or hallways. This flexibility allows use in many home areas. It works well for irregular or wide spaces.
Simple Setup and UseSetting up a foldable gate takes little time and effort. No special tools or skills are needed. You can open or close the gate quickly. This ease helps keep pets safe without hassle.
Safe and Comfortable for PetsFoldable gates have smooth edges and safe locks. They keep pets secure without causing harm. Pets can see through the gate, reducing stress. This design helps pets stay calm.
Materials And Tools Needed
Gathering the right materials and tools is the first step to building a foldable pet gate. Choose items that are easy to work with and sturdy enough to keep pets safe. This section lists everything needed to create a durable and functional gate.
Materials Needed
Select lightweight wood or metal for the frame. Use hinges to connect the panels. Choose mesh or slats to fill the gate and prevent pets from squeezing through. Sandpaper smooths rough edges. Paint or sealant protects the gate from wear and tear.
Tools Required
A saw cuts the wood or metal to size. A drill makes holes for screws and hinges. Screwdrivers tighten screws securely. A measuring tape ensures accurate dimensions. Clamps hold parts steady during assembly. Safety gear protects eyes and hands.
Choosing The Right Design
Choosing the right design for a foldable pet gate is important. It affects safety, ease of use, and how well it fits your space. A good design keeps your pet secure and makes your life easier. Think about your pet’s size and behavior. Also, consider where you will place the gate. The design should match your needs perfectly.
Size And Height Considerations
Size matters for a pet gate. It should be wide enough to fit the doorway or hallway. Measure the space before you start. Height is also key. The gate must be tall enough to stop your pet from jumping over. Small dogs need shorter gates. Bigger dogs need taller gates. Choose a height that fits your pet’s size and strength. This keeps them safe and secure.
Types Of Folding Mechanisms
There are different folding mechanisms for pet gates. Accordion folds are popular. They fold easily and save space. Hinged panels fold flat against each other. This design is sturdy and easy to store. Sliding panels move side to side. They work well in tight spaces. Pick a folding style that matches your space and how you will use the gate. A smooth, simple mechanism makes daily use easier.
Cutting And Preparing The Wood
Cutting and preparing the wood is a key step in making a foldable pet gate. This part shapes the wood pieces to fit perfectly. Proper cutting ensures stability and safety for your pet. Clean, smooth edges prevent splinters and injuries.
Careful measurement and precise cuts lead to a strong structure. Preparing the wood well also makes assembly easier. Follow each step with attention to detail for the best results.
Measuring And Marking The Wood
Measure twice before cutting once. Use a tape measure to mark the wood clearly. Mark all pieces needed for the gate frame and panels. Use a pencil or chalk for visible marks. Double-check measurements for accuracy.
Choosing The Right Wood Type
Select wood that is sturdy but light. Pine or cedar works well for pet gates. Avoid soft woods that break easily. Choose untreated wood to avoid harmful chemicals. Sand the wood to remove rough spots.
Cutting The Wood Safely
Use a saw suitable for your wood size. A handsaw or circular saw works fine. Cut along the marked lines slowly and steadily. Keep fingers away from the blade at all times. Wear safety glasses and gloves for protection.
Sanding And Smoothing The Edges
After cutting, sand all edges and surfaces. Use medium-grit sandpaper to smooth rough areas. Sand corners well to avoid sharp points. Smooth wood is safer for pets and looks better. Wipe off dust with a clean cloth.
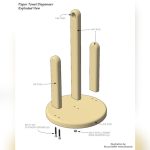
Assembling The Frame
Assembling the frame is a key step in making your foldable pet gate. The frame holds everything together and gives the gate its shape. Take your time to build it strong and steady.
Start by preparing all the materials and tools. This makes the process smooth and easy. Follow each step carefully for the best results.
Gathering Materials And Tools
Collect wood pieces or metal bars for the frame sides. You will also need screws, hinges, and a drill. A measuring tape and pencil help mark your cuts. Have all items ready before starting.
Cutting The Frame Pieces
Measure the gate size based on your door or space. Cut four pieces for the outer frame. Make sure the cuts are straight and smooth. Use sandpaper to remove rough edges.
Joining Frame Corners
Align two frame pieces at a right angle. Drill pilot holes to avoid splitting the wood. Attach the pieces with screws or brackets. Repeat for all corners to form a rectangle.
Installing Foldable Hinges
Attach hinges between frame sections to allow folding. Place hinges evenly for balance. Use screws to secure hinges tightly. Test the folding motion before final tightening.
Attaching The Hinges
Attaching the hinges is a key step to make your foldable pet gate work well. Hinges connect each panel and allow the gate to fold easily. Choose strong hinges that fit your gate size and material.
Position the hinges carefully for smooth folding and stability. Mark the spots before attaching them. This prevents mistakes and keeps the gate balanced.
Choosing The Right Hinges
Select hinges made of durable metal like steel or brass. These last longer and hold weight better. Pick hinges with a wide leaf for better support. Make sure they are the right size for your gate panels.
Marking Hinge Placement
Align the panels side by side in the order they will fold. Place the hinges about 3 inches from the top and bottom edges. Use a pencil to mark screw holes on both panels. Double-check the marks for accuracy.
Installing The Hinges
Hold the hinge in place and drill pilot holes for the screws. This prevents wood from splitting. Attach the hinges using screws and a screwdriver. Tighten screws firmly but avoid over-tightening. Test the folding action to ensure smooth movement.
Adding Safety Features
Adding safety features to your foldable pet gate is very important. These features protect your pet from injuries. They also keep the gate stable and reliable. Focus on smooth edges and secure latches for safety. These details make the gate safe and easy to use.
Smooth Edges And Finishes
Smooth edges prevent cuts and scratches on your pet. Sand all wooden or metal parts well. Use fine-grit sandpaper to remove rough spots. Check every corner and joint carefully. Apply a pet-safe finish or paint to seal surfaces. This stops splinters and makes cleaning easy. Soft edges keep your pet safe and comfortable.
Secure Latches
Secure latches keep the gate closed firmly. Choose latches that your pet cannot open. Test the latch strength before use. Use metal or heavy-duty plastic for durability. Install latches at a height your pet cannot reach. Ensure latches are easy for you to open and close. Strong latches prevent accidental escapes and keep your pet safe.

Credit: www.ubuy.com.jm
Painting And Finishing Touches
Painting and finishing touches give your foldable pet gate a neat, polished look. They protect the wood from scratches, dirt, and moisture. This step makes the gate last longer and look great in your home.
Choose paint or finish that is safe for pets. Use non-toxic, water-based paint or sealant. This keeps your pet safe and avoids strong smells.
Preparing The Surface
Start by sanding the wood lightly. Use fine-grit sandpaper to smooth rough spots. Remove all dust with a dry cloth. A clean surface helps paint stick better and look smooth.
Choosing The Right Paint
Pick paint made for wood and indoor use. Light colors show dirt less. Use paint labeled as pet-safe or non-toxic. Avoid oil-based paints because they have strong fumes.
Applying Paint Or Finish
Use a small brush or roller for even coverage. Apply thin coats to avoid drips and bubbles. Let each coat dry completely before adding another. Usually, two or three coats work best.
Adding A Protective Sealant
Apply a clear sealant after painting. Sealant protects paint from scratches and water. Choose a water-based polyurethane for a smooth finish. Let the sealant dry fully before use.
Final Inspection And Touch-ups
Check the gate for missed spots or rough areas. Sand lightly if needed and touch up paint. Make sure all surfaces feel smooth and look even. Your pet gate is ready to use now.
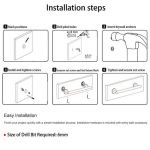
Installing The Foldable Gate
Installing the foldable pet gate properly keeps your pet safe and your home organized. This part of the process is simple and quick. Follow each step carefully for the best results.
Preparing The Installation Area
Clear the space where you want to place the gate. Remove any furniture or objects that block the area. Check the walls or door frame for damage or dirt. Clean the surface to help the gate stick or fit better.
Attaching The Hinges And Supports
Attach the hinges to the gate panels first. Use screws or bolts provided in the kit. Secure the supports on each side of the gate. Make sure they are tight and stable. This step helps the gate fold and unfold smoothly.
Mounting The Gate On The Wall
Hold the gate up to the wall or doorway. Mark the spots where screws will go. Drill small holes for the screws carefully. Fix the gate hinges to the wall anchors. Check the gate swings open and closes without problems.
Testing The Foldable Function
Fold and unfold the gate several times. Watch for any resistance or loose parts. Adjust screws if the gate feels unstable. Ensure the gate locks securely when closed. This prevents your pet from pushing it open.

Credit: baanarjor.com
Maintenance Tips For Longevity
Keeping your foldable pet gate in good shape helps it last longer. Regular care stops damage and keeps it safe for your pet. Simple habits can protect the gate from wear and tear.
Check the gate often. Small problems can grow if ignored. Clean it to remove dirt and dust. This keeps the gate looking new and working well.
Cleaning The Gate Regularly
Use a soft cloth and mild soap to clean the gate. Avoid harsh chemicals that can damage the material. Wipe all parts gently to remove dirt and pet hair. Dry the gate completely to stop rust or mold.
Inspecting Hinges And Joints
Look at the hinges and joints for loose screws or rust. Tighten any loose screws with a screwdriver. Apply a small amount of oil to hinges to keep them moving smoothly. Replace parts that look worn or broken.
Storing The Gate Properly
Fold the gate carefully after use. Store it in a dry place away from direct sunlight. Avoid placing heavy objects on top of the gate. Proper storage keeps the gate from bending or breaking.
Protecting The Gate From Pet Damage
Train your pet to avoid chewing or scratching the gate. Use covers or guards if your pet is very active. Check the gate surface for any bite marks or scratches. Repair damage quickly to keep the gate strong and safe.
Frequently Asked Questions
How Do I Make A Foldable Pet Gate At Home?
To make a foldable pet gate, use lightweight wood or PVC pipes. Cut panels, join with hinges, and add a latch. This allows easy folding and secure closure for pet safety.
What Materials Are Best For A Foldable Pet Gate?
Lightweight wood, PVC pipes, and metal hinges work best. These materials are sturdy, easy to handle, and provide durability. Ensure non-toxic finishes for pet safety.
How Can I Ensure My Pet Gate Is Safe?
Use smooth edges, secure hinges, and a reliable latch. Avoid gaps where pets can get stuck. Test stability by applying gentle pressure before use.
Can A Foldable Pet Gate Fit Different Doorways?
Yes, foldable gates are adjustable. Customize panel size and number for wider or narrower doorways. Folding design allows easy storage and portability.
Conclusion
Making a foldable pet gate is simple and practical. It helps keep pets safe and limits their space. You can use basic materials and tools at home. The gate folds easily for storage or travel. This project saves money compared to buying a ready-made gate.
Plus, it fits your space perfectly. Try building one to enjoy a safer home for your pets. Small effort, big benefits.