Are you looking to create longer, brighter LED light displays without buying new strips? Knowing how to string strips of LED lights together can save you time and money, while giving your space a custom look.
In this guide, you’ll discover simple steps to connect your LED strips safely and effectively. Whether you want to brighten up your room, decorate for a party, or add ambiance to your workspace, mastering this skill puts the power in your hands.
Keep reading, and you’ll soon be lighting up your world exactly the way you want.
Credit: www.ledsupply.com
Choosing The Right Led Strips
Choosing the right LED strips is the first step to a great lighting setup. The right strips match your space and needs. This choice affects brightness, power use, and how easy the strips are to install. Knowing the basics helps you pick the best LED strips for your project.
Types Of Led Strips
There are many types of LED strips. Some have single colors, like warm white or cool white. Others offer RGB, which means red, green, and blue lights. RGB strips can change colors and create effects. Some strips are waterproof, good for outdoors or wet spots. Choose the type based on where you will use the lights.
Voltage And Power Considerations
LED strips need the right voltage to work well. Common voltages are 12V and 24V. Higher voltage strips can run longer without dimming. Power matters too. Check the wattage to ensure your power supply can handle the strips. Using the wrong power can cause flickering or damage.
Length And Brightness Options
LED strips come in different lengths. You can cut most strips to fit your space. Brightness is measured in lumens. Choose brighter strips for task lighting and softer ones for mood lighting. Longer strips may need extra power to keep brightness even. Plan length and brightness for the best effect.
Credit: www.waveformlighting.com
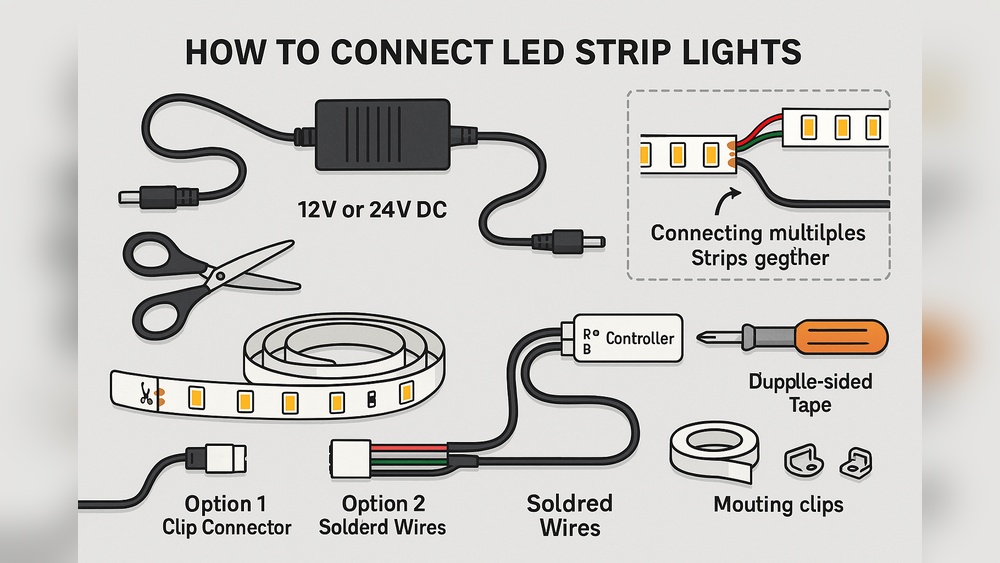
Tools And Materials Needed
Before stringing strips of LED lights together, gather the right tools and materials. Having everything ready makes the job easier and safer. This section covers the essential tools, connectors, accessories, and safety gear needed.
Essential Tools
A good pair of scissors or wire cutters is necessary to trim LED strips precisely. A soldering iron helps to join strips securely. A multimeter checks voltage and connections. Tape or clamps hold strips during work. A ruler or measuring tape ensures accurate length.
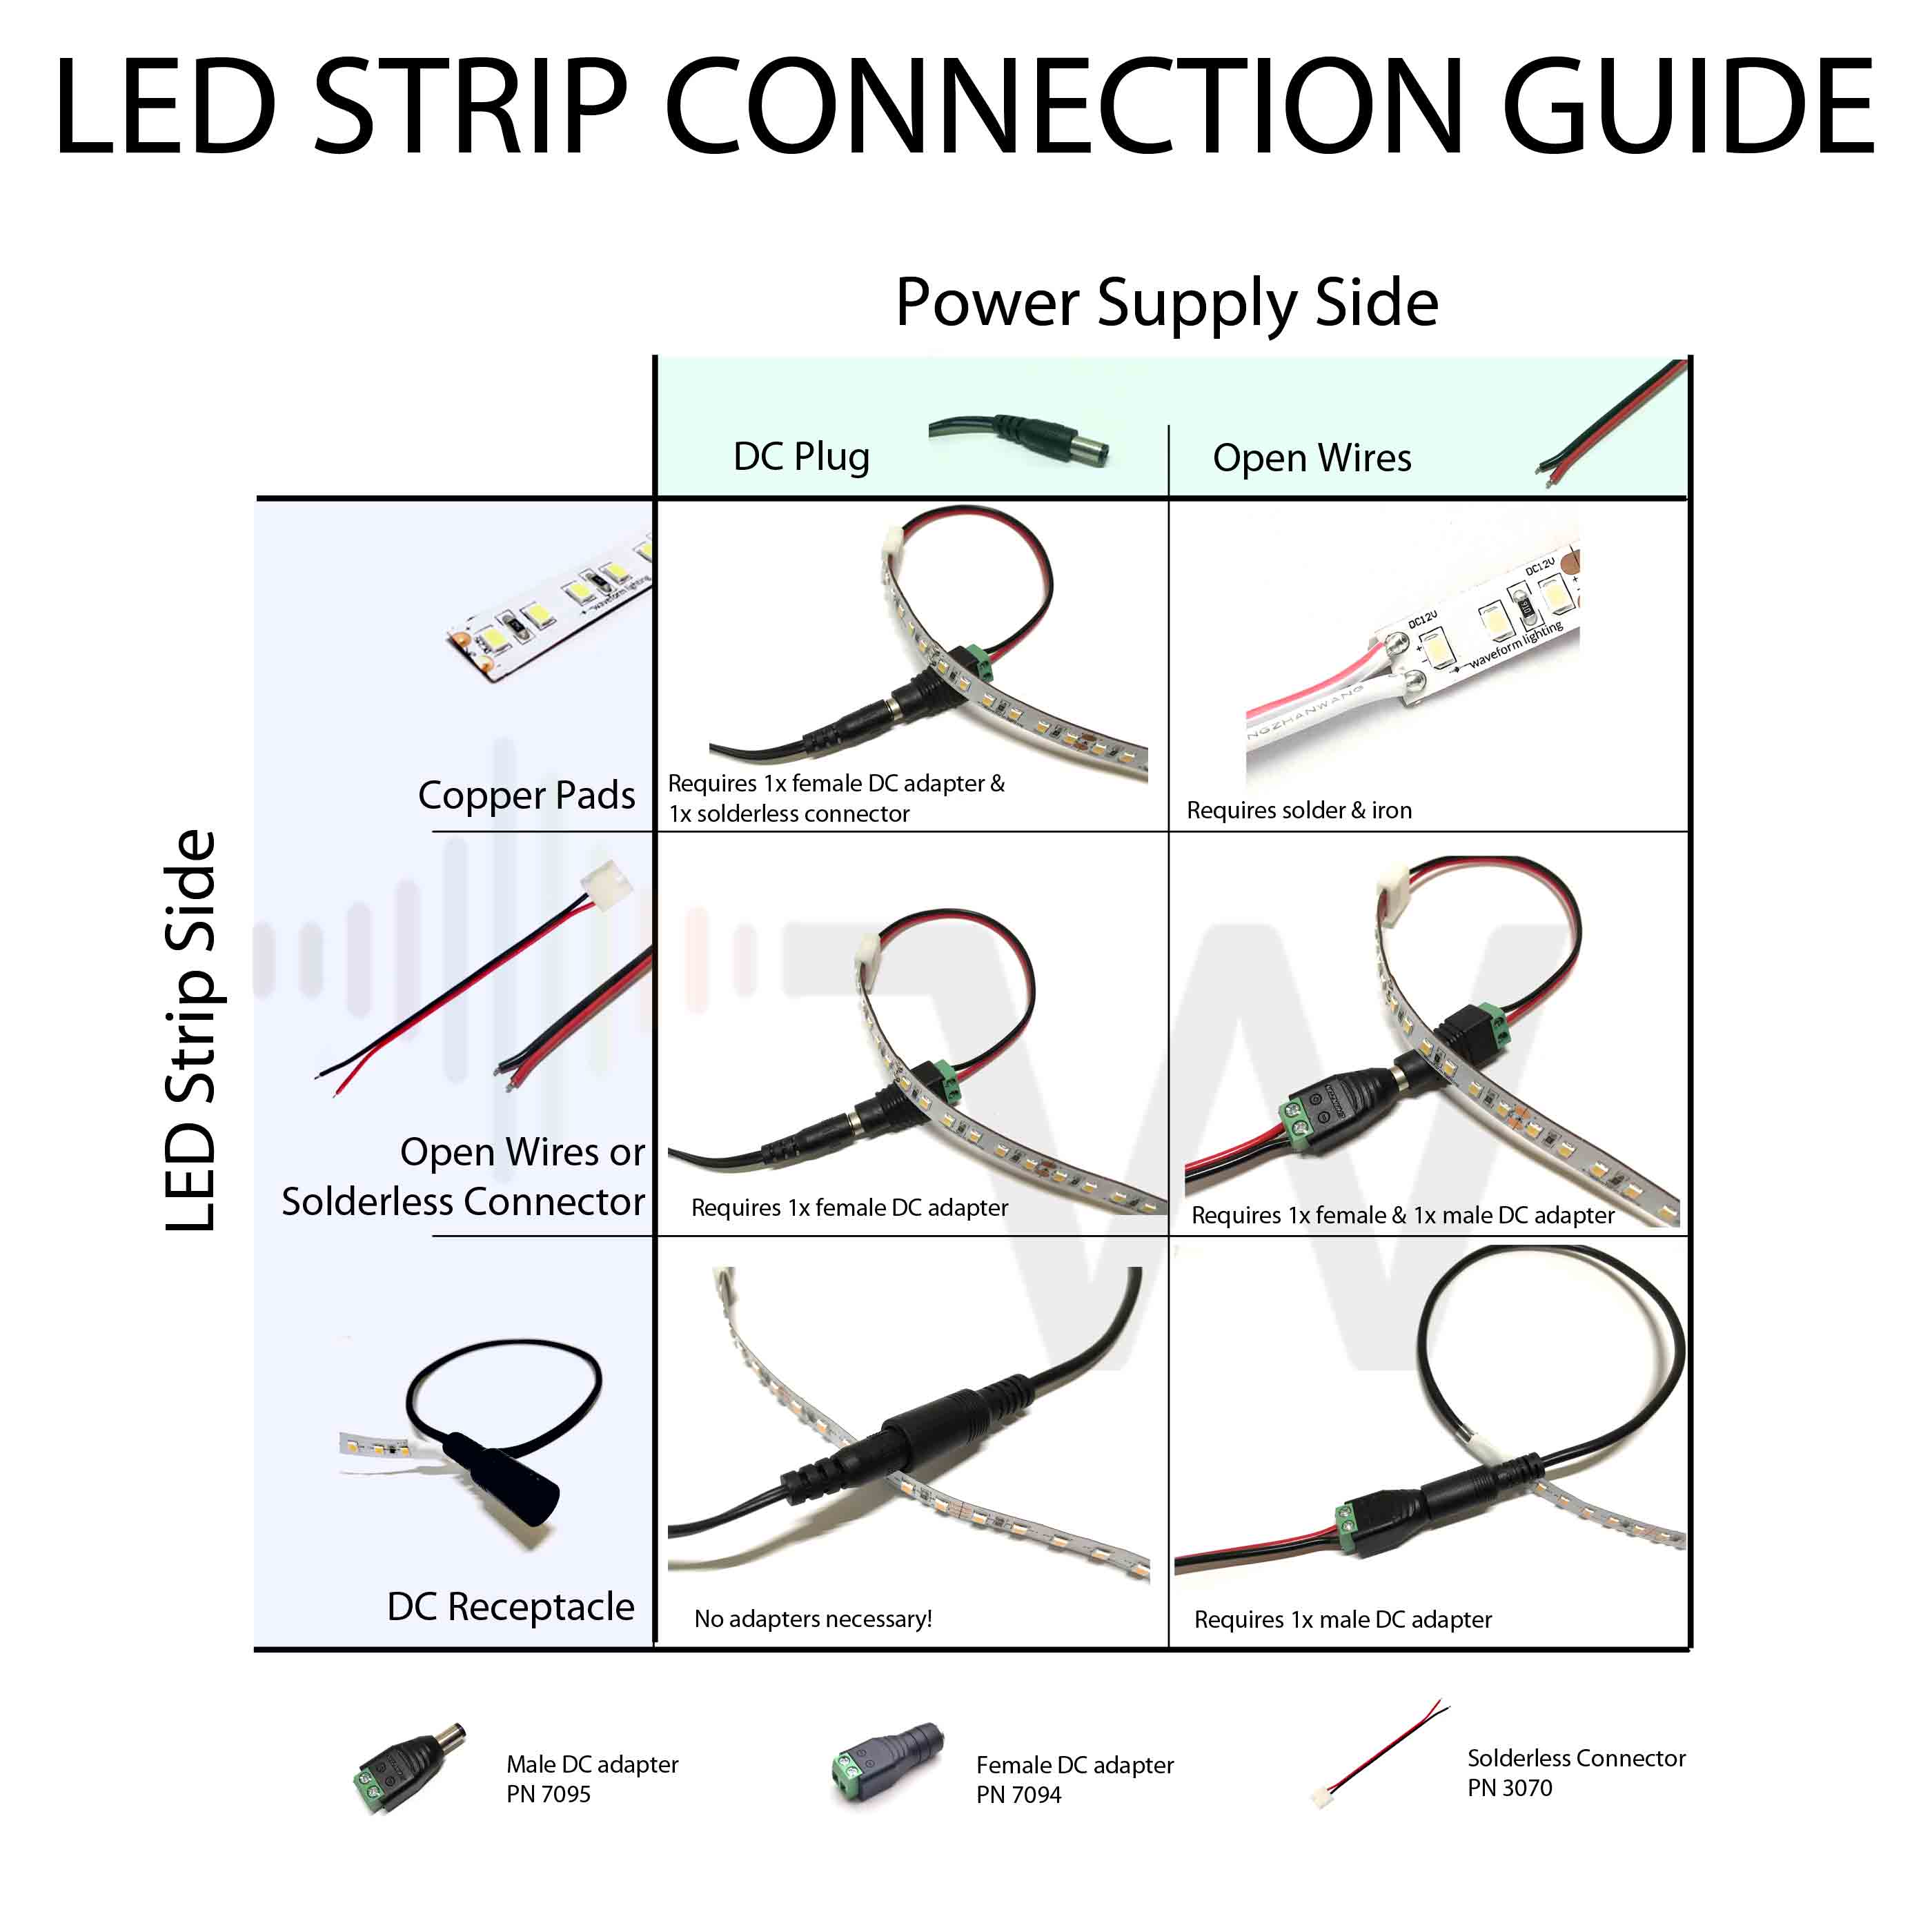
Connectors And Accessories
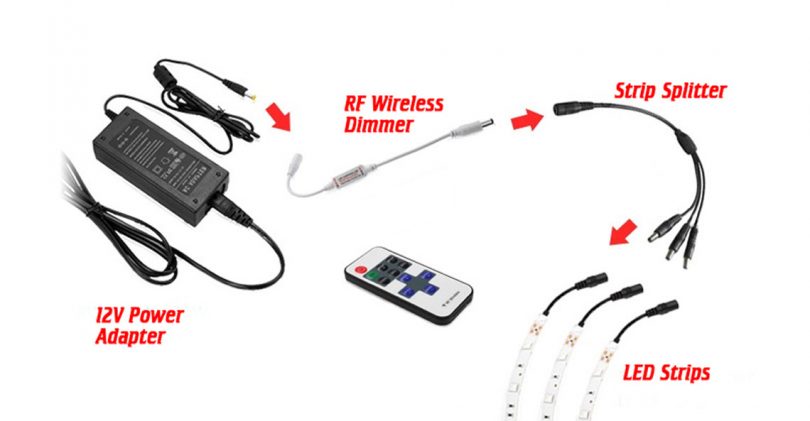
Connectors link LED strips without soldering. These come in clip or snap-on types. End caps protect strip ends from damage. Extension cables increase the length between strips. Power adapters supply electricity safely. Splitters allow multiple strips to connect to one power source.
Safety Gear
Wear safety glasses to protect eyes from sparks. Use gloves to avoid cuts and burns. Work in a well-lit area to see clearly. Keep a fire extinguisher nearby for emergencies. Always unplug power before handling strips or tools.
Preparing Led Strips For Connection
Preparing LED strips for connection is the first step in creating a long, continuous light display. This process ensures your strips fit perfectly and work safely. Proper preparation helps avoid damage and keeps the lights bright.
Follow these simple steps to get your LED strips ready for joining.
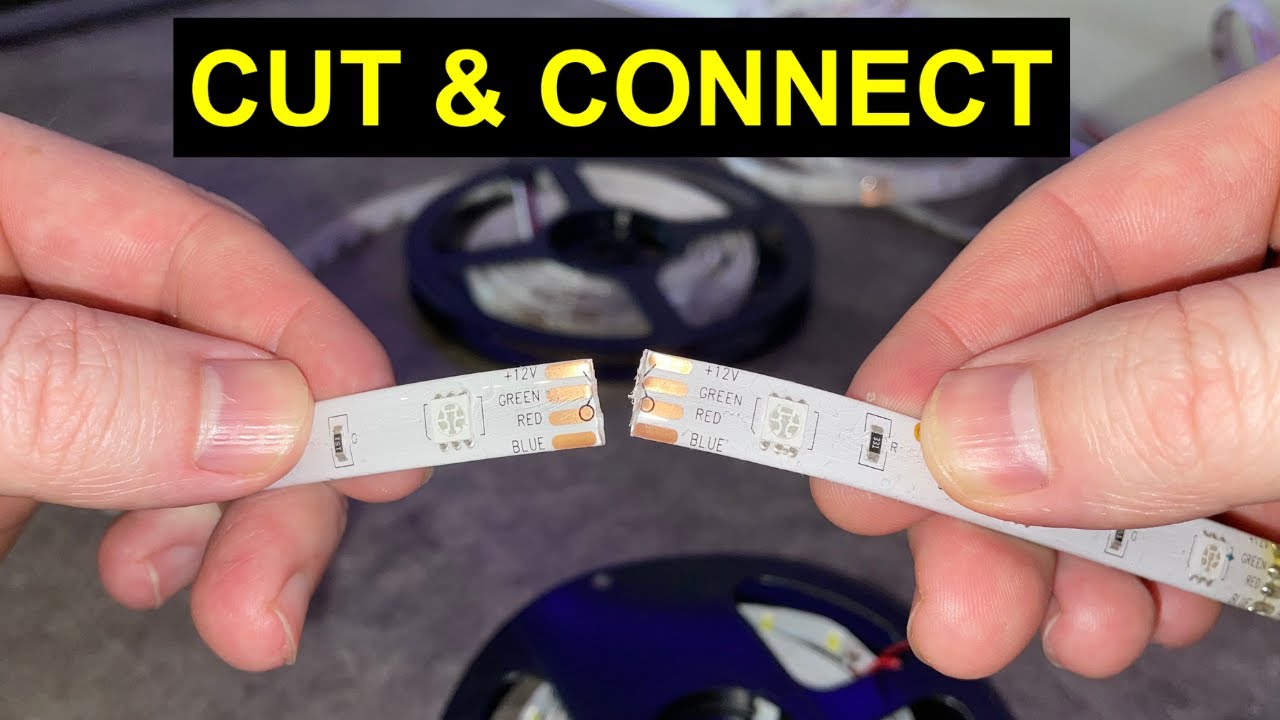
Measuring And Cutting Strips
Measure the area where you want to install the LED strips. Use a ruler or tape measure for accuracy. Cut the strips only at the marked cutting lines. These lines are usually between copper pads. Cutting elsewhere can break the circuit and stop the lights from working.
Identifying Connection Points
Look for the copper pads on the ends of the strips. These pads are the connection points. They allow electricity to flow from one strip to another. Make sure both strips have matching pads. Check for positive (+) and negative (-) symbols. Aligning these correctly is important to avoid damage.
Cleaning Contact Surfaces
Clean the copper pads gently with a soft cloth or alcohol wipe. Remove any dust, oil, or residue. A clean surface improves the connection quality. It also prevents corrosion over time. Let the pads dry completely before connecting the strips.
Methods To Connect Led Strips
Connecting LED strips allows you to create longer lighting setups. Different methods suit various needs and skill levels. Choose a method based on your tools and how permanent you want the connection to be. Here are three common ways to join LED strips safely and effectively.
Using Soldering Techniques
Soldering creates a strong, durable connection between LED strips. It involves melting a small amount of metal to join wires and copper pads. This method requires a soldering iron, solder wire, and some practice. Strip the LED strip ends to expose the copper pads. Heat the soldering iron, then apply solder to the pads and wires. Press them together until the solder melts and bonds. This method ensures good electrical contact and a neat finish.
Employing Clip-on Connectors
Clip-on connectors offer a quick and tool-free way to join LED strips. These plastic connectors snap onto the ends of the strips, locking the copper pads inside. Align the strips carefully before closing the clip. This method is perfect for temporary setups or if you want to avoid soldering. Clip-on connectors come in different styles for various strip widths and types. They provide a clean look without damaging the strips.
Utilizing Extension Cables
Extension cables link LED strips that are far apart. They have connectors compatible with LED strip ends. Use extension cables to bridge gaps or wrap around corners. This method keeps the strips flexible and easy to move. Connect the cable ends to the LED strips, ensuring a tight fit. Extension cables come in different lengths and configurations. They help maintain power flow and signal quality over distance.
Securing And Insulating Connections
Securing and insulating connections is important when stringing LED light strips together. Poor connections can cause flickering or short circuits. Proper insulation keeps the lights safe and working well. It also protects against dust, moisture, and accidental pulls on the wires.
Using the right tools and materials can make your LED strip setup last longer. This section explains simple ways to protect your connections.
Applying Heat Shrink Tubing
Heat shrink tubing covers and protects wire joins tightly. Slide the tubing over the connection before joining wires. Use a heat gun or hair dryer to shrink the tubing. It forms a strong seal that stops moisture and dirt from entering. Heat shrink tubing also prevents wires from moving and breaking.
Using Electrical Tape
Electrical tape is an easy way to insulate connections. Wrap the tape around exposed wires and joins. Make sure to cover all bare metal parts. Use multiple layers for better protection. Electrical tape stops short circuits and keeps wires from touching. It is flexible and simple to apply.
Ensuring Waterproofing
Water can damage LED strips and cause them to fail. Use waterproof connectors or seal the join with silicone sealant. Apply a thin layer over the connection after insulating. Let it dry fully before testing the lights. Waterproofing protects your setup in damp or outdoor areas.
Testing And Troubleshooting
Testing and troubleshooting are key steps when stringing LED light strips together. These steps ensure the lights work properly and safely. They help spot any problems early. Fixing issues now saves time and effort later.
Start by powering on the lights and checking each section. Look closely for any lights that don’t turn on or look dim. Next, check all the connections between strips. Loose or wrong connections cause many issues. Finally, if some parts flicker or look dim, there are simple fixes. Follow these steps to keep your LED strips shining bright.
Powering On And Checking Lights
First, plug in the power supply to turn on the LED strips. Watch each strip carefully. Make sure every LED lights up evenly. If some sections stay dark, note their position. Check if the power supply matches the total length of your strips. Too little power causes dim or dead sections.
Common Connection Issues
Loose connectors are a common problem. Make sure each strip fits tightly into the connectors. Check the polarity. LED strips have positive and negative sides. Incorrect polarity stops the lights from working. Use clean and dry connectors to avoid short circuits. Replace any damaged connectors immediately.
Fixing Flickering Or Dim Sections
Flickering often means poor connection or low power. Unplug the strip and reconnect it firmly. Test again. If flickering continues, try a stronger power supply. Dim sections may mean too much strip length on one power source. Split the strips and add extra power points. This keeps brightness even across all lights.
Tips For Long-term Maintenance
Maintaining LED light strips ensures they stay bright and safe for a long time. Proper care prevents damage and saves money on replacements. Follow simple tips to keep your LED strips working well.
Avoiding Overloading Circuits
Do not connect too many LED strips to one power source. Overloading can cause wires to heat up and fail. Check the power rating of your strips and power supply. Use multiple power supplies if needed. This keeps circuits safe and lights glowing.
Proper Storage And Handling
Store LED strips in a dry, cool place. Avoid folding or bending the strips sharply. Handle strips gently to prevent damage to the wires and LEDs. Use original packaging or a spool to keep strips neat. Good storage extends the life of your lights.
Replacing Damaged Sections
Inspect LED strips regularly for broken or dim sections. Cut out damaged parts carefully along the marked lines. Use connectors or solder to attach new sections. Replace damaged sections quickly to keep the entire strip working well. This prevents further damage and saves costs.
Credit: www.youtube.com
Frequently Asked Questions
How Do I Connect Multiple Led Strips Together?
You can connect LED strips using connectors or soldering wires between strip ends. Ensure voltage and polarity match for safety and function.
Can I String Different Led Strip Brands Together?
Mixing brands is possible if voltage, color temperature, and connector types match. Mismatched specs can cause flickering or damage.
What Power Supply Is Needed For Long Led Strips?
Use a power supply that matches total wattage of all strips combined. Overpowering prevents dimming and overheating.
How To Maintain Consistent Brightness Across Connected Led Strips?
Use uniform LED strips with equal voltage ratings. Add power injection points for longer runs to avoid dimming.
Conclusion
Stringing LED light strips together is simple and fun. Choose strips with matching connectors and voltage. Cut carefully along the marked lines to avoid damage. Use clips or solder to join strips securely. Test the connection before final installation to ensure lights work well.
This method brightens any space with ease. Try it yourself and enjoy the glow.