Are you ready to boost your home security with the Ring Video Doorbell 1? Installing this smart device might sound tricky, but with the right steps, you can have it up and running in no time.
Imagine seeing who’s at your door from your phone, even when you’re not home. This guide will walk you through the simple process, saving you time and frustration. Keep reading to discover how easy it is to protect your home and gain peace of mind with your Ring Video Doorbell 1.
Tools And Materials Needed
Gathering the right tools and materials makes the Ring Video Doorbell 1 installation easier. Having everything ready saves time and avoids frustration. This section lists what you need to complete the job smoothly.
Tools Required
You need a few basic tools to install the doorbell. A drill helps make holes for mounting screws. A screwdriver is essential for securing the doorbell in place. A level ensures the doorbell sits straight on the wall. A pencil or marker helps mark drill spots. A tape measure helps with proper placement. Finally, wire strippers may be needed if you connect to existing doorbell wires.
Materials Needed
The Ring Video Doorbell 1 package includes some materials. Mounting brackets and screws are inside the box. You may need extra screws for specific wall types. Anchors help secure the screws in drywall or brick. Batteries power the doorbell if you use the battery mode. If connecting to existing wiring, ensure the wires are compatible. Having these materials ready ensures a quick installation.
Preparing Your Doorbell Location
Preparing your doorbell location is an important first step for a smooth installation. Choose a spot where the camera can clearly see visitors. The view should cover the front door and any pathways leading to it.
Check the height of the spot. The Ring Video Doorbell 1 works best when mounted about 48 inches from the ground. This height captures faces well and detects motion accurately.
Checking For Power Source
Make sure there is a nearby power source. The Ring Video Doorbell 1 can use existing doorbell wiring or a rechargeable battery. If you use wiring, test that power flows properly before installation.
Ensuring Good Wi-fi Signal
Strong Wi-Fi is vital for video streaming. Test the Wi-Fi signal at your chosen location. Move your router or use a Wi-Fi extender to improve the connection if needed.
Choosing The Right Mounting Surface
The doorbell should be on a solid, flat surface. Brick, wood, or siding works well. Avoid uneven or loose surfaces that could cause the doorbell to shift or fall.
Charging The Doorbell Battery
Charging the Ring Video Doorbell 1 battery is an essential step before installation. The battery powers the device and keeps it running smoothly. Knowing how to charge it correctly saves time and avoids interruptions.
Preparing The Battery For Charging
First, remove the battery from the doorbell. Press the release button on the side of the device. Pull the battery out gently. Check the battery for any visible damage before charging.
Using The Charging Cable
Connect the battery to the USB charging cable included in the package. Plug the USB end into a power source. A wall adapter or computer USB port works well. Charging usually takes 5 to 10 hours for a full charge.
Checking The Battery Status
The battery has a small LED light to show charge status. Red means charging, green means fully charged. Avoid overcharging by unplugging once the light turns green. This keeps the battery healthy and extends its life.

Credit: www.ebay.com
Installing The Mounting Bracket
Installing the mounting bracket is the first step to set up your Ring Video Doorbell 1. This bracket holds the doorbell securely on your wall. Proper installation ensures your device stays in place and works well.
Before you start, gather the tools you need. A drill, screwdriver, level, and screws come with your Ring doorbell kit. Clear the area where you plan to install the bracket for easy access.
Choose The Right Location
Select a spot near your door at about chest height. This height captures clear video of visitors. Avoid places with direct sunlight or strong winds to keep the video clear.
Mark The Screw Holes
Hold the bracket against the wall. Use a pencil to mark the spots for screws. Double-check the marks with a level to keep the bracket straight.
Drill Pilot Holes
Use a drill bit that fits your screws. Drill small pilot holes where you marked. These holes help the screws go in easily and secure the bracket tightly.
Attach The Mounting Bracket
Line up the bracket with the pilot holes. Use a screwdriver to fasten the screws. Tighten them until the bracket is firm but avoid over-tightening.
Connecting The Doorbell To Power
Connecting the Ring Video Doorbell 1 to power is a key step in the installation process. Without power, the doorbell cannot function or send alerts. The device can be powered using your existing doorbell wiring or a rechargeable battery. This section explains both options clearly.
Using Existing Doorbell Wiring
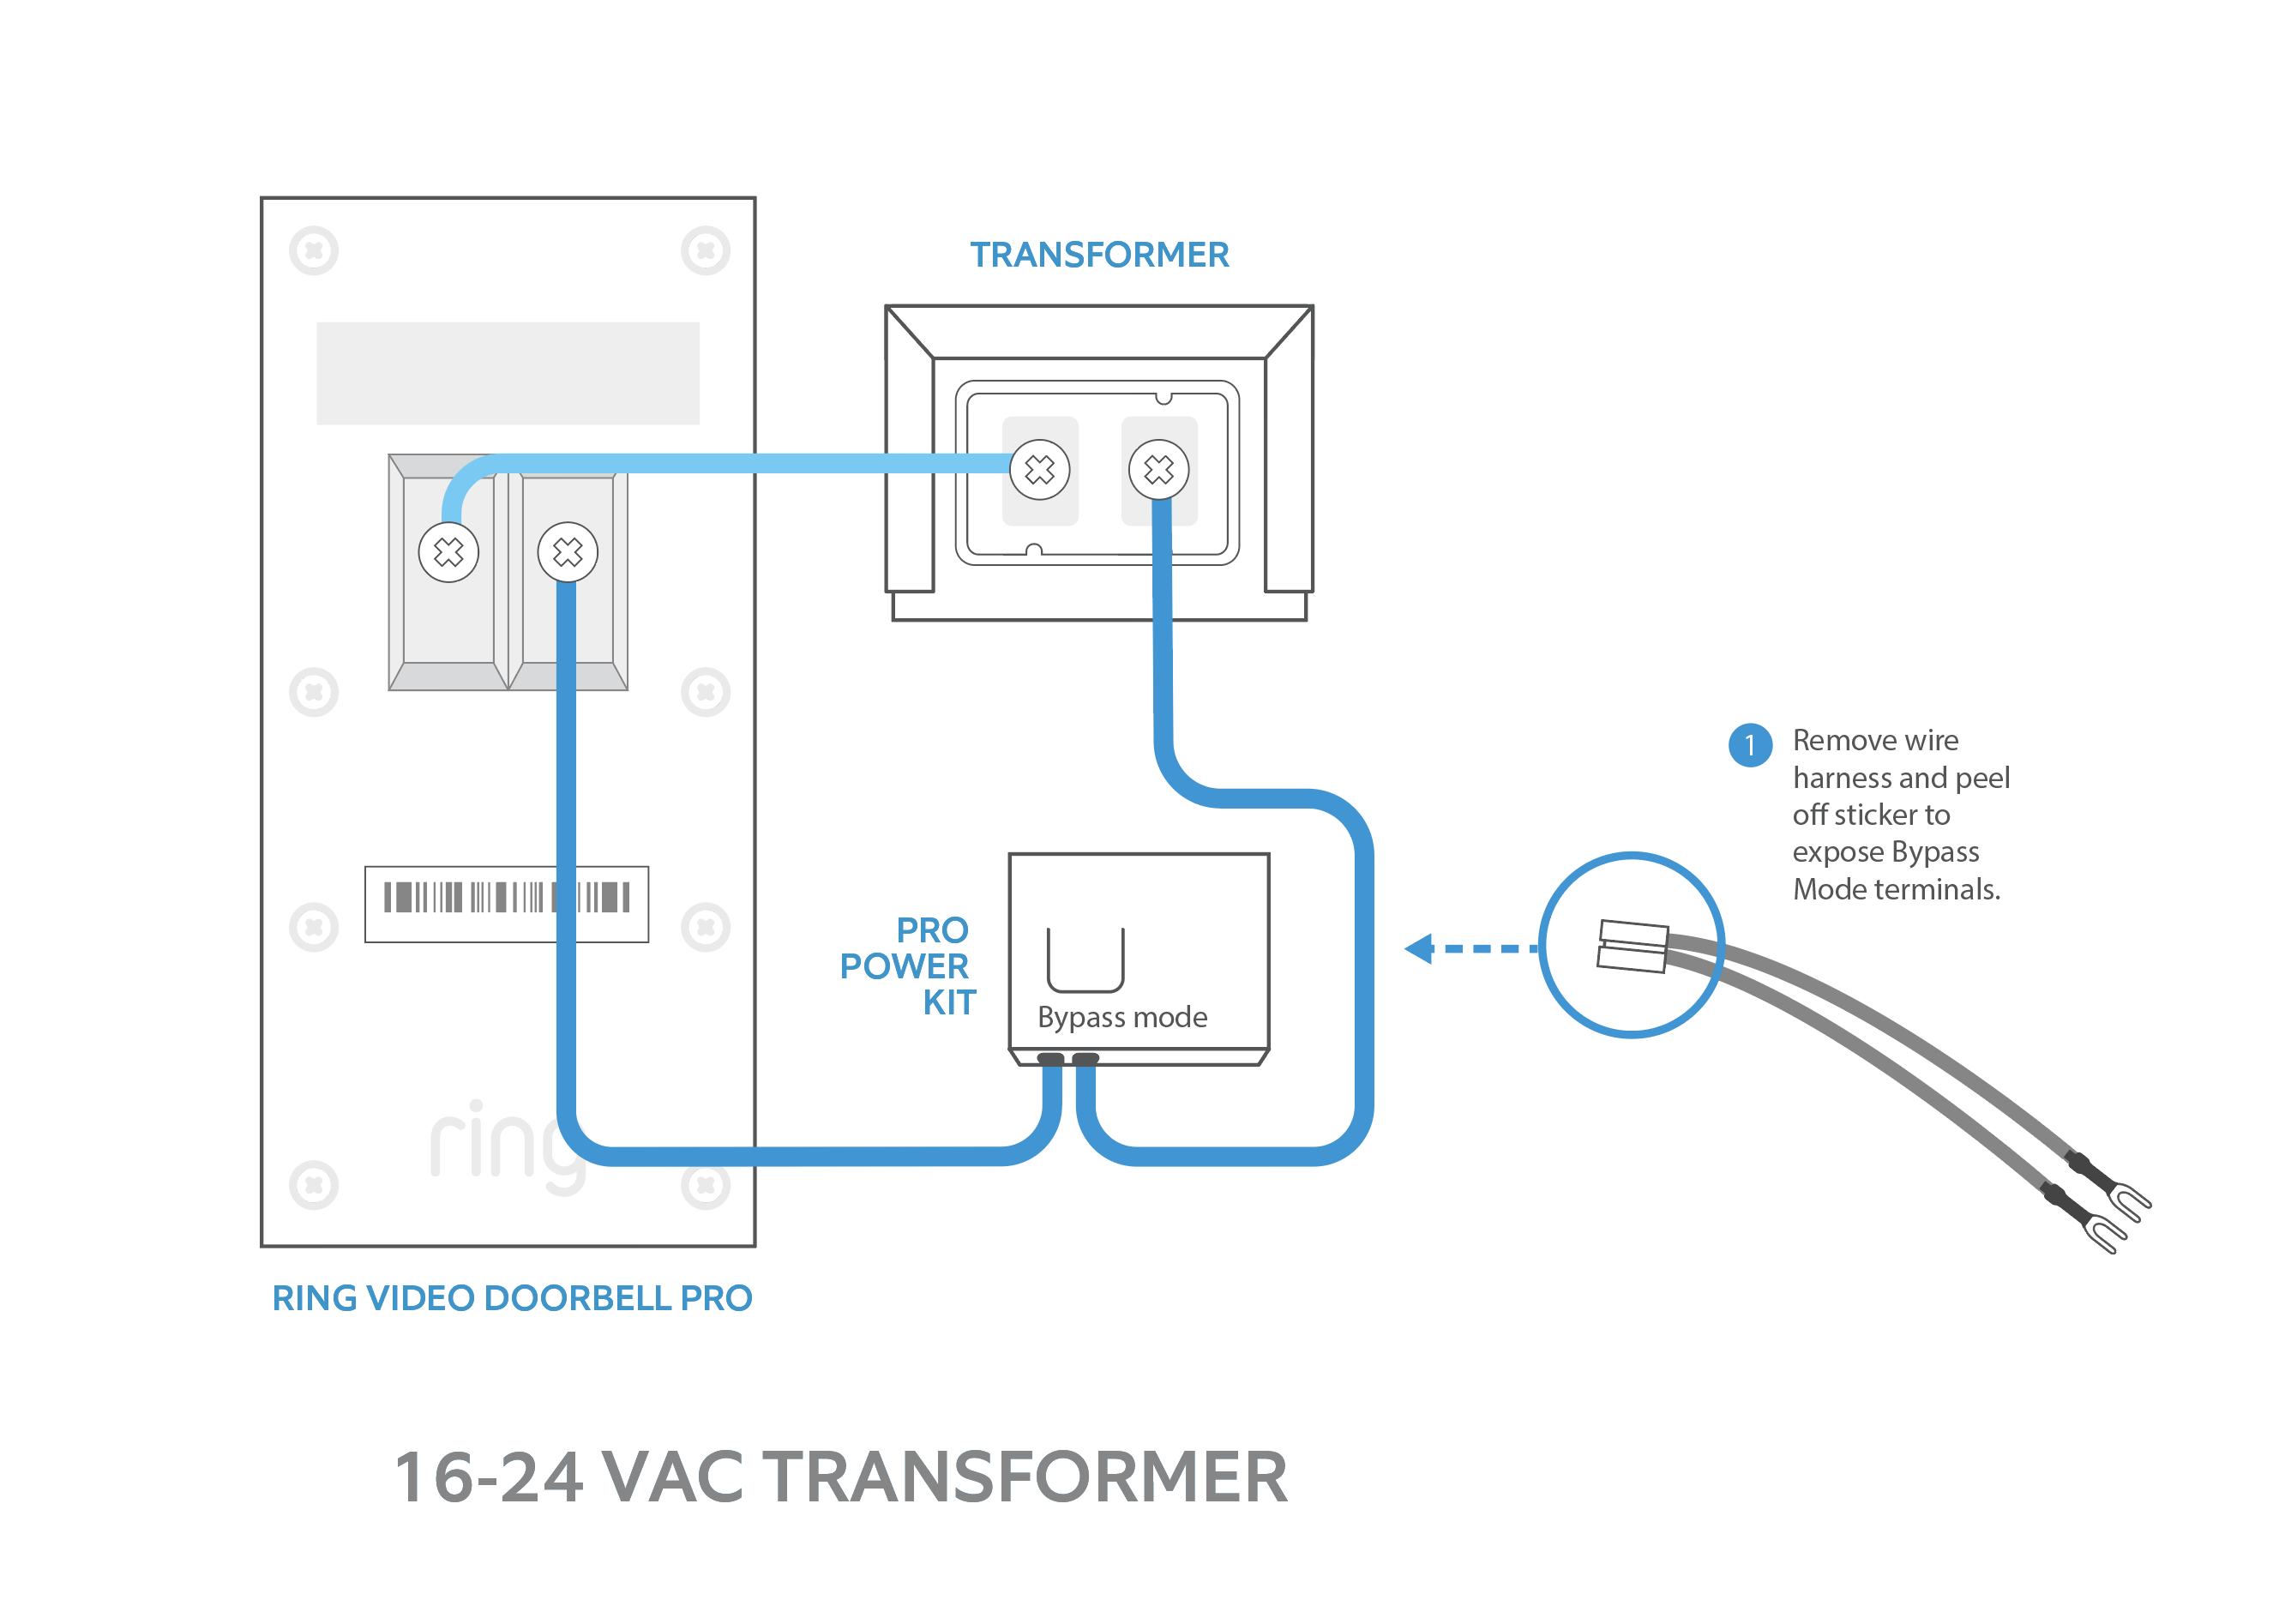
Check your current doorbell wires. They should provide 16-24 volts AC. Turn off power at the circuit breaker before touching wires. Connect the doorbell’s wires to the existing wires. Use the included screws and connectors for a secure fit. Restore power and test the doorbell.
Charging The Rechargeable Battery
Remove the doorbell from its mounting bracket. Take out the rechargeable battery. Charge it fully with the USB cable provided. A full charge takes about 5 hours. Insert the battery back into the doorbell. Mount the doorbell and switch it on.
Safety Tips For Power Connection
Always switch off power before working with wires. Use a voltage tester to confirm no power is present. Avoid touching bare wires with your hands. Wear insulated gloves if possible. Follow all local electrical codes and guidelines for safety.
Credit: www.esseg.eu
Attaching The Doorbell To The Bracket
Attaching the Ring Video Doorbell 1 to its bracket is a key step in the installation process. This step secures the doorbell and prepares it for use. A properly attached doorbell stays in place and works well over time.
The process is straightforward and does not require many tools. Following these simple steps helps ensure a firm and safe attachment.
Aligning The Doorbell With The Bracket
Hold the doorbell close to the bracket on your wall. Line up the bottom of the doorbell with the bracket’s hooks. Make sure the button faces outward and is easy to press. This alignment is important for the doorbell to fit properly.
Securing The Doorbell In Place
Push the doorbell firmly onto the bracket. You will hear a click sound. This sound means the doorbell locks into the bracket. Check if the doorbell is stable by gently pulling it. It should not move or wiggle.
Using The Security Screw
Locate the small hole at the bottom of the doorbell. Insert the security screw with the provided screwdriver. Turn the screw until it is tight but not too tight. This screw stops the doorbell from being removed easily. It adds extra security to your device.
Setting Up The Ring App
Setting up the Ring app is the first step to using your Ring Video Doorbell 1. The app connects your doorbell to your phone. It lets you see visitors and receive alerts instantly. A quick setup ensures your doorbell works smoothly.
Download And Install The Ring App
Go to the App Store or Google Play on your phone. Search for “Ring” and download the app. The app is free and small in size. Once downloaded, open the app to start the setup process.
Create Or Log In To Your Ring Account
You need a Ring account to use the app. Tap “Create Account” if you do not have one. Enter your email and create a strong password. If you already have an account, just log in with your details.
Connect The Ring Video Doorbell To Wi-fi
Turn on your Ring Doorbell and open the app. Follow the app instructions to connect your doorbell to Wi-Fi. Choose your home network and enter the password. A strong Wi-Fi signal is important for good video quality.
Complete The Device Setup
The app will ask you to name your doorbell. Pick a name that helps you remember its location. Finish the setup by testing the live video and motion alerts. Your Ring Video Doorbell is now ready to use.

Credit: www.amazon.com
Connecting To Wi-fi
Connecting your Ring Video Doorbell 1 to Wi-Fi is a key step for it to work properly. This connection allows the doorbell to send alerts and stream video to your phone. The setup process is simple and quick.
Before starting, make sure your Wi-Fi network is stable and your phone is near the doorbell. This helps avoid interruptions during setup.
Preparing Your Wi-fi Network
Check that your Wi-Fi is 2.4 GHz. Ring Video Doorbell 1 does not support 5 GHz networks. Ensure your network has a strong signal at your doorbell’s location. Move your router closer if needed.
Using The Ring App To Connect
Open the Ring app on your smartphone. Select “Set up a device” and choose “Doorbells.” Follow the app’s instructions to enter your Wi-Fi details. The app will guide you step-by-step.
Troubleshooting Wi-fi Connection Issues
Restart your router and doorbell if connection fails. Double-check the Wi-Fi password for accuracy. Keep your phone close to the doorbell during setup for better signal.
Testing Your Doorbell
Testing your Ring Video Doorbell 1 is an important step after installation. It ensures the device works correctly. Testing helps you avoid any issues later on. Follow these simple steps to check your doorbell’s performance.
Checking The Video Feed
Open the Ring app on your smartphone. Look at the live video from your doorbell. The video should be clear and steady. Move your hand in front of the camera to test motion detection. Confirm the video updates quickly without delays.
Testing The Doorbell Button
Press the doorbell button once. Your phone should ring or notify you immediately. Answer the call through the app to hear the visitor’s sound. Make sure the audio is clear on both ends. Repeat pressing the button a few times to check consistency.
Verifying Motion Alerts
Walk near the doorbell to trigger motion sensors. Your phone must send a notification promptly. Check the alert sound and message clarity. Open the app to view recorded motion clips. Adjust sensitivity in settings if alerts are too frequent or missed.
Confirming Wi-fi Connection
Ensure your doorbell stays connected to Wi-Fi during all tests. Poor connection causes delays or missed alerts. Check the signal strength in the Ring app. Move your router closer if the signal is weak. A strong connection improves video and audio quality.
Troubleshooting Common Issues
Installing the Ring Video Doorbell 1 can be simple, but sometimes issues arise. Troubleshooting helps fix these common problems fast. Understanding basic solutions saves time and effort.
This section covers typical issues users face. Clear steps guide you through solving each problem. Keep your doorbell working smoothly with these tips.
Power Supply Problems
Check if the doorbell has enough power. Low battery or weak wiring often causes power issues. Use the Ring app to see battery status. Replace or recharge batteries if needed. Make sure the wiring matches the device’s requirements.
Wi-fi Connection Issues
Strong Wi-Fi is crucial for video and alerts. Place the doorbell near the router for a better signal. Restart your router to refresh the connection. Reconnect the doorbell to your network through the Ring app. Avoid Wi-Fi interference from other devices.
App Notification Failures
Notifications let you know when someone is at the door. Turn on notifications in the Ring app settings. Check your phone’s notification settings too. Update the app to the latest version. Restart your phone if alerts still don’t appear.
Video Quality Problems
Clear video helps identify visitors easily. Clean the camera lens to remove dirt or smudges. Adjust the camera angle for better view. Make sure the Wi-Fi signal is strong to prevent lag. Lower video quality settings can improve streaming speed.
Doorbell Button Not Responding
Pressing the button should trigger alerts and sounds. Remove and reinstall the doorbell to reset it. Test the button for physical damage. Replace the button if it does not work after resets. Check wiring connections if using a wired setup.
Frequently Asked Questions
How Do I Install Ring Video Doorbell 1?
First, charge the doorbell fully. Then, mount the bracket using screws. Attach the doorbell and connect it to Wi-Fi through the Ring app.
What Tools Are Needed For Installation?
You will need a drill, screwdriver, level, and the included mounting screws. A pencil for marking holes also helps.
Can I Install Ring Video Doorbell 1 Without Wiring?
Yes, Ring Video Doorbell 1 can work wirelessly with its built-in battery. Just charge it and mount where you want.
How Do I Connect Ring Doorbell To Wi-fi?
Open the Ring app, select your device, and follow the setup prompts to connect to your home Wi-Fi network securely.
Conclusion
Installing the Ring Video Doorbell 1 is simple and quick. Follow each step carefully to avoid mistakes. Make sure the doorbell connects well to your Wi-Fi. Test the device to check its performance before final use. Enjoy the added security and convenience at your home.
Stay safe and keep your visitors in sight anytime. This small tool can make a big difference daily.