Are you tired of worrying about your pet roaming where they shouldn’t? Building your own PVC pet gate is easier than you think—and it gives you full control over size, style, and safety.
Imagine having a sturdy, custom gate that keeps your furry friend safe without breaking the bank or sacrificing your home’s look. In this guide, you’ll discover simple steps to create a durable pet gate using affordable materials you can find at any hardware store.
Keep reading, and by the end, you’ll have the confidence and know-how to make a pet gate that fits perfectly in your space—and your life.

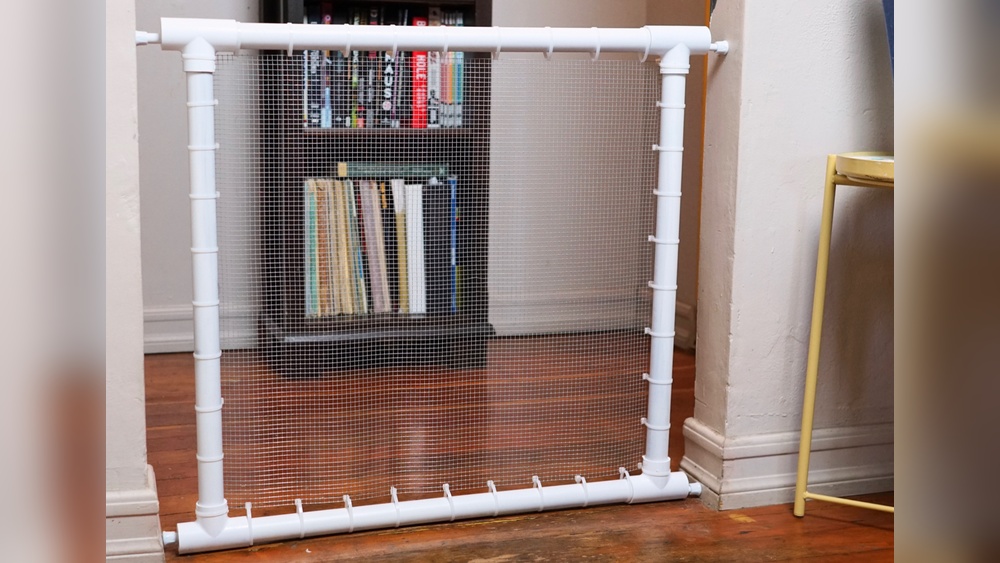
Credit: arloren.com
Choosing The Right Pvc Materials
Choosing the right PVC materials is key to building a strong pet gate. The materials must be safe, durable, and easy to work with. Using the right type of PVC pipe and connectors ensures the gate will hold up against your pet’s activity. This section covers the basics of selecting the best materials for your project.
Types Of Pvc Pipes
PVC pipes come in various sizes and thicknesses. Schedule 40 PVC pipe is a popular choice for pet gates. It is strong and can handle pressure well. You can also choose pipe diameter depending on your gate size. Usually, 1-inch or 1.5-inch pipes work best for stability. Avoid thin pipes that might bend or break easily.
Selecting Connectors And Fittings
Connectors join the PVC pipes to form the gate frame. Elbow connectors create corners, while T-connectors help add support bars. Use slip-on connectors for easy assembly and disassembly. Make sure all fittings match the pipe diameter. This keeps the frame tight and secure. Choose connectors made from durable PVC to last longer.
Tools Needed For The Project
Several tools help you build the PVC pet gate with ease. A saw or PVC pipe cutter cuts pipes to the right length. Sandpaper smooths pipe edges after cutting. A measuring tape ensures accurate pipe sizes. A marker helps mark cutting spots clearly. Lastly, a rubber mallet or hammer can help fit connectors firmly onto pipes.

Credit: www.instructables.com
Measuring And Planning Your Gate
Measuring and planning your PVC pet gate is the first step to ensure a perfect fit. Careful measurements help create a gate that keeps pets safe and fits your space well. Planning the design lets you build a sturdy, functional gate. Focus on size, structure, and safety to meet your needs.
Taking Accurate Measurements
Start by measuring the width of the doorway or opening. Use a tape measure and note the exact width at the top, middle, and bottom. Take the largest measurement to avoid gaps. Measure the height from the floor to where you want the gate to reach. Write down all measurements clearly. Double-check your numbers for accuracy before buying materials.
Designing The Gate Structure
Decide on the style of your gate. A simple rectangular frame works best with PVC pipes. Think about how the gate will open—swing or slide. Plan the frame size based on your measurements. Add support bars for extra strength. Keep the design simple for easy assembly and use.
Safety Considerations For Pets
Check for gaps where pets could squeeze through or get stuck. Make sure the gate is tall enough to stop jumping. Smooth all edges to prevent scratches or cuts. Use non-toxic materials safe for pets. Ensure the gate locks securely but is easy for you to open. Safety keeps pets happy and protected.
Cutting And Preparing Pvc Pieces
Cutting and preparing PVC pieces is the first important step in making a pet gate. This stage ensures all parts fit together perfectly. Proper preparation helps avoid problems during assembly. Clean, smooth edges make the gate safer for pets and easier to build.
Cutting Pipes To Size
Measure each pipe carefully before cutting. Use a marker to draw cutting lines. A fine-toothed saw works best for clean cuts. Cut slowly to avoid cracking the PVC. Check each piece after cutting for accuracy.
Sanding And Smoothing Edges
Rough edges can cause injuries or poor fits. Use sandpaper or a sanding block to smooth all cut ends. Sand until edges feel soft and even. Remove any small plastic shards or dust. Clean the pipes after sanding to remove residue.
Labeling Parts For Assembly
Labeling helps keep track of each pipe’s role. Use a marker or tape to mark parts clearly. Write simple codes like “A,” “B,” or numbers. This saves time and reduces confusion later. Keep labels visible but easy to remove if needed.
Assembling The Pvc Frame
Assembling the PVC frame is a key step in building your pet gate. This step shapes the structure and sets the base for the gate’s strength. A well-assembled frame ensures your pet gate stays secure and safe.
Connecting Pipes And Fittings
Start by cutting PVC pipes to your desired lengths. Use a sharp saw for clean cuts. Match each pipe with the correct fittings, such as elbows or tees. Push pipes firmly into the fittings. Make sure connections fit tightly without gaps. Use PVC cement for extra hold. This keeps the frame from wobbling or coming apart.
Ensuring Stability And Strength
Check every joint to confirm it is secure. Add extra supports if the frame feels weak. Use crossbars to increase rigidity. Avoid loose parts that could cause the gate to collapse. Test the frame by gently pressing each side. The frame should not bend or shift easily. Strong frames protect pets and keep the gate in place.
Adding Hinges Or Latches
Attach hinges to one side of the frame. Use screws that fit the PVC material well. Hinges allow the gate to open and close smoothly. On the opposite side, fix a latch or lock. Choose a latch that is easy for you but hard for your pet. Secure all hardware tightly. This step finishes the frame and makes the gate functional.
Customizing For Style And Function
Customizing your PVC pet gate lets you match your home’s style and meet your pet’s needs. A plain gate can be simple, but adding personal touches makes it unique and practical. Focus on style and function to create a gate that looks good and works well.
Painting And Finishing Touches
Start with clean, smooth PVC surfaces for painting. Use spray paint made for plastic to avoid peeling. Choose colors that match your room’s decor or your pet’s personality. Add a clear sealant to protect paint from scratches and weather. This makes the gate last longer and look fresh.
Adding Decorative Elements
Decorate the gate with simple items like stickers, stencils, or decals. Use pet-themed designs for a fun look. Attach lightweight wooden or plastic trims for extra style. Keep decorations safe and out of your pet’s reach. Small touches add charm without making the gate bulky.
Incorporating Safety Features
Safety is key when customizing a pet gate. Smooth all edges and corners to avoid cuts. Add non-slip pads to the gate’s bottom for stability. Use secure locks or latches that pets cannot open. Check all parts regularly to keep the gate safe and sturdy.

Credit: www.valent.mx
Installing The Pet Gate
Installing the PVC pet gate is a crucial step to keep your pet safe. Proper installation ensures the gate stays firm and works well. Follow simple steps to mount the gate securely. Check the gate’s strength before use. Regular care helps keep it in good shape.
Mounting Options
Choose a spot with solid walls or door frames. You can use screws or pressure mounts. Screws give strong support but need drilling. Pressure mounts are easy and do not damage walls. Use rubber pads to protect surfaces from pressure mounts. Measure the space carefully before fitting the gate. Make sure the gate fits snugly without gaps.
Testing Gate Security
Push the gate gently to test stability. Check that it does not move or wobble. Open and close the gate several times. Ensure the latch locks firmly every time. Try to push the gate from your pet’s side. It should stay closed and not open easily. Adjust mounting if the gate feels loose. Safety first for your pet’s peace of mind.
Maintenance Tips
Clean the gate regularly with mild soap and water. Avoid harsh chemicals that can damage PVC. Check screws or mounts every few weeks. Tighten loose parts to keep the gate strong. Lubricate hinges or latches for smooth action. Replace broken parts immediately. A well-maintained gate lasts longer and stays safe for pets.
Frequently Asked Questions
What Materials Do I Need To Make A Pvc Pet Gate?
You need PVC pipes, connectors, a saw, measuring tape, sandpaper, and a drill. These items help build a sturdy, custom pet gate.
How Do I Measure For A Pvc Pet Gate?
Measure the width and height of the doorway or space. Accurate measurements ensure the gate fits securely and functions well.
Can I Customize The Size Of A Pvc Pet Gate?
Yes, PVC pipes are easy to cut and assemble. Customize the gate size to fit any doorway or area perfectly.
Is A Pvc Pet Gate Safe For Pets?
PVC gates are safe when properly built and secured. They prevent pets from accessing restricted areas without harming them.
Conclusion
Building a PVC pet gate is simple and cost-effective. You can protect your pets and keep your home safe. Using basic tools and materials makes the project easy. Customizing the gate fits your space perfectly. This DIY project saves money and adds convenience.
Try making your own gate today. Enjoy peace of mind with your new pet barrier.

