Are you ready to upgrade your home security with a video doorbell but worried about the installation process? Installing a video doorbell to your existing wired system may sound tricky, but it’s easier than you think.
With the right steps, you can have a smart, connected doorbell that lets you see and talk to visitors from your phone. This guide will walk you through the process clearly and simply, so you can protect your home without stress.
Keep reading, and by the end, you’ll have the confidence to install your video doorbell yourself.
Credit: vicentetorns.com
Tools And Materials Needed
Installing a video doorbell to a wired system needs the right tools and materials. Having these ready makes the process smooth and safe. This section helps you gather all essentials before starting the installation.
Essential Tools
Gather a screwdriver set for mounting and wiring. A drill helps create holes for screws and cables. Wire strippers are necessary to remove insulation from wires. A voltage tester checks if the power is off before touching wires. A level ensures your doorbell is straight. Have electrical tape handy for securing wire connections.
Compatible Video Doorbells
Choose a video doorbell designed for wired installation. Check if it supports your home’s voltage, usually 16-24 volts. Verify compatibility with your doorbell chime for full functionality. Pick a model with clear installation instructions. Select one with good customer reviews for reliability.
Safety Equipment
Turn off power at the circuit breaker before starting. Wear insulated gloves to protect from electric shocks. Safety glasses protect your eyes during drilling or wire handling. Use a sturdy ladder if mounting the doorbell high. Keep a flashlight nearby for better visibility in dim areas.
Credit: ring.com
Preparing For Installation
Preparing for the installation of a wired video doorbell is an important first step. It helps keep you safe and makes the process easier. This stage involves checking your home’s current setup. Also, it includes making sure the power is off and the wiring is ready. Proper preparation saves time and prevents problems later.
Turn Off Power
Safety is the top priority. Find the circuit breaker that controls your doorbell. Switch it off to cut the power. Use a voltage tester to confirm no electricity flows to the doorbell wires. Never touch wires when power is on. This step protects you from electric shock.
Check Existing Wiring
Look at the wires coming from your old doorbell. Check for wear or damage. Make sure the wires are long enough to reach the new video doorbell. Note the wire colors, usually red and white. These colors help connect the new device correctly. Clean any dirt or rust on the wires before proceeding.
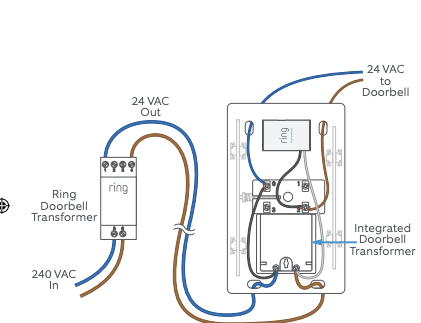
Test Doorbell Transformer
The transformer powers your doorbell system. Use a multimeter to measure its voltage. It should be around 16 to 24 volts. If the voltage is too low or missing, the doorbell will not work. Replace the transformer if needed. This ensures your video doorbell receives enough power to run smoothly.
Removing Old Doorbell
Removing the old doorbell is the first step in installing your new video doorbell. This process helps you prepare the area and access the wiring needed for the new device. Take care to handle everything safely and keep the wires intact for easy connection. Follow these steps to remove the old doorbell correctly.
Unscrew The Old Doorbell
Locate the screws holding the old doorbell to the wall. Use a screwdriver to remove these screws carefully. Keep the screws aside in case you need them later. Gently pull the doorbell away from the wall. Avoid pulling too hard to prevent damaging the wires behind.
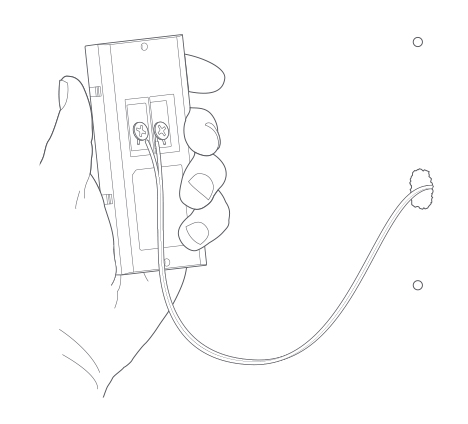
Disconnect Wires Safely
Before touching the wires, turn off power at the circuit breaker. This stops any electric shock risk. Once power is off, use a voltage tester to confirm no electricity flows. Unscrew the wire connectors or terminals from the doorbell. Carefully separate the wires and secure them with wire nuts or electrical tape. This keeps wires safe until you connect the new video doorbell.
Mounting The Video Doorbell
Mounting the video doorbell is a key step in the installation process. It ensures the device stays secure and functions properly. A well-mounted doorbell captures clear video and maintains a strong connection to your home’s wiring.
Follow each step carefully to avoid mistakes. Tools like a drill, screwdriver, and level help achieve a neat installation. Proper mounting also protects the doorbell from weather damage and theft.
Attach Mounting Plate
Start by selecting the right spot near your door. Use the mounting plate as a guide to mark drill holes. Drill holes carefully to avoid damaging wires inside the wall.
Fix the mounting plate to the wall using screws. Make sure it sits flush and is level. A crooked plate can affect the doorbell’s camera angle and sensor function.
Connect Wiring To Video Doorbell
Turn off power at the breaker before touching wires. Connect the doorbell wires to the terminals on the back of the device. Tighten screws to secure the wires firmly.
Check that the wires do not touch each other. This prevents short circuits and device failure. After wiring, gently attach the doorbell to the mounting plate. It should click into place securely.
Securing The Doorbell
Securing your video doorbell properly ensures it stays in place and works well. A well-mounted doorbell resists theft and damage. It also keeps the wiring safe from weather and wear. Follow these steps to secure your wired video doorbell firmly and protect it from outdoor elements.
Fasten Doorbell To Plate
Start by aligning the doorbell with the mounting plate. Use the screws that came with your doorbell kit. Tighten each screw firmly but avoid over-tightening. Over-tightening can crack the plate or doorbell casing. Check the doorbell for any movement after screwing. It should feel stable and solid against the wall.
Seal For Weather Protection
Apply a thin bead of waterproof sealant around the edges of the mounting plate. This prevents water from entering behind the doorbell. Use silicone-based sealant for long-lasting protection. Smooth the sealant with your finger or a tool. Ensure all gaps and screw holes are sealed completely. This step helps protect wiring and electronics from rain and moisture.

Credit: www.youtube.com
Restoring Power And Testing
Restoring power and testing your wired video doorbell is the final step. It ensures your device works correctly and safely. Follow simple steps to turn power back on, check video and audio, and confirm the doorbell rings.
Turn On Power
Go to your home’s circuit breaker panel. Find the switch that controls your doorbell circuit. Flip the switch to the ON position. This restores electricity to the doorbell wiring. Be careful to avoid touching any bare wires.
Test Video And Audio
Open the video doorbell app on your phone or tablet. Look for a live video feed from the doorbell camera. Speak into the app’s microphone to check two-way audio. Listen for clear sound from the doorbell speaker. Adjust settings if video or sound quality is poor.
Check Doorbell Functionality
Press the doorbell button. Listen for the chime inside your home. Confirm the app sends a notification. Test several times to ensure reliable operation. If the doorbell does not ring or notify, recheck wiring and power connection.
Troubleshooting Common Issues
Troubleshooting common issues can save time and frustration during your video doorbell installation. Problems with power, video, or connection often arise. Most problems have simple fixes. Check each step carefully and stay patient.
No Power To Doorbell
First, check the circuit breaker. It might be off or tripped. Next, inspect the doorbell wires. Look for loose or damaged connections. Use a voltage tester to confirm power at the doorbell. If no power shows, the transformer may be faulty. Replace it with one matching the doorbell’s voltage needs.
Poor Video Quality
Clear video depends on good lighting and a clean lens. Wipe the camera lens gently with a soft cloth. Avoid direct sunlight on the camera, which can cause glare. Check your camera settings for resolution options. Lower resolution causes blurry images. Also, poor Wi-Fi signals can reduce video quality.
Connectivity Problems
Strong Wi-Fi is crucial for your doorbell’s connection. Move your router closer or use a Wi-Fi extender. Restart your router and doorbell to refresh the connection. Confirm your doorbell is connected to the correct network. Remove interference from other devices that use the same frequency.
Tips For Optimal Performance
To get the best from your wired video doorbell, follow simple tips. These help keep your device working well and improve its lifespan. Small efforts make a big difference.
Positioning The Doorbell
Place the doorbell at eye level for clear video. Avoid direct sunlight or harsh shadows on the lens. Keep it close to your front door for wide coverage. Make sure it is not blocked by plants or decorations.
Maintaining The Device
Clean the camera lens regularly with a soft cloth. Remove dirt, dust, and spider webs gently. Check the wiring for any damage or loose connections. Keep the area around the doorbell dry and free from moisture.
Updating Firmware
Check for firmware updates often to improve features and security. Follow the manufacturer’s instructions to install updates safely. Updated software helps the doorbell run smoothly and fixes bugs.
Frequently Asked Questions
How Do I Connect A Wired Video Doorbell Safely?
Turn off power at the breaker before starting. Use a voltage tester to ensure no current. Connect wires according to the doorbell’s instructions. Secure connections with wire nuts. Restore power and test the doorbell function.
What Tools Are Needed To Install A Wired Video Doorbell?
You need a screwdriver, drill, voltage tester, wire strippers, and mounting hardware. A ladder may be necessary for high installations. Having a level helps ensure the doorbell is straight. Always follow manufacturer tool recommendations.
Can I Use Existing Doorbell Wires For Installation?
Yes, most wired video doorbells work with standard doorbell wires. Check compatibility with your doorbell’s voltage requirements. Replace old or damaged wires for safety and performance. Ensure wires are properly connected to avoid malfunctions.
How Do I Mount A Video Doorbell To The Wall?
Choose a sturdy, weather-resistant surface near your door. Use the included mounting bracket and screws. Drill pilot holes if necessary for secure mounting. Align the doorbell properly and snap or screw it into place.
Conclusion
Installing a video doorbell to wired power is simple and secure. Follow each step carefully to avoid mistakes. Make sure the power is off before starting the work. Test the doorbell after installation to confirm it works well. A wired connection provides constant power without battery worries.
Enjoy clear video and reliable alerts at your door. Taking time to do it right saves future trouble. Now, your home feels safer and more connected.

