Are you ready to boost your home’s security with a smart, easy-to-use device? Installing a Wyze Video Doorbell can give you peace of mind by letting you see and talk to visitors right from your phone.
But if you’re worried it might be complicated or time-consuming, don’t be. This guide will walk you through every step, making the process simple and stress-free. By the end, you’ll have your Wyze Video Doorbell up and running, keeping your home safer and smarter.
Keep reading to find out how!
Preparing For Installation
Preparing for the installation of your Wyze Video Doorbell is an important first step. It helps avoid delays and makes the process smooth. This preparation involves gathering tools, checking Wi-Fi, and following safety rules.
Taking time now saves frustration later. A well-prepared setup ensures your doorbell works perfectly from the start.
Gathering Necessary Tools
Collect all tools before starting the installation. You will need a screwdriver, drill, measuring tape, and a level. Having these ready keeps you from stopping midway. Also, keep the Wyze Video Doorbell kit nearby. Check that all parts are included in the box. A small ladder may help if your doorbell is high up.
Checking Wi-fi Requirements
The Wyze Video Doorbell requires a strong Wi-Fi connection. Check your home network speed and signal at the doorbell location. A weak signal can cause video lag or disconnections. Use a smartphone to test Wi-Fi strength outside your door. The doorbell supports 2.4 GHz Wi-Fi bands only. Make sure your router settings match this requirement.
Reviewing Safety Precautions
Safety is key during installation. Turn off power to the existing doorbell before starting work. Use a voltage tester to confirm no electricity flows. Wear safety glasses and gloves if needed. Avoid drilling near wires or pipes. Read the Wyze doorbell manual carefully for any warnings. Keep children and pets away from the work area.
Credit: www.wyze.com
Unboxing And Inspecting The Doorbell
Unboxing and inspecting your Wyze Video Doorbell is the first step before installation. It helps confirm you have everything needed. It also ensures the device is in good condition.
Take your time during this process. Carefully open the package and check each item. Doing so avoids surprises later on.
Contents Of The Package
The Wyze Video Doorbell box includes several key parts. Inside, you will find the doorbell itself. There is a mounting bracket to attach it to your wall.
A USB charging cable is also included. This cable powers your device during setup. You will also see screws and anchors for mounting. Finally, a quick start guide helps you begin.
Verifying Components
After removing everything, check each component closely. Make sure the doorbell has no visible damage. Look for scratches or cracks on the surface.
Count the screws and anchors to confirm the right quantity. Check the USB cable for any cuts or frays. The mounting bracket should feel sturdy and free of defects.
Having all parts in good shape means a smooth installation. Missing or broken items will cause delays. Contact Wyze support if you find any issues.
Choosing The Installation Location
Choosing the right spot for your Wyze Video Doorbell is very important. The location affects how well it records and connects. A good spot helps capture clear video of visitors. It also ensures the doorbell stays connected to your Wi-Fi. This section guides you on picking the best place for installation.
Optimal Height And Angle
Place the doorbell at about 48 inches from the ground. This height captures faces clearly and covers the front door area. Angle the doorbell slightly downward. This view shows visitors from head to toe. Avoid placing it too high or too low. Too high misses faces. Too low limits the field of view.
Avoiding Signal Interference
Keep the doorbell away from metal objects and thick walls. These can block Wi-Fi signals. Avoid placing it near other electronics like microwaves or cordless phones. These devices can cause interference. Test Wi-Fi strength before fixing the doorbell. Strong signal means better video and faster alerts.
Mounting The Doorbell
Mounting the Wyze Video Doorbell is a key step to secure your home. Proper mounting ensures clear video and smooth operation. Follow each step carefully to install the doorbell firmly and safely.
Marking Drill Points
Begin by holding the mounting plate against the wall. Align it where you want the doorbell to sit. Use a pencil to mark the holes on the wall. These marks will guide your drilling and keep the plate steady.
Drilling And Anchoring
Use a drill bit that matches the size of the wall anchors. Drill holes at the marked points gently but firmly. Insert wall anchors into each hole. These anchors hold screws tightly and prevent the plate from loosening.
Attaching The Mounting Plate
Place the mounting plate back on the wall. Line up the holes with the anchors inside the wall. Screw the plate firmly using a screwdriver. Check the plate to ensure it is secure and level before attaching the doorbell.
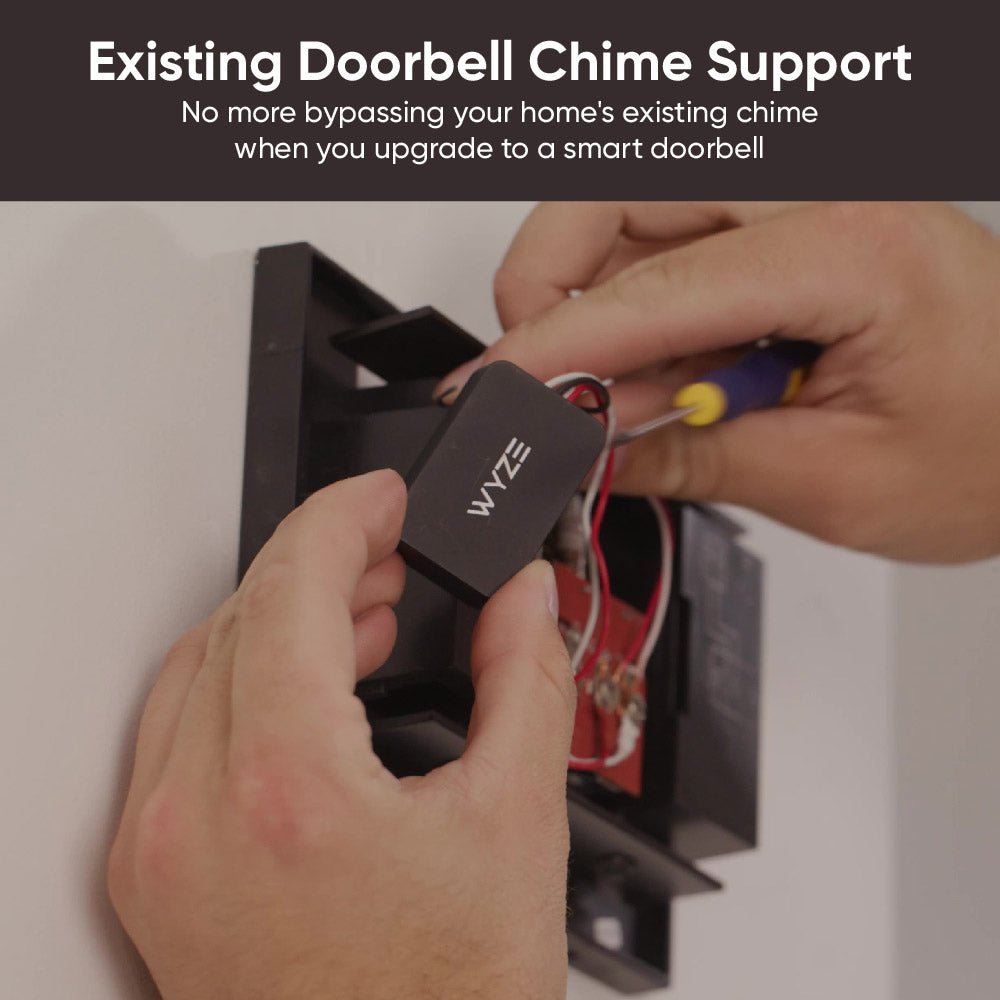
Wiring The Doorbell
Wiring the Wyze Video Doorbell is a crucial step. It connects your doorbell to power and allows it to function correctly. Proper wiring ensures the doorbell works safely and reliably. Follow these steps carefully to avoid any issues.
Turning Off Power
First, turn off the power at the circuit breaker. This step prevents electric shocks. Check the doorbell wires with a tester to confirm no power flows. Safety is the top priority before handling wires.
Connecting Wires Correctly
Identify the existing doorbell wires. Usually, two wires are present: one for power and one for the chime. Connect these wires to the Wyze Video Doorbell terminals. Match wire colors if possible. Tighten the screws to hold wires firmly in place.
Securing Wire Connections
Secure wire connections with wire nuts or electrical tape. This step stops wires from loosening or touching each other. Loose connections cause malfunctions or shorts. After securing, gently push wires into the wall box. Ensure nothing is pinched or exposed.
Setting Up The Device
Setting up your Wyze Video Doorbell is simple and fast. This step is crucial for your device to work properly. Follow the easy steps below to get your doorbell ready.
Downloading The Wyze App
Start by downloading the Wyze app on your smartphone. The app is free and available on both iOS and Android. Search for “Wyze” in the app store. Tap “Download” and wait for the app to install. The app guides you through the setup process.
Creating Or Logging Into Account
Open the Wyze app after installation. You need a Wyze account to use the doorbell. Create a new account by entering your email and setting a password. If you already have an account, just log in. This step connects your device to your personal settings.
Connecting To Wi-fi
Next, connect the doorbell to your home Wi-Fi. Choose a strong and stable network for the best performance. Enter your Wi-Fi password carefully to avoid errors. The doorbell needs this connection to send alerts and stream video. Wait a moment for confirmation that the device is online.
Finalizing Installation
Finalizing the installation of your Wyze Video Doorbell is a simple but important step. This part ensures your doorbell works perfectly and fits securely. Follow these steps carefully to finish the setup and enjoy your new device.
Attaching The Doorbell To Mount
First, place the doorbell on its mounting bracket. Align the doorbell’s bottom hooks with the mount slots. Press firmly until you hear a click. This sound means the doorbell is locked in place. Make sure it feels tight and does not move.
Testing Video And Audio
Next, test the video and audio functions. Open the Wyze app and select your doorbell. Check the live video feed for clear picture quality. Speak into the app to test the two-way audio. Listen for your voice from the doorbell speaker. Fix any issues before continuing.
Adjusting Settings In App
Finally, customize the settings in the Wyze app. Set motion detection zones to avoid false alerts. Adjust video quality to save data or improve clarity. Turn on notifications to know when someone is at your door. Save your changes to complete the setup.
Credit: support.wyze.com
Troubleshooting Common Issues
Troubleshooting common issues helps keep your Wyze Video Doorbell working well. Problems may occur during or after installation. Fixing them quickly ensures safety and clear video. This section guides you through easy solutions.
Wi-fi Connectivity Problems
Wi-Fi issues often cause the doorbell to stop working. Check if your Wi-Fi signal is strong near the doorbell. Weak signals cause delays or disconnections.
Restart your router and the doorbell. This can refresh the connection. Move the router closer if the signal is too weak. Avoid thick walls or metal objects blocking Wi-Fi.
Ensure the doorbell connects to a 2.4 GHz network. It does not support 5 GHz bands. Enter the correct Wi-Fi password carefully to avoid mistakes.
Power Supply Issues
The doorbell needs steady power to run smoothly. Check the power source and wiring first. Loose connections cause power failures or flickering lights.
Confirm the transformer meets the doorbell’s voltage requirements. Use the right adapter or wiring as per the manual. If the doorbell keeps losing power, call an electrician.
Battery models need regular charging. Charge the battery fully before use. Low power can lead to poor performance or shutdown.
Video Quality Concerns
Video problems reduce the doorbell’s effectiveness. Clean the camera lens regularly to remove dirt or smudges. A dirty lens blurs the video.
Adjust the camera angle for better views. Check the app settings for video resolution options. Higher resolution uses more data but improves image quality.
Low light affects video clarity. Use night vision mode or add external lighting near the doorbell. This improves visibility during dark hours.

Credit: www.youtube.com
Frequently Asked Questions
How Do I Install A Wyze Video Doorbell?
To install a Wyze Video Doorbell, first turn off power at the breaker. Mount the bracket, connect wires, and attach the doorbell. Restore power and follow the app setup instructions for Wi-Fi and configuration.
What Tools Are Needed For Wyze Doorbell Installation?
You will need a screwdriver, drill, wire stripper, and level. These tools help mount the doorbell securely and connect it to your home’s wiring safely.
Can I Install Wyze Video Doorbell Without Professional Help?
Yes, the Wyze Video Doorbell is designed for easy DIY installation. Clear instructions and app guidance make the process simple for most homeowners.
How Do I Connect Wyze Doorbell To Wi-fi?
After installation, open the Wyze app and follow prompts to connect the doorbell. Ensure your phone is near the device and on the same Wi-Fi network for smooth setup.
Conclusion
Installing a Wyze Video Doorbell is simple and quick. Follow the steps carefully for best results. Make sure your Wi-Fi is strong to avoid connection issues. Test the doorbell after installation to ensure it works well. Enjoy the added security and convenience it brings to your home.
A small effort brings peace of mind every day. Ready to see who’s at your door? You’ve got this!