Are you staring at that old towel rack on your wall, wondering how to get it down without causing damage? Removing an old towel rack might seem tricky, but with the right steps, you can do it quickly and safely.
In this guide, you’ll learn simple tips and tricks to take it off cleanly, so your wall looks great and ready for a fresh new look. Keep reading—you’re just minutes away from mastering a handy home improvement skill that anyone can do!
:max_bytes(150000):strip_icc()/how-to-remove-towel-bar-5221017-hero-01-c6a21614aaeb4e9ca8071b79bd398ef6.jpg)
Credit: www.thespruce.com
Tools Needed
Removing an old towel rack from the wall requires the right tools. Using proper tools makes the job easier and faster. It also helps protect your wall from damage. Gather everything before starting to save time and avoid frustration.
Screwdrivers And Drills
A screwdriver is essential to remove screws holding the rack. A Phillips head screwdriver fits most screws. Sometimes, a flathead screwdriver works better for certain screws. A power drill speeds up removing screws. Use a drill with a screwdriver bit. Make sure the drill is set to low speed to avoid damage.
Wall Repair Materials
Removing the rack leaves holes and marks on the wall. Use spackle or wall filler to cover holes. A putty knife helps spread the filler smoothly. Sandpaper smooths the dried filler to match the wall. Paint touch-up may be needed for a clean finish. Have a small paintbrush and matching paint ready.

Credit: www.youtube.com
Prepare The Area
Preparing the area is the first step to remove an old towel rack safely. It helps avoid damage and keeps the space clean. Take time to clear and protect the workspace before starting.
Clear The Surrounding Space
Remove all items near the towel rack. Clear shelves, counters, and floors. This prevents accidents and gives you enough room to work. Make sure no objects block your reach or fall during the removal.
Protect The Wall And Floor
Cover the floor with a drop cloth or old sheet. Use painter’s tape to protect the wall around the rack. This stops scratches, paint chips, and dust from causing damage. Protection makes cleanup easier and keeps your home safe.
Locate The Fasteners
Before removing an old towel rack, find all the fasteners holding it. Fasteners keep the rack attached to the wall. Knowing their location helps avoid damage during removal. This step saves time and effort.
Identify Screws And Anchors
Look closely at the towel rack for visible screws. They are usually on the mounting brackets or ends. Screws hold the rack firmly in place. Some racks also use wall anchors for extra support. Anchors are plastic or metal pieces inside the wall. They grip the drywall to hold screws tightly. Use a flashlight to spot small or hidden screws and anchors.
Check For Hidden Mounts
Some racks have mounts covered by decorative caps. These caps hide screws to give a clean look. Gently tap or pry these caps with a flat tool. Remove the caps to access hidden screws. Also, check behind the rack for extra mounts. These mounts may be under the rack or along its length. Finding all mounts ensures a smooth removal process.
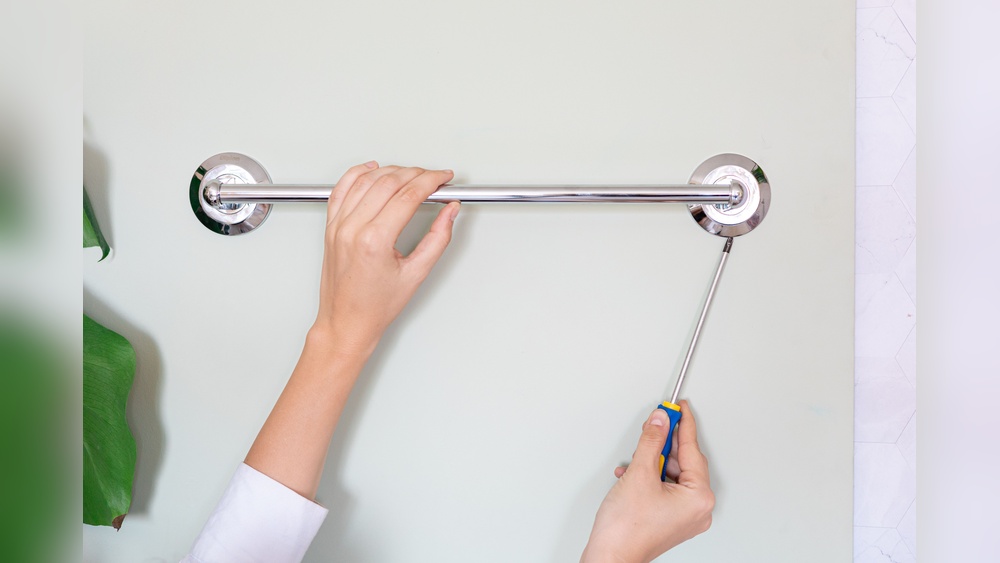
Remove The Towel Rack
Removing an old towel rack is a simple task that anyone can do. It helps prepare the wall for a new rack or a fresh look. Careful removal protects the wall from damage.
Follow these steps to take off the towel rack safely and easily.
Unscrew The Mounting Hardware
Start by locating the screws holding the rack to the wall. Use a screwdriver that fits the screws well. Turn the screwdriver counterclockwise to loosen each screw. Keep the screws in a safe place for reuse or disposal. Make sure all screws are removed before moving to the next step.
Gently Detach The Rack
After unscrewing, hold the rack firmly with both hands. Pull the rack slowly away from the wall to avoid damage. If the rack feels stuck, wiggle it gently to loosen. Avoid using force that might crack the wall. Set the rack aside once it is free.
Handle Wall Anchors
Handling wall anchors is a key step in removing an old towel rack. Anchors hold the rack firmly in place. Removing them carefully prevents wall damage. Different types of anchors require different removal methods. Two common types are plastic anchors and toggle bolts. Learn how to remove each type safely.
Remove Plastic Anchors
Plastic anchors are simple and common. Start by pulling the towel rack off the wall. Next, try to pull out the plastic anchor with pliers. Grip the anchor firmly and pull straight out. If it is stuck, push it gently into the wall cavity. This leaves a small hole to patch later. Avoid twisting, which can enlarge the hole.
Extract Toggle Bolts
Toggle bolts have a spring-loaded wing inside the wall. First, unscrew the bolt from the towel rack. The wings will fall inside the wall cavity and stay there. To remove the bolt, twist and pull it out slowly. Do not force the wings out. Patch the hole left by the toggle bolt after removal.
Repair Wall Damage
Removing an old towel rack often leaves damage on the wall. Repairing this damage is key for a clean, smooth finish. Small holes and cracks need attention before painting or installing new fixtures. Proper repair helps walls look fresh and new again.
Fill Holes And Cracks
Start by cleaning the holes and cracks of any dust or debris. Use a putty knife to apply wall filler or spackle into the gaps. Press firmly to fill each hole completely. Allow the filler to dry as per the product instructions. For deeper holes, apply filler in layers, letting each dry before adding more.
Sand And Smooth Surface
After the filler dries, use fine-grit sandpaper to smooth the area. Sand lightly until the surface is even with the rest of the wall. Wipe away dust with a clean cloth. A smooth surface ensures paint or wallpaper will stick evenly. Take your time to avoid rough patches or bumps.
Prepare For New Installation
Preparing for a new towel rack installation starts with careful planning. This step ensures your new rack fits well and holds up over time. It helps avoid mistakes and extra work later.
First, decide the best spot for the new rack. Think about convenience and wall strength. Next, mark the exact points on the wall where you will attach the rack. These marks guide you during installation and keep things level.
Choose New Rack Location
Pick a spot that is easy to reach after a shower or bath. Avoid areas with too much moisture to protect the wall. Check if the wall behind can support the rack’s weight. Avoid weak drywall without studs or anchors.
Consider the height too. Place the rack where both adults and children can easily use it. Keep enough space around it for towels to hang freely. Think about the room’s layout and other fixtures nearby.
Mark Mounting Points
Hold the new towel rack against the wall in the chosen spot. Use a pencil to mark where the screws will go. Make sure the rack is level before marking. Use a spirit level or a smartphone app to check.
Double-check the marks for accuracy. Marking correctly prevents holes that don’t align with the rack. This step saves time and keeps the installation neat. It also ensures the rack will be secure and stable.
Credit: www.reddit.com
Frequently Asked Questions
How Do I Safely Remove An Old Towel Rack?
Start by unscrewing the mounting screws with a screwdriver. Gently pull the rack off the wall. Use a putty knife to loosen any stuck parts carefully. Avoid damaging the drywall during removal for easier repairs later.
What Tools Are Needed To Remove A Towel Rack?
You need a screwdriver, putty knife, and optionally a drill. A utility knife helps cut paint around the rack. Have spackle and sandpaper ready for wall repairs after removal.
How Can I Fix Holes After Removing A Towel Rack?
Fill holes with spackle or wall filler using a putty knife. Let it dry completely, then sand smooth. Repaint the area to match your wall color for a seamless finish.
Can I Reuse The Old Towel Rack After Removal?
Yes, if it’s undamaged and clean. Remove screws and clean mounting surfaces. Store it safely if you plan to reinstall or donate it. Otherwise, consider recycling or disposing responsibly.
Conclusion
Removing an old towel rack can be quick and simple. Take your time and follow each step carefully. Use the right tools to avoid wall damage. Clean the area once the rack is off. Ready for a fresh look or new rack installation.
Small repairs can make a big difference. You now know how to remove an old towel rack safely. Give your bathroom a neat, updated feel. Easy tasks like this save money and effort. Try it yourself and see the results!